Using keyboard shortcuts in Aftershoot lets you review an AI cull without reaching for your mouse. Arrow keys move between images, 1–5 set star ratings, 6–9 and the minus key set color labels, comma and period step through duplicates, and Spacebar zooms. Every shortcut can be remapped, and you can switch to a Lightroom or Photo Mechanic key layout in one click.
The AI handles the first pass, but the final call on every frame is still yours, and that review is where shortcuts pay off. Save one second per decision on a 3,000-frame wedding and you’ve got nearly an hour back. Below: every culling shortcut by view, the retouching shortcuts, how to customize them, and three keyboard-only review routines worth stealing.
At a Glance: Using Keyboard Shortcuts in Aftershoot
| Action | Mac | Windows | Works in |
|---|---|---|---|
| Move between images | Arrow keys | Arrow keys | All views |
| Previous / next duplicate | , / . | , / . | All views |
| Star rating | 1–5 | 1–5 | All views |
| Color label (red, yellow, green, blue, purple) | 6, 7, 8, 9, – | 6, 7, 8, 9, – | All views |
| Clear stars and color | 0 or = | 0 or = | All views |
| Flag / unflag | P | P | All views |
| Mark as Selected (duplicate sets) | A | A | Grid View |
| Swap with a duplicate | S | S | Grid View |
| Reject whole duplicate set | Z | Z | Loupe View |
| Zoom | Spacebar | Spacebar | Loupe, Survey |
| Grid / Loupe / Survey | G / E or Enter / N | G / E or Enter / N | All views |
| Undo | Cmd + Z | Ctrl + Z | Everywhere |
| Go back | Esc | Esc | Everywhere |
Using Aftershoot Keyboard Shortcuts in the Grid View
Grid View is where Aftershoot drops you after a cull. It’s the fastest place to sweep through ratings. Once AfterShoot has completed the culling process, you are presented with the Result Grid which allows you make changes to the selections if needed. While you can use your mouse to make these changes, you can also simply use keyboard shortcuts (and make this process even quicker).
1. Navigating Images and Duplicates
Use the arrow keys to move between images. When an image has duplicates, press , (comma) to see the previous shot in the set and . (period) to see the next one.
While in the Film Strip, you can keep pressing the next or previous arrow key to quickly scroll through the images.
Pressing and holding the Next/Prev key automatically moves through the Film Strip thereby Super-Scrolling through it!
2. Star Ratings, Color Labels, and Flags
| Action | Key |
|---|---|
| 1–5 star rating | 1, 2, 3, 4, 5 |
| Red label | 6 |
| Yellow label | 7 |
| Green label | 8 |
| Blue label | 9 |
| Purple label | – (minus) |
| Clear star rating and color label | 0 or = |
| Flag / unflag | P |
Here’s a screenshot showcasing the possible Keyboard Shortcuts for changing the Star Ratings:
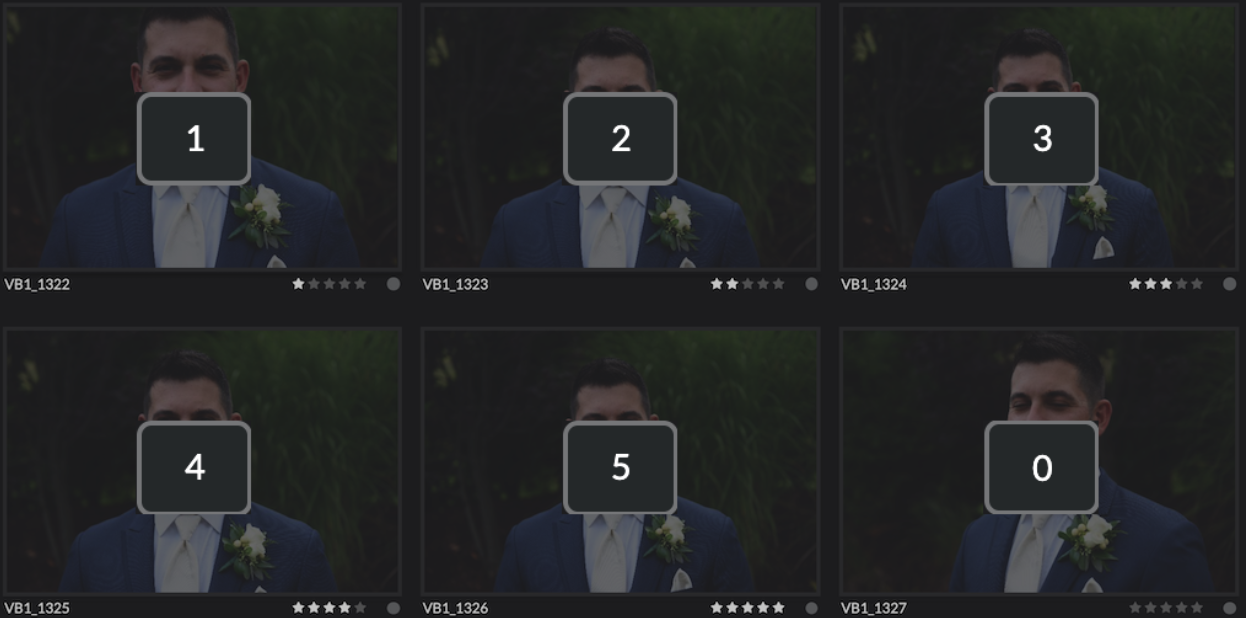
To toggle between the Stars, you can use the following keys:
- “1” to mark an image with 1 star
- “2” to mark an image with 2 star
- “3” to mark an image with 3 star
- “4” to mark an image with 4 star
- “5” to mark an image with 5 star
- “0” to clear the star rating of the image
Similarly, Aftershoot also has options to change the Color Labels from the Grid View as well!
We have another screenshot showcasing the keyboard shortcuts that let you do so.
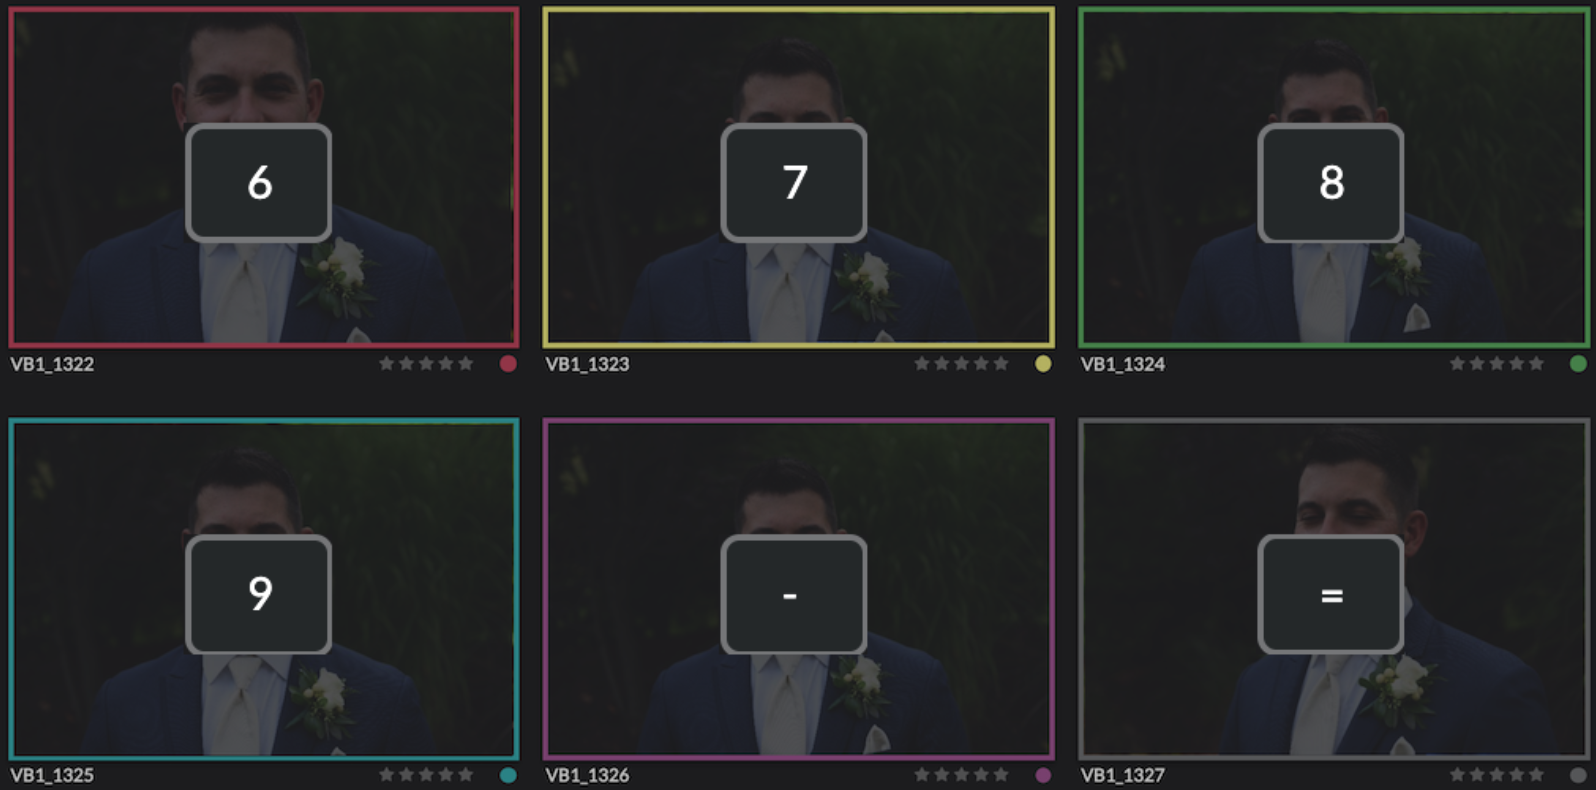
To toggle between the available colors, you can use the following keys:
- “6” to mark the image with Red Color
- “7” to mark the image with Yellow Color
- “8” to mark the image with Green Color Label
- “9” to mark the image with Blue Color Label
- “-” to mark the image with Purple Color Label
- “=” to Clear the color label of the image
Swapping and Selecting Within Duplicate Sets
These three keys only work on images that have duplicates:
- S swaps the current image with one of its duplicates. In the 5-Star Selected cull filter, click a duplicate in the right-hand drawer and press S to move the 5-star rating onto it.
- A marks the image as Selected.
- X clears both the star rating and the color label.
Using Keyboard shortcuts in Loupe View
Press E or Enter to open an image in Loupe View. Every Grid View shortcut above still works here. Loupe adds shortcuts for dealing with duplicate sets and for inspecting a single frame closely. You will also be provided with quick options to reject an image or select an alternate image.
1. Rejecting and Removing Duplicates
| Action | Mac | Windows |
|---|---|---|
| Reject every image in a duplicate set | Z | Z |
| Delete one image from a set | Delete | Backspace / Delete |
| Remove the entire set | Shift + Delete | Shift + Backspace / Delete |
When you delete, Aftershoot asks you to confirm. If you tick “Remember my choice for this album”, the prompt won’t appear again for that album, so only tick it once you’re confident.
2. Zoom, Key Faces, and Image Details
| Action | Mac | Windows |
|---|---|---|
| Zoom in (press again to change zoom level) | Spacebar | Spacebar |
| Previous / next Key Face | Option + ← / → | Alt + ← / → |
| Show image info | Q | Q |
| Show Image Score | I | I |
| Full screen | F | F |
- Zooming to a spot: hover your cursor over the area you want to check before pressing Spacebar. The zoom centers on the cursor.
- Checking group shots: Option/Alt + arrow jumps from face to face, so you can check every expression without zooming in and panning by hand.
3. Main Components to Loupe View
There are 4 main components to the Loupe View:
1. Main Image
2. Filmstrip at the bottom
3. Key Faces
4. Similar Images
Let’s quickly go over the screenshots so it’s easier for you to understand.
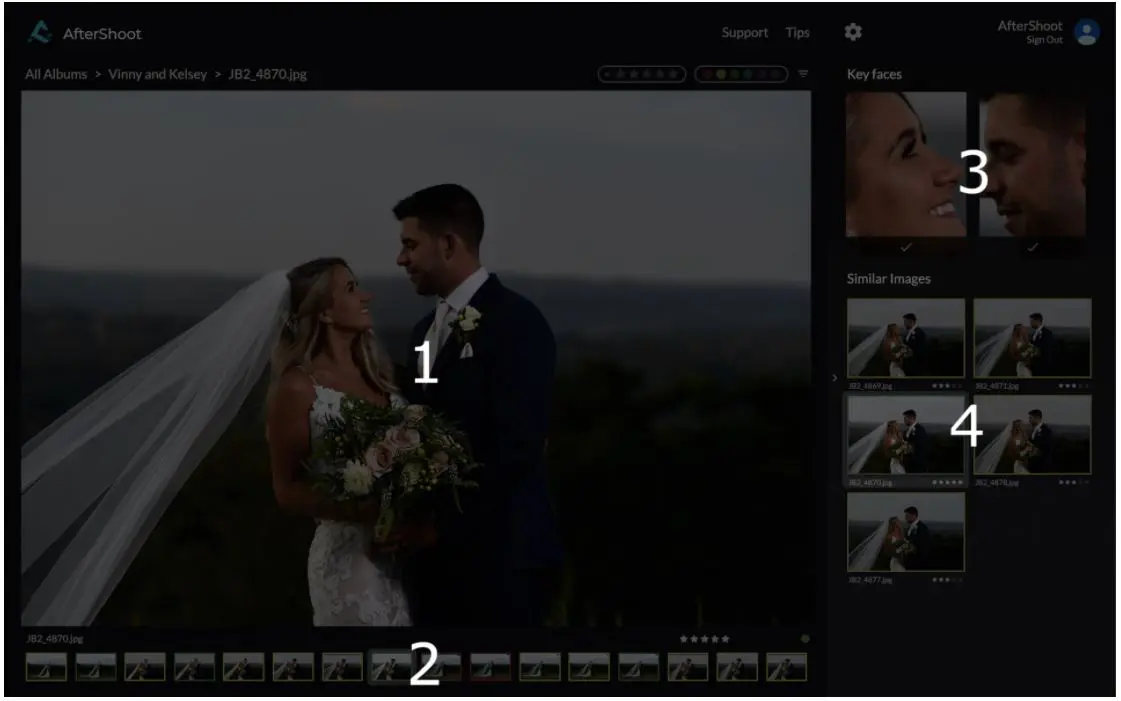
Let’s cover the keyboard shortcuts that are associated with each of the sections one by one.
Main Image
You can press the Space Key to zoom in or out in the Main Image.
Similar to the Result Grid, you can use the same keyboard shortcuts to change the color and star for the image that’s currently shown.
Key Faces
For an image that has Key Faces shown in the right, you can either click on the faces to directly zoom the main image straight to that face. You can also press Alt + Next Arrow or Alt + Prev Arrow to scroll between the faces present in the image.
This lets you inspect each face more closely for any potential issues.
Similar Images
For an image that has Similar Images shown in the right, you can click on a similar image to show that as the main image.
Once you have a similar image shown as the main image, you can use the keyboard shortcuts to change the color or star rating of this image to mark it as a keeper/reject.
You can also press the Escape Key (Esc) to move back to the previous screen at any time in the app.
Survey Mode and Spray Can Mode Shortcuts
Press N to open Survey Mode. It stacks a duplicate set side by side, and zoom stays synchronized across every frame in the set, so you compare focus on the same spot in each shot. All Grid and Loupe shortcuts work here, except the Loupe-only ones.
Survey Mode has one shortcut of its own. Hold Cmd (Mac) or Ctrl (Windows) and left-click a frame to drop it from the comparison. Keep going until one frame is left.
Press Cmd + Option + K (Mac) to enter Spray Can Mode, which also works in Grid View. Press G to return to Grid View when you’re done.
General Shortcuts That Work Everywhere
| Action | Mac | Windows |
|---|---|---|
| Hide the right drawer (filters, duplicates) | / | / |
| Go back to the previous screen | Esc | Esc |
| Undo | Cmd + Z | Ctrl + Z |
| Rotate left / right | [ / ] | [ / ] |
| Contact support | F1 (or Fn + F1) | F1 |
Aftershoot Retouching Shortcuts
Aftershoot Retouching has its own shortcut set, built around moving between tabs and nudging sliders precisely.
| Action | Mac | Windows |
|---|---|---|
| Subject / Background / Patch tab | Shift + F / Shift + B / Shift + J | Shift + F / Shift + B / Shift + J |
| Next / previous slider | Tab / Shift + Tab | Tab / Shift + Tab |
| Adjust slider by 1 | ↑ / ↓ | ↑ / ↓ |
| Adjust slider by 5 | Shift + ↑ / ↓ | Shift + ↑ / ↓ |
| Copy / paste slider adjustments | Cmd + C / Cmd + V | Ctrl + C / Ctrl + V |
| Brush smaller / larger (Patch, Correction) | [ / ] | [ / ] |
| Open History | H | H |
| Toggle before/after | / | / |
| Rotate left / right | Cmd + [ / ] | Ctrl + [ / ] |
| Zoom to cursor | Spacebar | Spacebar |
| Pan while zoomed (Patch, Correction) | Shift + left-click drag | Shift + left-click drag |
Two keys change meaning between culling and retouching:
- / hides the drawer while culling but toggles before/after in Retouching.
- [ and ] rotate while culling but resize the brush in Retouching. Rotation in Retouching needs Cmd/Ctrl.
How to Customize Keyboard Shortcuts in Aftershoot
To see every shortcut without leaving your cull, click the keyboard icon in the top-right corner of Grid View, Loupe View, or Survey Mode.
To change a shortcut:
- Open Preferences (Mac) or Settings (Windows) from the top menu bar.
- Pick a category on the left: Image Properties, Grid View, Loupe View, Survey Mode, or Others.
- Click the shortcut you want to change, then press the new key or key combination.
- Click Save Changes in the lower-right corner.
Your change also updates the cheat sheet on the culling screen. To go back to the original layout, click Restore Defaults.
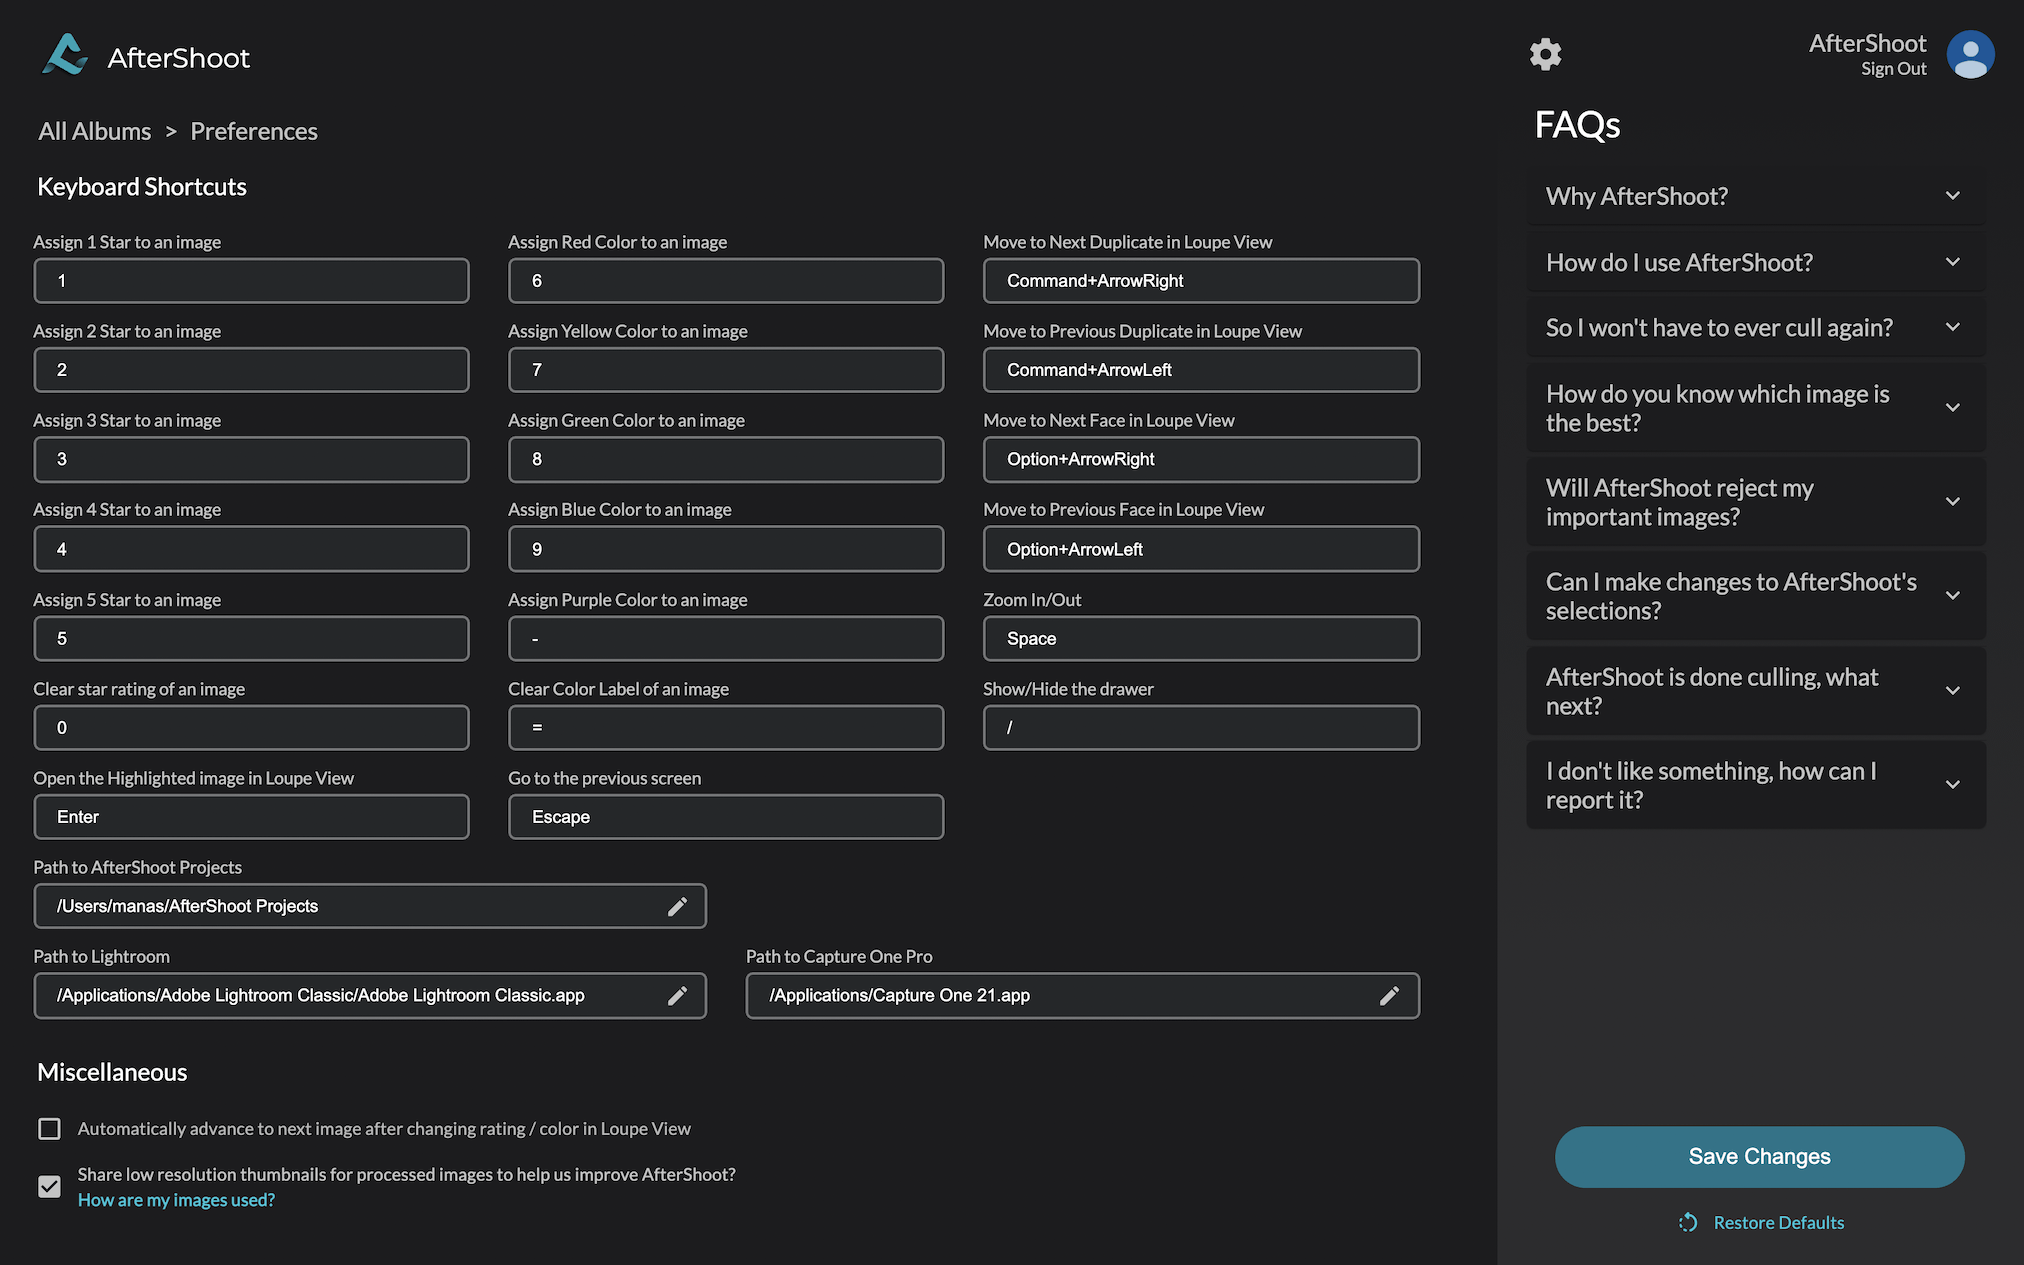
To Change a keyboard shortcut, click on it and assign an alternate shortcut than the one that’s already assigned to it.
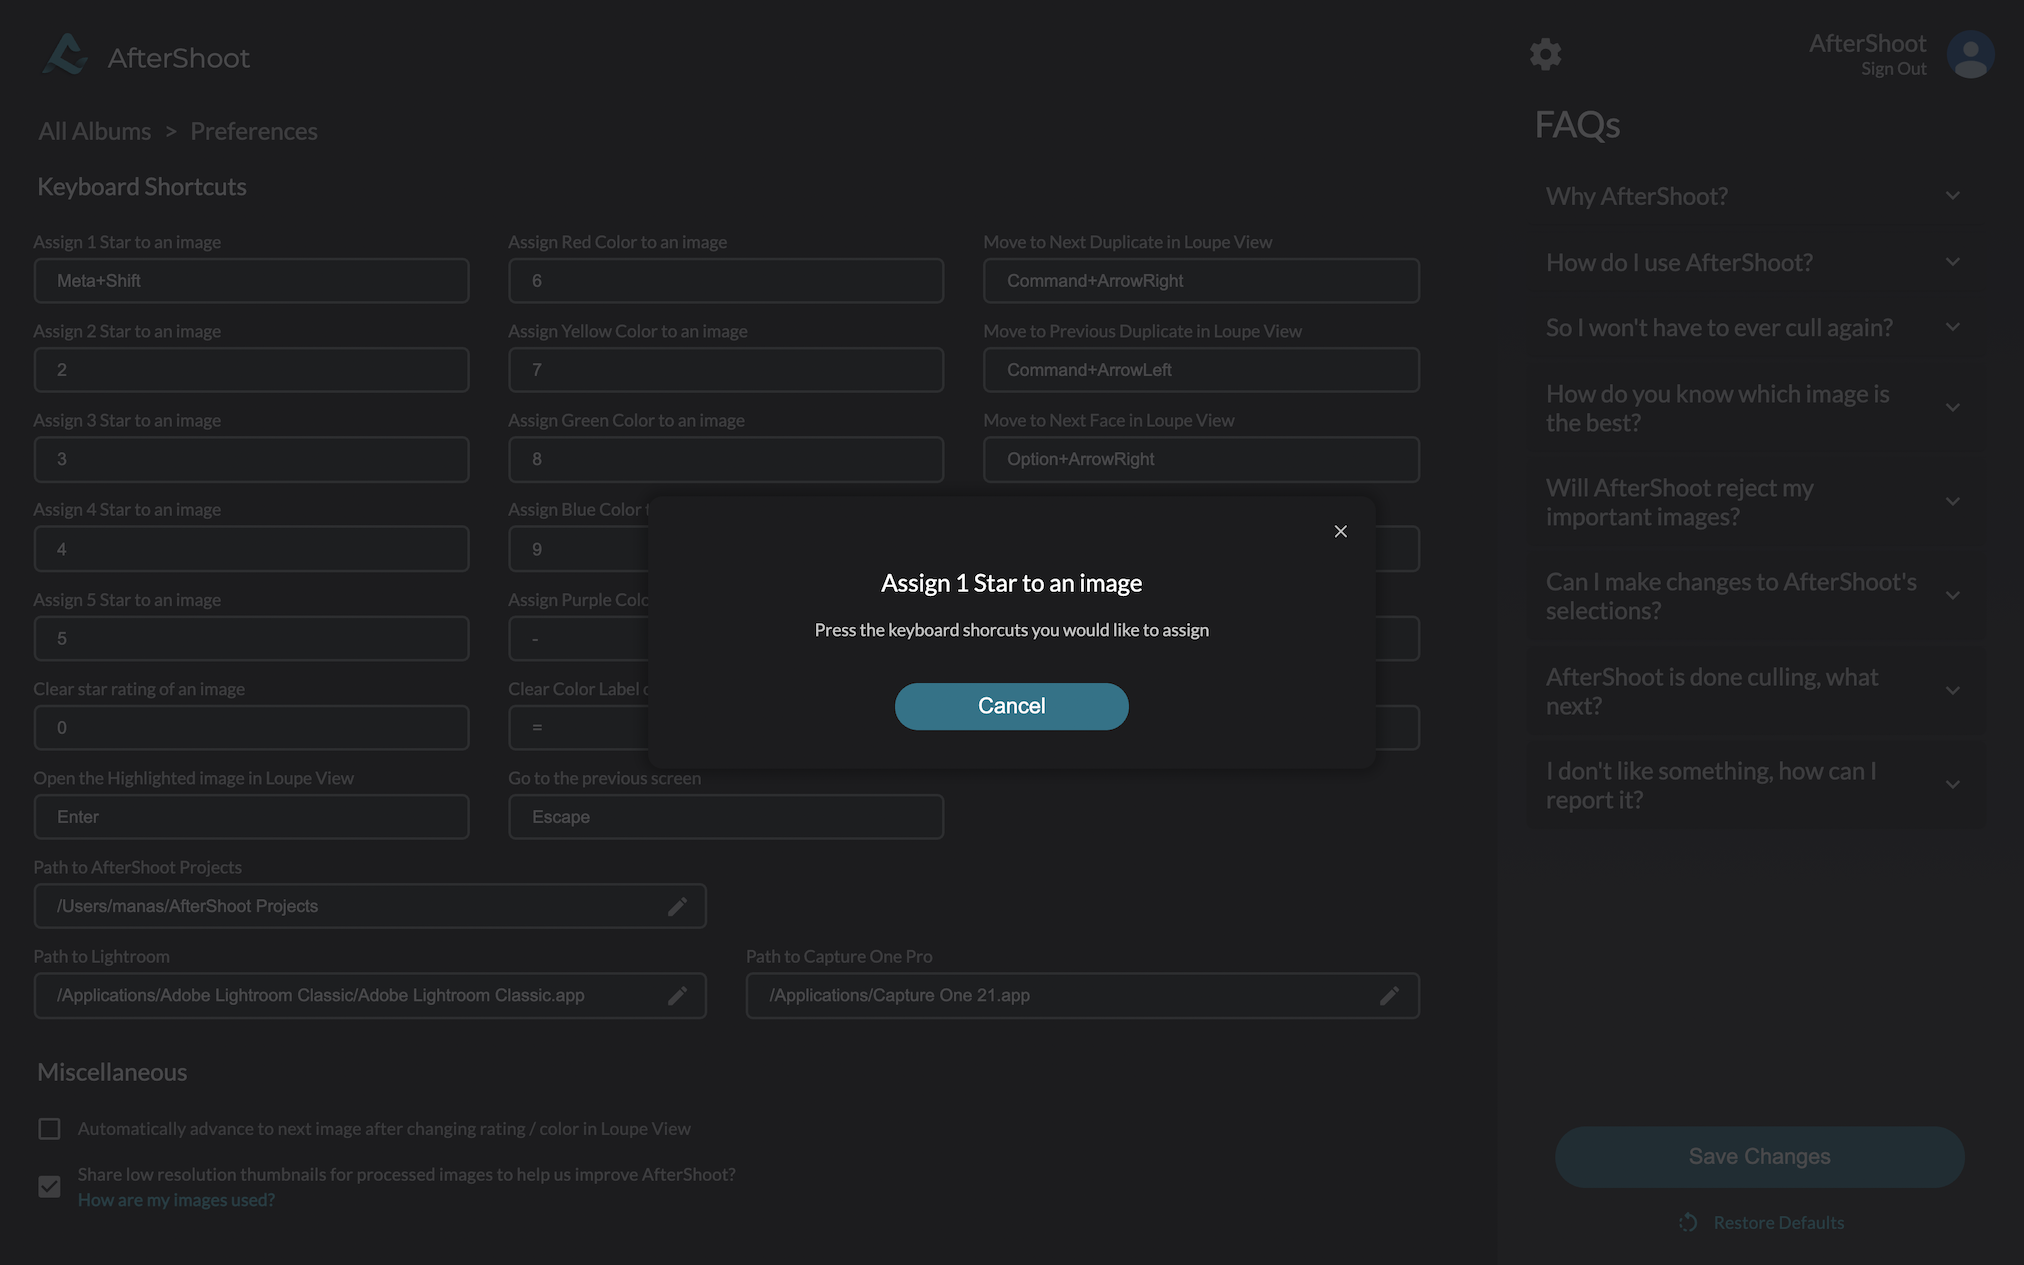
Use Lightroom or Photo Mechanic Shortcut Presets
If your muscle memory comes from another app, scroll to Preset at the bottom of the shortcuts list. You can switch Aftershoot to a Lightroom or Photo Mechanic key layout there, which is especially useful if you move between Aftershoot and Lightroom on the same job.
Once you’re done, remember to save your changes by clicking on the “Save Changes” Button in the Bottom-Right corner. You can also revert to the original keyboard shortcut by clicking on the “Restore Defaults” option here.
Aftershoot vs Lightroom vs Photo Mechanic Shortcuts
Most photographers come to Aftershoot with years of Lightroom or Photo Mechanic muscle memory, and Lightroom Classic now has its own AI culling in the mix. Here’s how the defaults line up:
| Action | Aftershoot | Lightroom Classic | Photo Mechanic |
| Mark a keeper | P (flag), A (select in a duplicate set) | P (pick) | T (tag toggle) |
| Reject | Z (whole duplicate set) | X | Tag-based: keepers are tagged, the rest are left untagged |
| Star ratings | 1–5 | 1–5 | Ctrl + 1–5 (Mac), Alt + 1–5 (Win) by default; 1–5 if set in preferences |
| Color labels | 6–9, – | 6–9 (purple has no default key) | Number keys for color classes |
| Zoom | Spacebar | Z | Z |
| Custom shortcuts | Full remap + Lightroom/Photo Mechanic presets | No built-in shortcut editor | Custom shortcut files |
The number-row convention (stars on 1–5, colors on 6 and up) is close to universal, so switching tools costs less than you’d expect. Other culling apps that appear in the same searches, such as Excire Foto, follow it too. The real difference is what happens before you start pressing keys. For a deeper look at that, see our Aftershoot vs Photo Mechanic comparison.
Three Keyboard-Only Review Routines
How much work the shortcuts do depends on how you culled. After an AI-Automated cull, Aftershoot has already assigned stars and color labels, so you’re mostly correcting. In AI-Assisted Culling, Aftershoot only detects Key Faces, scores images, and groups duplicates, so every rating comes from your keyboard. You choose which of the two AI cullingmodes to use.
1. The Wedding Duplicate Sweep
- In Grid View, open the 5-Star Selected cull filter.
- Use . to step through each image’s duplicates.
- If a duplicate beats the pick (better expression, cleaner background), click it in the drawer and press S to move the 5 stars onto it.
- Move on with the arrow keys.
2. The Group Shot Face Check
- Press E to open a group shot in Loupe View.
- Tap Option/Alt + → to jump face by face.
- Press I for the Image Score if you’re torn between frames.
- If nothing in the set works, Z rejects the whole set in one keystroke.
3. The Burst Shortlist
- Press N for Survey Mode on a burst (first dance, confetti exit, a sports sequence).
- Zoom with Spacebar. Every frame zooms to the same spot.
- Cmd/Ctrl + click the weaker frames until one remains.
- Rate it and press G to return to the grid.
Once the shortcuts are second nature, the next thing to tighten is where culling sits in your wider workflow. This guide to culling workflows with Aftershoot covers culling before or after a Lightroom or Capture One import. If something isn’t behaving as expected, start with these Aftershoot troubleshooting tips.
Using Keyboard Shortcuts in Aftershoot
Q1. How do I see all keyoard shortcuts in Aftershoot?
Click the keyboard icon in the top-right corner of Grid View, Loupe View, or Survey Mode for an on-screen cheat sheet. For the full editable list, open Preferences (Mac) or Settings (Windows).
Q2. How do I move between duplicates in Aftershoot?
Press comma (,) for the previous image in a duplicate set and period (.) for the next. The arrow keys move between separate images.
Q3. How do I zoom In on an image in Aftershoot?
Hover over the area you want to check and press Spacebar. Press it again to change the zoom level. In Survey Mode, zoom is synchronized across every frame in the duplicate set.
Q4. Can I use Lightroom shortcuts in Aftershoot?
Yes. Open Preferences/Settings, scroll to Preset at the bottom of the shortcuts list, and choose the Lightroom or Photo Mechanic layout. You can also remap any individual key.
Q5. Does Aftershoot retouching have keyboard shortcuts?
Yes, and they’re a separate set: Shift + F, B, and J switch tabs, Tab moves between sliders, and the arrow keys adjust values by 1 (or by 5 with Shift). See the Retouching table above for the full list.
Q6. Are keyboard shortcuts available on every Aftershoot plan?
Shortcuts are built into the Aftershoot desktop app rather than sold as a feature. Which ones you use depends on the tools in your plan: culling shortcuts come with culling, and Retouching shortcuts with Retouching. Aftershoot offers a 30-day free trial with no credit card required, and current plans are listed on the pricing page.