TL;DR
- Retouching is selective. Most photographers give the delivered gallery a light clean-up and save detailed work for hero portraits, album spreads and wall art.
- Retouch after culling and your global edit, never before. Otherwise you’re cleaning skin on frames that won’t be delivered.
- Natural retouching removes what’s temporary (a breakout, a stray hair, a crease) and keeps what’s permanent (freckles, moles, laugh lines, tattoos) unless the couple asks otherwise.
- AI handles the repetitive layer across hundreds of images. Photoshop is still the right tool for composites, heavy distraction removal and body work.
- Outsourced retouching typically runs from a couple of dollars to $15+ per image depending on complexity. AI tools range from per-image credits to flat subscriptions.
Wedding retouching is the detail work that happens after your global edit: clearing a breakout, softening under-eye shadows from a 14-hour day, taking flyaways off a bride’s cheek, smoothing dress creases, and removing the exit sign from the ceremony frame. Done well, nobody notices it. Done badly, it’s the first thing a couple notices when they open the gallery.
This guide covers which wedding photos actually need retouching, a workflow that keeps a 600-image gallery consistent, how to keep skin looking like skin, and what it costs to retouch yourself, with AI, or through an outsourcing service.
Take AI Retouching on a quick spin. Try it out 30 days for free, no questions asked!
What is Wedding Retouching?
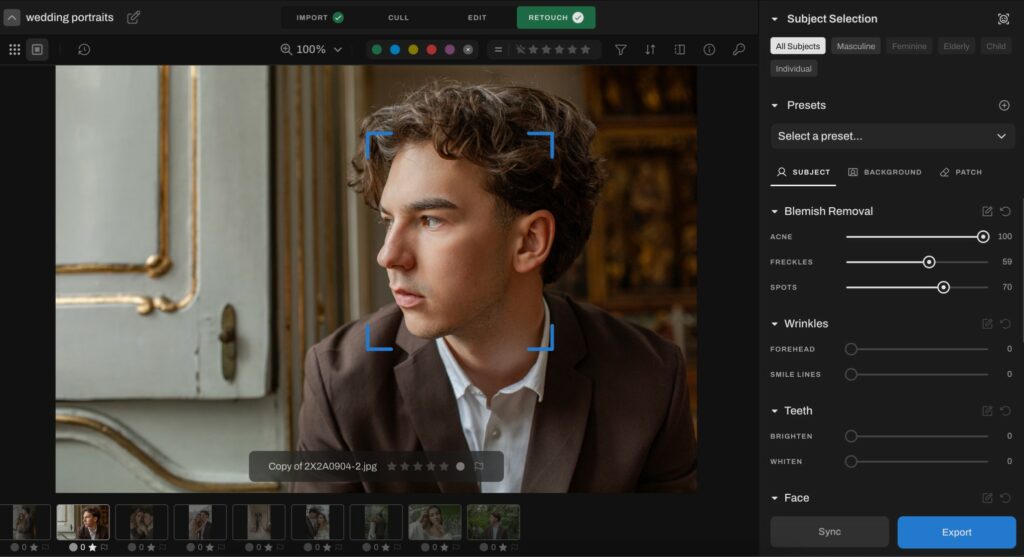
Wedding retouching is local, detail-level correction applied to wedding photos after exposure and color are set. Typical tasks include removing temporary blemishes and flyaways, softening under-eye shadows, brightening teeth, removing glare from glasses, cleaning up fabric creases, and taking distractions (exit signs, cables, a guest’s raised phone) out of the frame.
Editing changes the whole photo. Retouching changes parts of it. That difference matters for scheduling and pricing: editing scales across a gallery in batches, while manual retouching has traditionally scaled one face at a time.
| Parameter | Wedding Photo Editing | Wedding Photo Retouching |
|---|---|---|
| What it changes | Whole image: exposure, white balance, color, contrast, crop | Specific areas: skin, eyes, teeth, hair, fabric, background |
| Applied to | Every delivered image | A light pass on most portraits, detailed work on selected images |
| Typical tools | Lightroom Classic, Capture One, AI editing | Photoshop, AI retouching tools, retouching plugins |
| Manual time per image | Seconds with synced presets | Minutes for a clean-up; 20–45 minutes for a frequency-separation hero portrait |
Which Wedding Photos Should You Retouch?
Not every frame needs the same treatment. Most wedding photographers work in three tiers:
| Retouching Level | Which Images | What Gets Done | Realistic Approach |
|---|---|---|---|
| Light clean-up | Portraits and close candids across the delivered gallery | Temporary blemishes, shine, flyaways, glasses glare | Batch with AI, spot-check |
| Standard | Couple portraits, getting-ready, family formals | Everything above plus under-eye shadows, teeth, fabric creases, small distractions | AI pass plus manual tweaks per image |
| Advanced | Album spreads, wall art, sneak peeks, social posts | Everything above plus dodge and burn, complex people/object removal, sky or background work | Photoshop (or outsourced), image by image |
Put your tiers in writing. Many photographers include a set number of detailed retouches per wedding and charge per image after that, which keeps “can you just fix…” requests from turning into unpaid days. Zoe Larkin, for example, includes 10 detailed edits per wedding before per-image fees apply.
How to Retouch Wedding Photos: A Step-by-Step Workflow
Step 1: Cull Before You Touch a Single Face
Retouching comes last because it’s the most expensive work per image. Cut duplicates, closed eyes and missed focus first, then flag the frames that will get more than a light pass: album candidates, portraits for the couple’s parents, and the sneak peek.
Step 2: Lock Your Global Edit First
Set white balance, exposure and your color look across the gallery before retouching. Skin tones shift when you grade, and a blemish you removed at one color temperature can reappear as a blotch at another. If you need a refresher on the full sequence, our wedding photography editing workflow covers it end to end.
Step 3: Run a Light Retouching Pass Across the Gallery
This is the repetitive layer: reducing blemishes, shine, flyaways and glare on every portrait that makes the cut. It helps you apply natural, client-ready polish without spending hours in Photoshop. It’s also where AI retouching earns its place, because the job is consistency across hundreds of images rather than artistry on one.
Step 4: Give Hero Images a Manual Finish
For the 20 to 60 images that will be printed large, go further in Photoshop. Frequency separation lets you even out skin tone without erasing texture. Dodge and burn adds shape back after smoothing. Generative Fill or the Remove tool handles larger distractions. Most photographers now split the work this way, and our breakdown of AI and manual retouching goes deeper into where each one wins.
Step 5: Check Consistency, Then Export
Review the gallery in grid view before export. You’re looking for skin that suddenly looks smoother in one sequence than the next, and any retouch that’s visible at normal size. Fix those, then export.
How to Keep Wedding Retouching Natural (and Avoid Over-Retouching)
The couples who complain about retouching rarely complain that it wasn’t done. They complain that they don’t recognize themselves. The simplest rule that prevents this: retouch what’s temporary, keep what’s permanent.
| Usually Retouch | Usually Leave Alone (Unless the Couple Asks) |
|---|---|
| Breakouts, redness, razor bumps | Freckles, moles, birthmarks |
| Flyaways crossing the face | Natural hair texture, baby hairs at the hairline |
| Shine from flash or heat | Skin texture and pores |
| Under-eye shadows from a long day | Laugh lines and crow’s feet (soften, don’t erase) |
| Glare on glasses | Tattoos |
| Creases from sitting in a dress or suit | Body shape |
| Exit signs, cables, phones in the aisle | Guests who are part of the moment |
1. Retouch at 100%, Judge at Fit-to-Screen
Zoom in to work, then zoom out to decide. If the change is visible at normal viewing size, it’s probably too strong. Check hero images once more at their print size before they go into an album.
2. Pull the Strength Back Before You Sync
Whatever strength looks right on the first image usually looks heavy by the fortieth. Set it slightly lower than feels right, then sync. A slightly under-retouched gallery gets no complaints; a slightly over-retouched one does.
3. Protect Makeup, Jewelry and Tattoos
Smoothing and blemish tools can’t tell a deliberate beauty mark or a highlighter sheen from a flaw. Mask those areas out rather than dialing the whole face back.
4. Keep Retouching Consistent Across a Sequence
If the bride’s skin is softened in frame 212 and untouched in frame 213 from the same burst, it reads as two different people in the album. Retouch sequences together, not image by image.
5. Never Reshape Bodies Without Asking
Slimming, liquify and facial reshaping should only happen on request, and ideally be scoped in your contract. It’s the retouching decision most likely to damage trust, and it can’t be undone once the couple has noticed it.
6. Ask the Couple Before the Wedding
A two-minute question in your consultation (“Anything you’d like softened, or anything you’d never want changed?”) saves more revision rounds than any technique. Some people want every freckle kept; others want a scar softened. You won’t know unless you ask.
💡 Want to build a retouching workflow that actually works for you? Try it free for 30 days!
How to Retouch Wedding Photos in Aftershoot?
If you retouch whole wedding galleries rather than a handful of portraits, Aftershoot’s AI Retouching handles the light-to-standard pass in the same app you cull and edit in. It works on RAW, JPEG and TIFF-8 files. Every change is a slider you can dial up, dial down or mask out, so nothing gets applied that you haven’t reviewed.
Step 1: Bring Your Photos Into the Retouch Tab
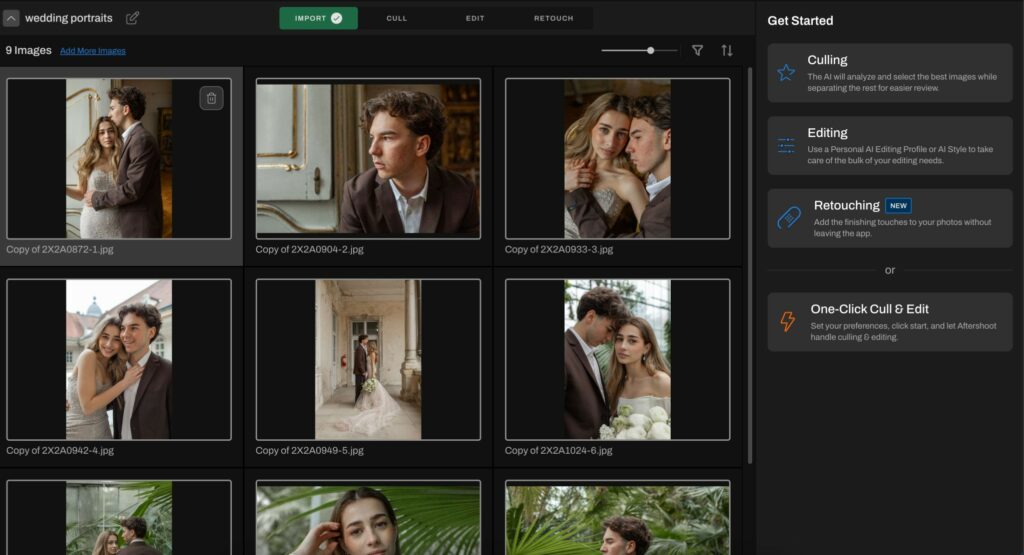
There are two ways in, depending on where you manage your catalog.
Inside Aftershoot: You can retouch at any point after importing an album, before or after editing. Open the Retouch tab and press Enter or L to switch to Loupe View; retouching only works there. Your selected image sits in the center, with the rest of the gallery in the filmstrip below. You can move freely between the Edit and Retouch tabs. Note that retouching adjustments don’t display in the Edit tab.
From Lightroom Classic: Select the frames you want to retouch in the filmstrip, right-click, and choose Edit In > Edit in Aftershoot. In the pop-up, pick Edit a Copy with Lightroom Adjustments. Lightroom creates a copy, and that copy is what you retouch; your original stays untouched. Give the copies a star rating or color label so you don’t end up with a doubled gallery. This route suits photographers who keep everything in Lightroom and only want to retouch selected images.
Step 2: Start With a Preset, Then Dial It Back
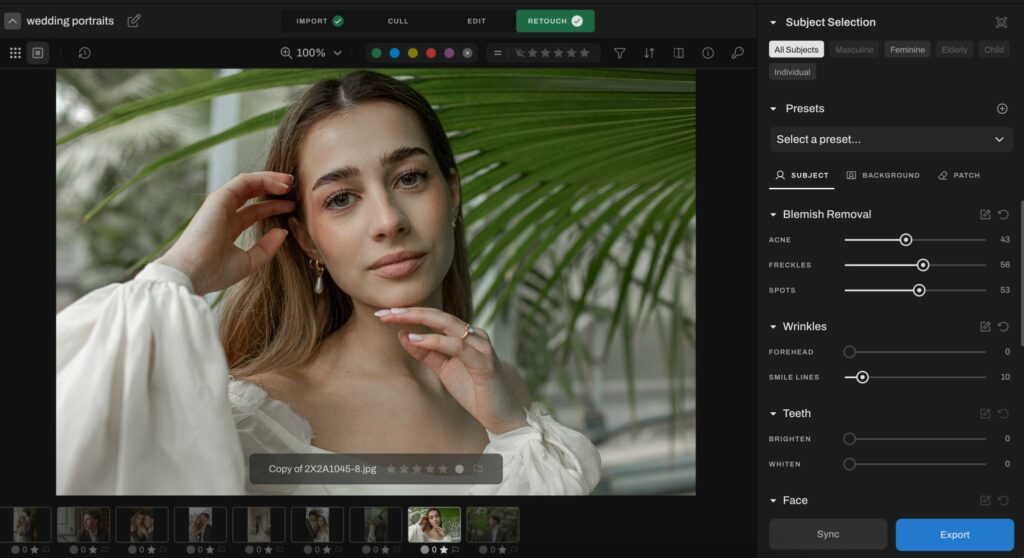
The preset dropdown sits at the top right of the retouching panel. Choose a starting point such as Wedding Radiance, then use the Preset Strength slider to pull it back until the change reads as “rested” rather than “retouched.”
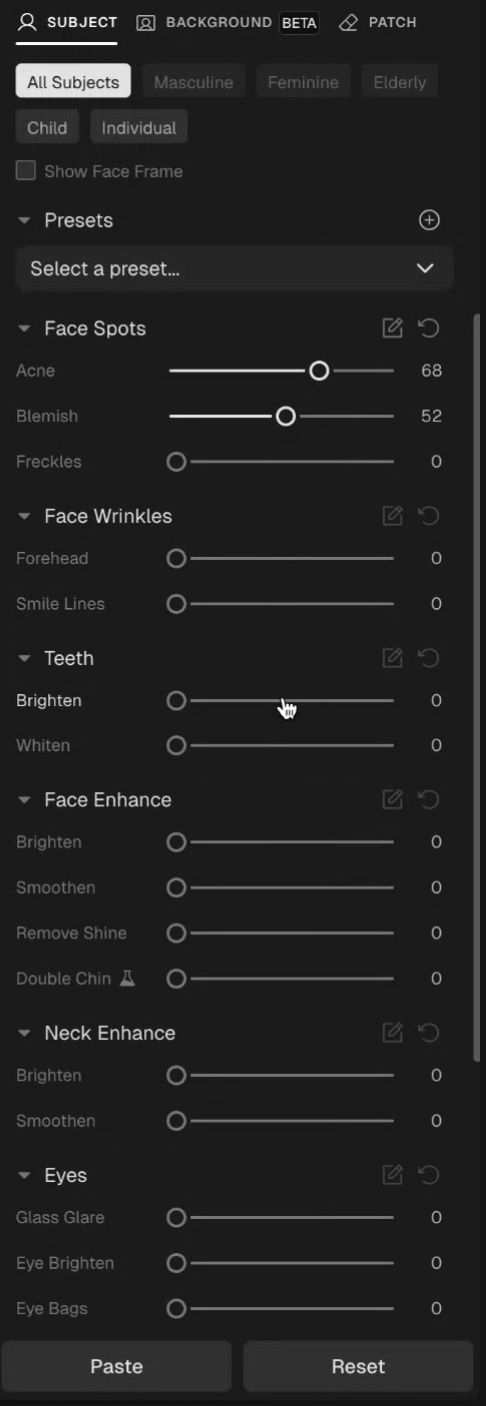
From there, adjust individual sliders only where the image needs more. The sliders are grouped by what they fix:
| Slider Group | What It Handles | Wedding-Day Use |
|---|---|---|
| Face Spots | Acne, blemishes, freckles | Stress breakouts; leave Freckles at zero unless the couple asks |
| Face Wrinkles | Forehead lines, smile lines | Soften, don’t erase; laugh lines belong in wedding photos |
| Teeth | Brighten, whiten | Candid laughter under warm reception light |
| Face Enhance | Brighten, smoothen, remove shine, double chin | Flash shine on the dance floor; Double Chin currently works on front-facing subjects only |
| Neck Enhance | Brighten, smoothen | Evens out a face-to-neck lighting line in harsh sun |
| Eyes | Glass glare, eye brighten, eye bags, dark circles | Glare on Grandpa’s glasses; tired eyes after a 14-hour day |
| Hair | Flyaways | Veil static and outdoor wind |
| Body | Smoothen, blemish, cloth dewrinkle | Creases from sitting through the ceremony |
Once a combination works, click the + next to Presets to save it as your own. Your next wedding then starts where this one finished.
Step 3: Retouch Groups by Group, Not All at Once
Bridal parties and family formals are where retouching usually goes wrong. The groomsmen don’t need the same treatment as the bride, and nobody wants Grandma’s smile lines erased.
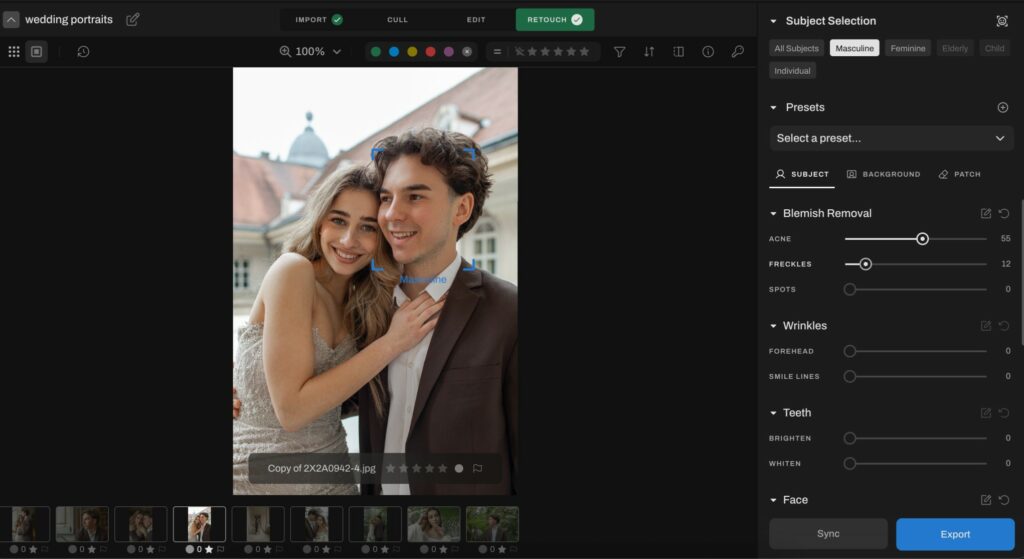
In the All Subjects tab, you can apply sliders to everyone or target Masculine, Feminine, Elderly or Child subjects separately. Face frames show exactly who you’re adjusting. You can also apply separate presets to masculine and feminine subjects in the same image.
For one person who needs something different, like the maid of honor with a breakout or the uncle with glare on his glasses, switch to the Individual tab and select that person.
Two things to know about the order of adjustments:
- Later changes overwrite earlier ones. If you make individual adjustments and then apply a group adjustment (say, Masculine), the group values overwrite the individual ones. Any individual changes made after that overwrite the group values again. The easiest habit is groups first, individuals last.
- Individual adjustments don’t sync. Aftershoot numbers people in the order they appear in each frame, and that order changes from shot to shot. Group-level adjustments sync normally, with Masculine, Feminine, Elderly and Child settings taking priority over All Subjects.
Step 4: Protect What Shouldn’t Be Retouched
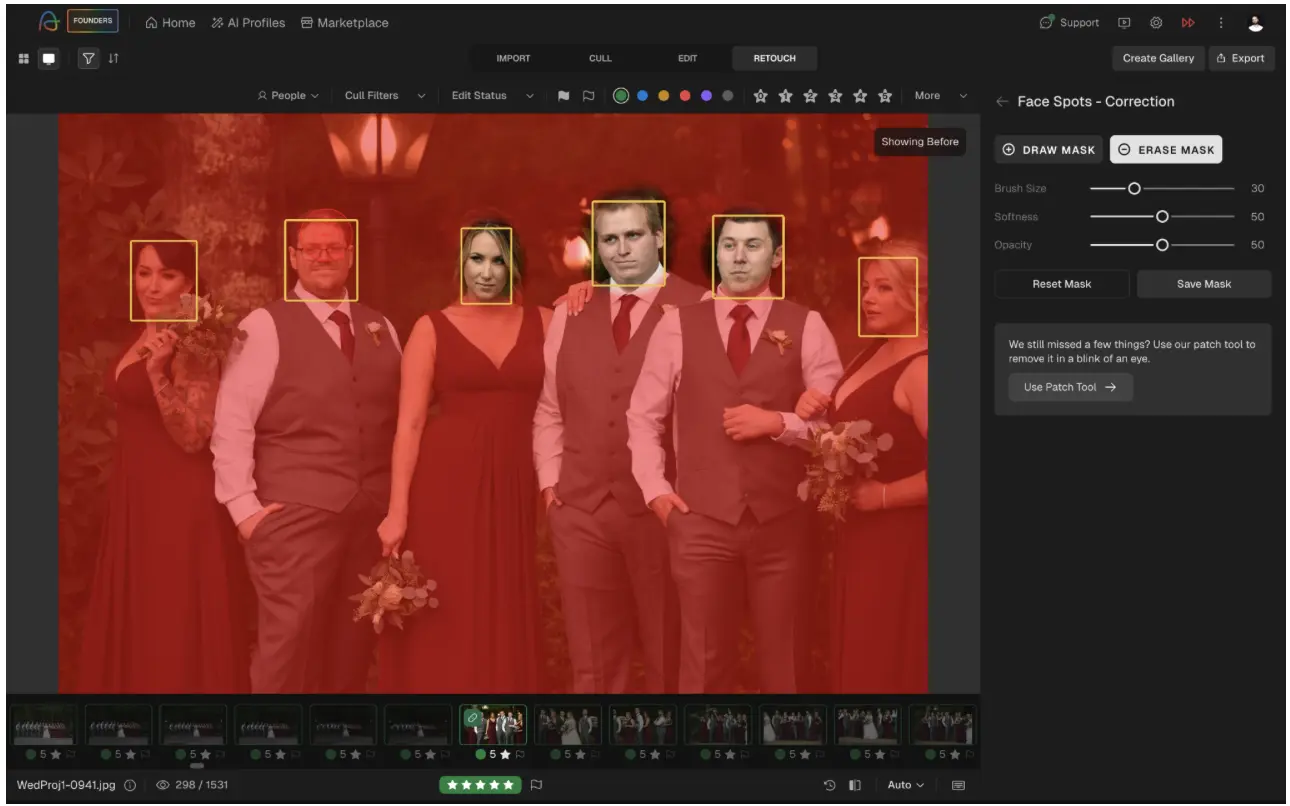
If a bride’s highlighter, a beauty mark or a tattoo needs to stay exactly as shot, don’t turn the whole face down. Rather, mask those areas out.
Click the Advanced Tuning icon next to any slider group’s name. On the Erase Mask tab, set the brush Size, Softness and Opacity, then paint over the area you want left exactly as shot. If you mask too much, switch to Draw Mask and brush it back. Click Save Mask, then repeat for any other slider group where you need the same protection.
Step 5: Remove Distractions With Patch
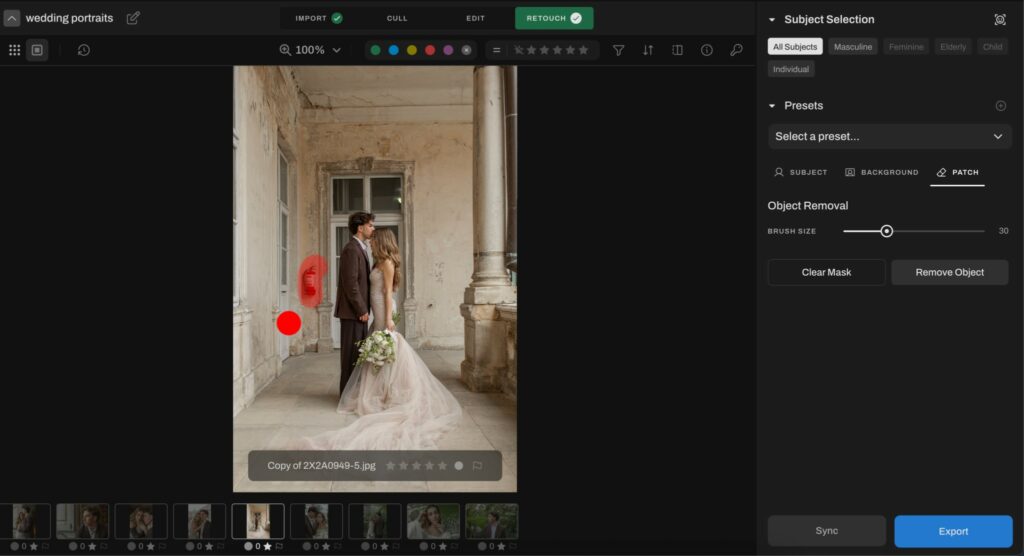
For the exit sign over the altar, the extension cord in the aisle or a guest’s raised phone, click Patch, then Draw Mask. Size the brush, paint over the object, and click Remove Object. Use Erase Mask to fine-tune the selection, or Clear Mask to start over.
Step 6: Sync Across the Sequence and Check Your Work
When one frame looks right, select the rest of that sequence in the filmstrip (hold Cmd/Ctrl and click, or Cmd/ Ctrl + A for everything) and click Sync. To copy settings to a single image, use Cmd/Ctrl + C on the finished frame and Cmd/Ctrl + V on the next.
Before you move on, check your work:
- Press \ to toggle before/after. If the difference jumps out at normal viewing size, pull the strength back.
- Press H to open History and click back to any earlier state.
There’s currently no Redo. If you hit a slider group’s Reset button, you’ll need to reapply that group’s retouching by hand, so go to History before you reach for Reset.
Step 7: Export the Gallery, or Send Hero Images On
Select the images you want (or Cmd/Ctrl + A for all), click Export in the upper-right corner, and choose a folder. You can rename files inside Aftershoot before exporting. If you started from Lightroom Classic, the retouching syncs to the copy Lightroom created.
For most of the gallery, you’re done at this point. Send only the album and wall-art images on to Photoshop for composites, dodge and burn, or anything that needs pixel-level judgment.
If you’d rather watch a video instead, check out our quick guide on how to retouch with Aftershoot:
Wedding Retouching Software Compared (2026)
The right tool depends on where your retouching time goes. If it’s spread across hundreds of portraits, you want batch control. If it’s concentrated in a few hero images, you want depth.
| Tool | Best For | How It Works | Pricing (Checked Sept 2026) | Watch Out For |
|---|---|---|---|---|
| Aftershoot Retouch | Batch retouching full wedding galleries | Desktop app, runs locally; RAW, JPEG, TIFF; “Edit in” from Lightroom Classic | From $20/mo billed annually, unlimited images; Complete (cull + edit + retouch) $45/mo billed annually; 30-day free trial | Composites and body reshaping still belong in Photoshop |
| Evoto | Detailed beauty and portrait retouching | Standalone app; pay per exported image | 1 credit per exported image; annual plans from US $80/yr (800 credits) to US$1,205/yr (24,000 credits); 7-day trial | Costs scale with delivered images; reimported images count as new |
| Retouch4me | Photoshop users who want task-specific AI | Separate plugins (Heal, Dodge & Burn, Fabric, etc.) for Photoshop, Lightroom and Capture One | Perpetual license per plugin (roughly $124–$159 each in recent reviews) or cloud credits | A full toolkit means buying several plugins |
| Imagen | Lightroom Classic users combining editing and skin smoothing | Cloud editing tied to Lightroom Classic | Pay-as-you-go with a $7/mo minimum plus per-photo AI tool charges; flat Limitless plan includes retouching tools (Billed annually at $129/ month) | Built around Lightroom Classic |
| Adobe Photoshop | Hero images, composites, body work | Manual: frequency separation, dodge and burn, Generative Fill | Photography plan (Lightroom + Photoshop, 1TB) $19.99/mo on an annual commitment for new US subscribers | Slowest per image; results depend on skill |
| Luminar | One-off portrait enhancement | Face and skin AI tools in a standalone editor | Licenses and bundles change frequently; check skylum.com | Pricing moves often |
For a wider look at portrait-focused options, see our roundup of portrait retouching software.
DIY, AI or Outsourced: What Does Wedding Retouching Cost?
| Approach | Typical Cost | Turnaround | Control | Best For |
|---|---|---|---|---|
| Manual (you, in Photoshop) | Your time, often 20–45 minutes per hero portrait with frequency separation, plus your Adobe subscription | Whatever your backlog allows | Full | Album and wall-art images |
| AI retouching tool | Flat subscription or per-image credits (see the table above) | Minutes for a batch | High: sliders, masks, review before export | Light and standard retouching across the whole gallery |
| Outsourced retoucher | Roughly $2–$15+ per image depending on level | Often 24–48 hours for standard work, longer for high-end | Through a style guide and revision rounds | Peak-season overflow and complex manipulation |
The math shifts fast at wedding volume. Sixty hero portraits at 30 minutes each is 30 hours of Photoshop per wedding, before a single light retouch on the rest of the gallery. That’s why most working photographers combine approaches: a batch pass for the gallery, manual or outsourced work for the few images that justify it.
Real Wedding Retouching Examples (Before and After)
1. Heidi Blanchard – Ginger Snapshots (Maryland)
Heidi, a Maryland-based wedding photographer, shared her retouching workflow for Alexandra and Darius’ wedding: “I wanted an editing style as elevated as their love story. For this wedding—and honestly, for a lot of my weddings- Chérie was the magic wand that set the perfect tone. I tested 5–10 photos in various styles, fine-tuning until I found the perfect vibe. After basic edits in Aftershoot, I move to Lightroom Classic for a consistency check, followed by advanced masking” she said.
“I add drama to the background by lowering exposure and boosting texture, then enhance the subject for a ‘main character’ feel.
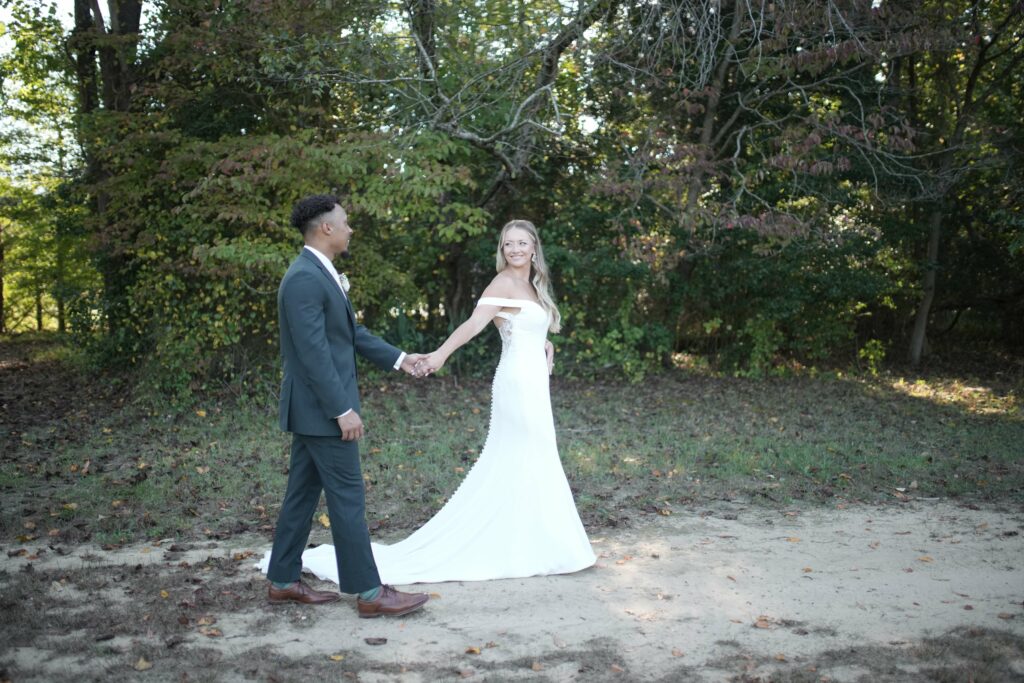
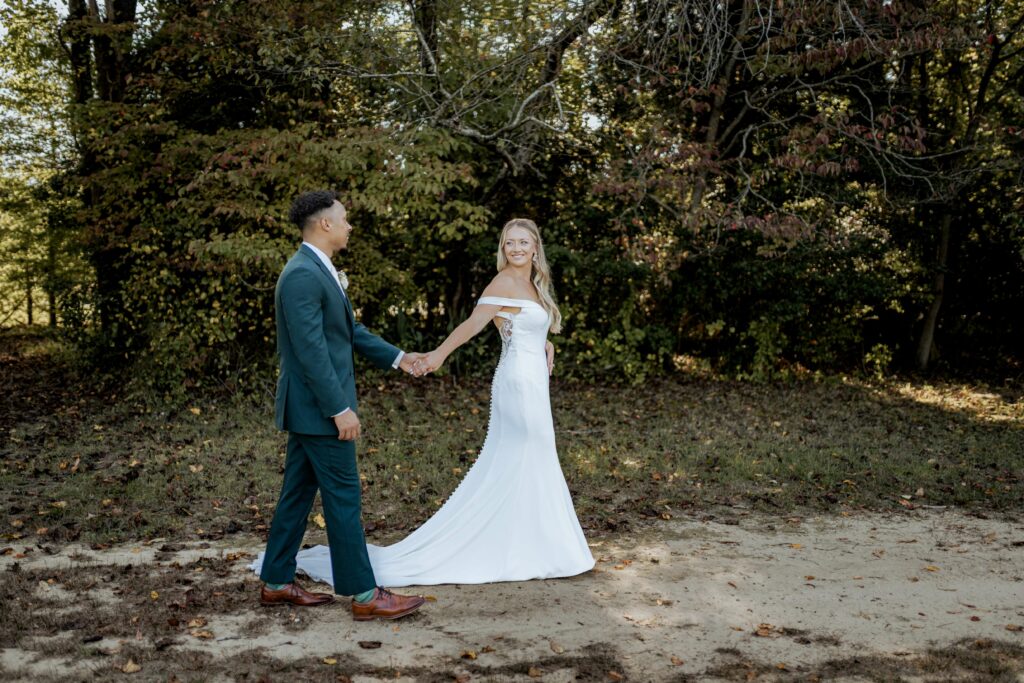
Before/After: color and tone set with an AI edit, then background exposure lowered and texture boosted in Lightroom Classic to separate the couple. The hero version was finished in Photoshop with a 16:9 crop and distraction cleanup.
For epic shots, she goes all out with a cinematic edit. “In Photoshop, I switch to a 16:9 ratio for a widescreen vibe, adding sky replacements, overlays, and generative AI to clean up distractions. It’s about creating frame-worthy masterpieces with blockbuster energy.”
2. Wes Shinn (Outer Banks, North Carolina)
Wes Shinn, a wedding photographer based in the Outer Banks, edits in his own style first, then brings final images into Aftershoot for a skin-smoothing and cleanup pass before delivery. The goal is clean skin that still has texture, with no visible “retouched” look at normal viewing size. Here are the results:
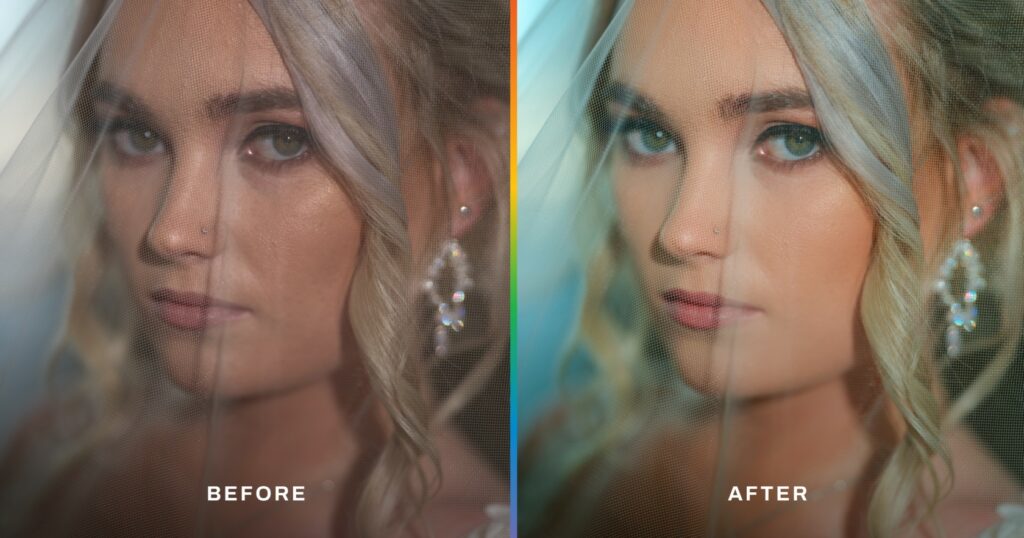
“The retouching time has been cut in half.”
– Sokratis Katsanos, wedding photographer
Retouch What Matters
Phew..that pretty much covers it. The small fixes you make behind the scenes play a big role in how your couples relive their big day. Whether it’s removing a distracting background guest or gently smoothing skin while keeping it natural, every thoughtful edit adds to the experience they will cherish forever.
With Aftershoot, you can streamline the repetitive parts of your workflow and spend more time crafting images that feel authentic. The result? A faster turnaround, consistent quality, and a gallery that feels elevated from start to finish.
When your editing process is both efficient and intentional, your clients notice and remember. Experience the power of next-level retouching today.
FAQs on Wedding Retouching
Q1. Do wedding photographers retouch every photo?
Most edit every delivered photo but retouch selectively. A light clean-up (blemishes, shine, flyaways) often covers the portraits in the gallery, while detailed retouching is reserved for a smaller set of hero images, album spreads and prints. What’s included varies by photographer, so it should be stated in the contract.
Q2. How much does wedding photo retouching cost?
Outsourced retouching usually ranges from about $2 per image for basic corrections to $15 or more for high-end work. AI tools charge either per exported image or a flat subscription; Aftershoot Retouch, for example, is a flat monthly plan with unlimited images. Doing it yourself costs time: a detailed manual retouch can take 20–45 minutes per portrait.
Q3. How do you retouch wedding photos without making skin look fake?
Remove what’s temporary and keep what’s permanent. Clear breakouts and flyaways, but keep freckles, moles, pores and laugh lines unless the couple asks. Work at 100% zoom but judge the result at normal viewing size, keep strength slightly lower than feels right, and mask out makeup, jewelry and tattoos.
Q4. Is AI retouching good enough for wedding photos?
For the repetitive layer, yes: blemish removal, shine, flyaways, glasses glare and fabric creases across hundreds of portraits. Current tools let you adjust strength per slider, target groups or individuals, and mask areas you want untouched. Composites, heavy object removal and body reshaping still need Photoshop and a human eye.
Q5. How long does it take to retouch a wedding gallery?
Manually, a light clean-up takes a few minutes per portrait and a hero retouch can take 20-45 minutes, so a full gallery can run into days. With batch AI retouching, the light pass across a gallery takes minutes, and your manual time goes only to the images that need it.
Q6. Should you charge extra for wedding retouching?
Many photographers include light retouching in every package and a fixed number of detailed retouches, then charge per image beyond that. Defining this up front protects your time and gives couples a clear upgrade path for album or wall-art images.