TL;DR
- Fashion photography retouching cleans up skin, hair, garments and backgrounds while keeping skin texture, fabric detail and true-to-life garment color intact.
- Garment as well as model: unlike portrait retouching, fashion work treats the garment as seriously as the model, so creases, fit, pattern alignment and color accuracy matter as much as skin.
- Agree the retouching level up front. Basic cleanup, natural/commercial, editorial/high-end and beauty/advertising each cost and take very different amounts of time.
- Work in order: RAW color correction → cull → cleanup pass → texture-preserving skin work (frequency separation, dodge and burn) → garment fixes → consistent color grade → final check at 100%.
- Use AI for the gallery pass and manual work for hero frames. AI handles repetitive fixes like blemishes, flyaways, shine and soft creases across large sets. Hero frames still need dodge and burn, patterned-fabric fixes and fit work done by hand.
- Costs range widely: outsourced retouching runs from about $0.50 per image for basic cleanup to $100+ for beauty and advertising work. AI tools like Aftershoot cost a flat $20/month (billed annually) with unlimited images.
A lookbook comes back from the shoot with 40 looks, three lighting setups and a client who wants every frame to feel like it belongs on the same page. The blazer has a crease across the shoulder that wasn’t there at the fitting. The lipstick reads magenta on one set and brick-red on the next. And the skin needs to look finished without looking filtered.
That’s the job of fashion photography retouching: making the model, the garment and the frame look their best while keeping all three believable. This guide covers the techniques professional retouchers use, a step-by-step workflow you can follow in Photoshop, Lightroom or Capture One, where AI tools genuinely save time (and where they don’t), and what each approach costs.
Here’s the quick answer you’re looking for:
Fashion photography retouching is the post-production work of cleaning up skin, hair, garments and backgrounds in fashion images while keeping skin texture, fabric detail and true-to-life garment color intact. A typical workflow moves from RAW color correction to a cleanup pass, texture-preserving skin work (frequency separation or dodge and burn), fabric and fit fixes, color grading across the full set, and a final check at 100% zoom before export.
What Is Fashion Photography Retouching?
Fashion retouching overlaps with portrait retouching, but the brief is different. In a portrait, the person is the point. In fashion, the garment is usually what’s being sold, so the clothes get as much attention as the skin. Color has to match the physical sample, not just look pleasing. And because fashion images often run large (magazine spreads, campaign posters, billboards), skin texture and fabric detail get scrutinized at sizes where heavy smoothing falls apart.
| Parameter | Fashion (Editorial, Campaign, Lookbook) | Portrait and Headshot | E-commerce Apparel |
|---|---|---|---|
| Main goal | Sell a look or a story; model and garment both matter | Flatter the person | Show the product exactly as it is |
| Skin work | Texture-preserving; more stylized for editorial | Natural cleanup | Minimal, often no model |
| Garment work | Creases, lint, pins, fit, pattern alignment | Rarely | Ghost mannequin, clipping paths, symmetry |
| Color priority | Garment accuracy plus a creative grade | Skin tone | Exact product color match |
| Where it’s used | Magazines, campaigns, lookbooks, brand social | Client galleries, LinkedIn, websites | Product pages, marketplaces |
The Four Levels of Fashion Retouching
Not every frame deserves the same treatment. Agree on the level with the client up front, so a 300-image lookbook isn’t retouched to cover standard and a cover isn’t rushed like a lookbook.
| Level | What’s Included | Best For | Typical Outsourced Cost* |
|---|---|---|---|
| Basic cleanup | Dust, lint, stray hairs, temporary blemishes, color correction | Lookbooks, social, high-volume galleries | ~$0.50–$3 per image |
| Natural / commercial | Basic cleanup plus texture-preserving skin work, fabric creases, flyaways, background cleanup, consistent grade | Brand lookbooks, on-model catalog, e-commerce | ~$2–$15 per image |
| Editorial / high-end | Commercial plus dodge and burn, frequency separation, makeup refinement, garment reshaping, detailed color work | Magazine features, campaigns | ~$15–$50+ per image |
| Beauty / advertising | Pore-level work, composites, heavy sculpting, billboard-size output | Cosmetics, covers, out-of-home ads | $100+ per image |
*Rates may vary by provider, volume and turnaround. Ranges reflect published 2026 retouching price guides.
Here’s What You Should Retouch (and What You Can Leave Alone)
The fastest way to over-retouch is to fix everything you can see. Decide what stays before you start, ideally with the brief or the client’s brand guidelines in hand.
| Area | Usually Fix | Usually Keep |
|---|---|---|
| Skin | Temporary blemishes, redness, flash shine, makeup separation | Pores, freckles, signature moles, softened (not erased) fine lines |
| Eyes | Visible veins, heavy under-eye shadows | Natural eye shape and iris color |
| Hair | Flyaways crossing the face or eyes, strands on the garment | Movement and texture that give the image energy |
| Makeup | Smudges, uneven lip line, glitter fallout | The makeup artist’s intended look |
| Garment | Sitting creases, lint, dust, fitting pins and clamps, tags, loose threads | Natural drape, pleats, fabric grain, stitching |
| Body | Bruises, temporary marks | Body shape and proportions, unless the client asks (see the FAQ on labeling rules) |
| Background | Tape marks, scuffed floors, cables, light stands, backdrop seams | Set texture that’s part of the concept |
How to Retouch Fashion Photos: Step-by-Step
This workflow works in Photoshop with Lightroom Classic or Capture One. The order matters: color decisions affect skin decisions, and cleanup should happen before you start sculpting light.
Step 1: Read the Brief and Collect References
Before touching a file, confirm three things:
- Where the images will run. Web, print or large format decides how hard you’ll be judged at 100%.
- Which retouching level the job calls for.
- Any brand rules. Many brands now ban body reshaping or ask to keep freckles and tattoos.
If the client supplied reference images or garment samples, keep them next to your screen for color matching.
Step 2: Correct Color and Exposure in the RAW File
Set white balance from a grey card or color checker shot on set, then fix exposure so white garments keep their highlight detail and black fabrics keep texture in the shadows. Apply lens corrections here too.
Compare the garment against the physical sample under daylight-balanced light. A dress that’s slightly off in the RAW edit will stay off through every later step.
Step 3: Pick Your Selects and Hero Frames
Retouch only the images that will be delivered. On a big lookbook day, AI culling can handle the first sort while you make the final picks.
Then split your selects into two groups:
- Hero frames: covers, campaign images, the opening image of each look. These get full manual work.
- Gallery frames: these get a cleanup and consistency pass.
Step 4: Do a Cleanup Pass First
On an empty layer, set to sample all layers, use the Spot Healing Brush, the Healing Brush and the Clone Stamp to remove dust, lint, tape, fitting pins and stray hairs. Photoshop’s Remove tool handles larger background distractions like cables and light stands.
Work at 100% zoom, moving across the image in a grid so nothing gets skipped. This repetitive pass is where AI retouching saves the most time.
Step 5: Retouch Skin Without Losing Texture
Frequency separation splits the image into two layers:
- a low-frequency layer that holds color and tone
- a high-frequency layer that holds texture such as pores and fine hair
Even out blotchy color on the low layer with a soft brush or a light blur inside a selection, and heal individual spots on the high layer. The texture stays untouched.
Dodge and burn comes next for anything above basic level. Use two Curves adjustment layers, one brighter and one darker, each with a black mask. Paint on the masks with a soft brush at very low flow to even out uneven light patches and shape the face.
A temporary black-and-white helper layer makes uneven luminance much easier to see. When you’re done, pores should still be visible at 100%.
Step 6: Fix the Garment: Creases, Lint and Fit
- Soft creases: dodge and burn or frequency separation work on fabric the same way they work on skin.
- Deep folds: clone or patch along the direction of the weave.
- Prints, stripes and checks: clone along the repeat, then check that lines still meet at seams. A broken pattern is the most obvious sign of a garment edit.
- Fit: use Liquify sparingly, and only to fix bunching or pinning, with the background protected by a freeze mask. Check nearby straight lines such as door frames and backdrop edges for warping.
Step 7: Grade Color Consistently Across Every Look
Pick one reference frame per look and sync its grade across the set. Then compare skin tones between lighting setups, because the same model can drift warm on one set and cool on the next.
Re-check the garment after grading: a warm creative grade can quietly turn a cream dress yellow. If you’re working to a signature look, keep your photo editing style consistent from look to look. For large lookbooks, an AI editing profile trained on your past edits can apply your base grade across the set, leaving you to fine-tune.
Step 8: Sharpen, Check at 100% and Export
Do a final review in two passes:
- Zoomed out, to read the whole image.
- At 100%, to catch halos, repeated clone patterns and lost texture.
Flipping the image horizontally is an old retoucher’s trick for spotting shape problems your eye has stopped seeing.
Sharpen for the output size. Export sRGB for web, and follow the printer’s color specs for print. Keep a layered PSD or TIFF master in case the client asks for revisions.
Where AI Retouching Fits in a Fashion Workflow
AI retouching is good at the repetitive, rules-based part of the job: the same blemish, flyaway and shine fixes repeated across hundreds of frames. It’s much weaker at judgment calls, like whether a strand of hair adds movement or whether a fold is part of the garment’s design. The practical split for most fashion photographers is to let AI take the gallery pass and spend manual time on hero frames.
| Task | AI Retouching | Still Manual |
|---|---|---|
| Blemish and spot removal | Strong, and batchable across a set | Check moles or freckles the model wants kept |
| Flyaways | Good against skin and plain backdrops | Hair against busy or patterned backgrounds |
| Face shine, under-eye shadows | Good | Rarely needed |
| Soft clothing creases | Good on solid fabrics | Deep folds, prints, stripes, pattern alignment |
| Small background distractions | Good | Large set extensions and composites |
| Skin consistency across a set | Good when synced from a reference frame | Hero frames shot in mixed light |
| Dodge and burn, sculpting | Limited | Manual in Photoshop |
| Garment fit, body reshaping | Not offered by most AI retouchers | Manual Liquify, with client approval |
If you’re weighing the two approaches in more depth, here’s how manual and AI retouching compare in practice.
How to Retouch Fashion Photos in Aftershoot
Aftershoot AI Retouching handles the gallery pass: skin cleanup, flyaways, soft clothing creases and small distractions, synced across a full set. You stay in control of how strong each fix is. Here’s how that looks on a fashion shoot.
Step 1: Bring your Selects into Aftershoot
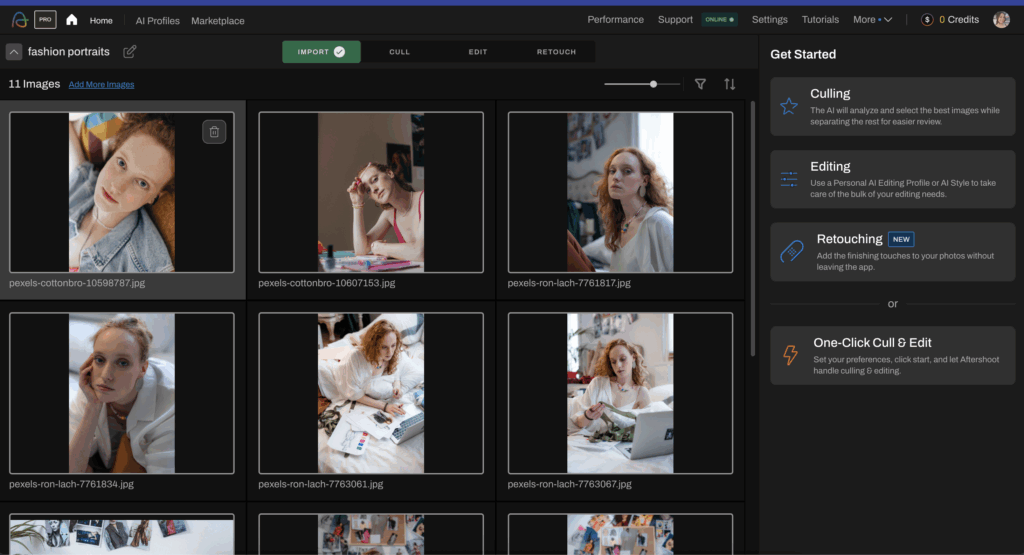
Import RAW, JPEG or TIFF-8 files directly. There’s no need to export JPEGs first, and you can move between the Edit and Retouch tabs at any point.
If you manage your catalog in Lightroom Classic:
- Select the images.
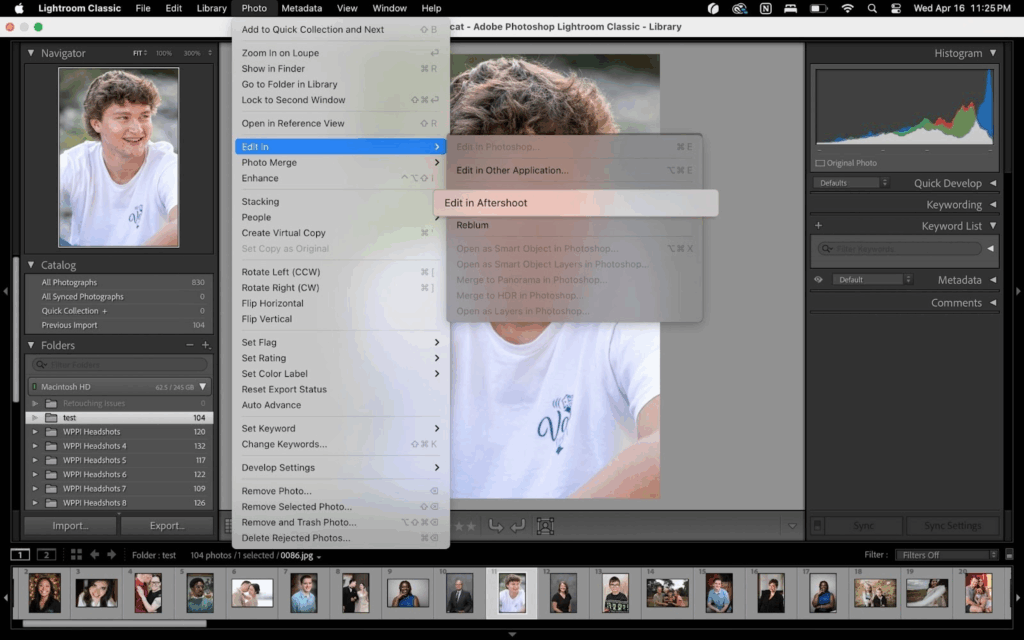
- Right-click and choose Edit In → Edit in Aftershoot.
- Choose Edit a Copy with Lightroom Adjustments.
Lightroom creates copies for you to retouch. Give the copies a star rating or color label so you don’t end up with duplicates in your catalog.
Step 2: Start with a preset
Open the Retouch tab in Loupe View (press Enter or L). Pick a preset from the dropdown and use Preset Strength to pull it back to a natural finish. For fashion, keep face smoothing low and lean on the targeted sliders instead:
- Face Spots for acne and blemishes
- Flyaways for stray hairs
- Remove Shine for flash hot spots
- Eye Bags and Dark Circles for tired eyes
- Cloth Dewrinkle (under Body) for soft creases
Save your settings as a custom preset for the next shoot.
Step 3: Retouch each model separately in group shots
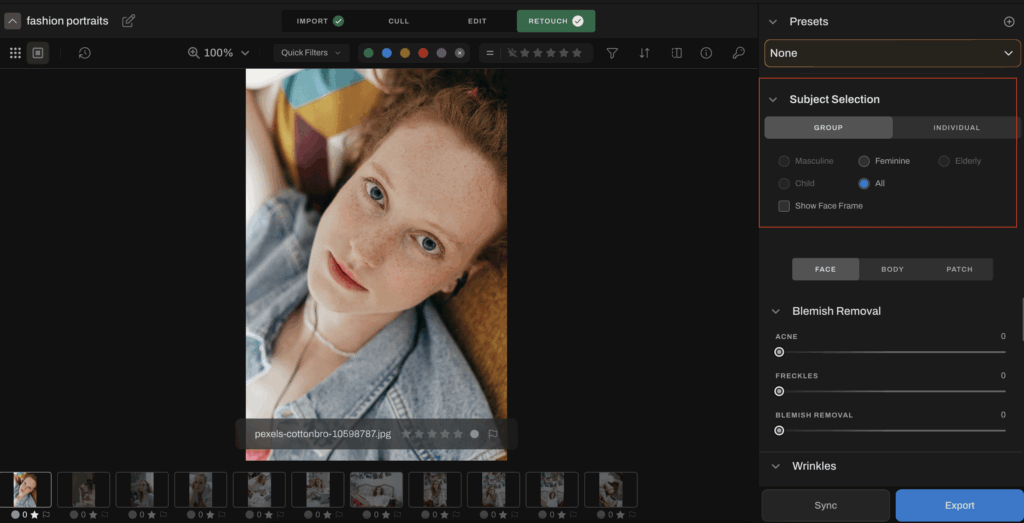
The All Subjects tab applies sliders to everyone, or to a group (Masculine, Feminine, Elderly or Child). The Individual tab adjusts one person at a time.
Group-level settings sync across images. Individual settings for Person 1, 2 and so on don’t, because the order of people changes from frame to frame.
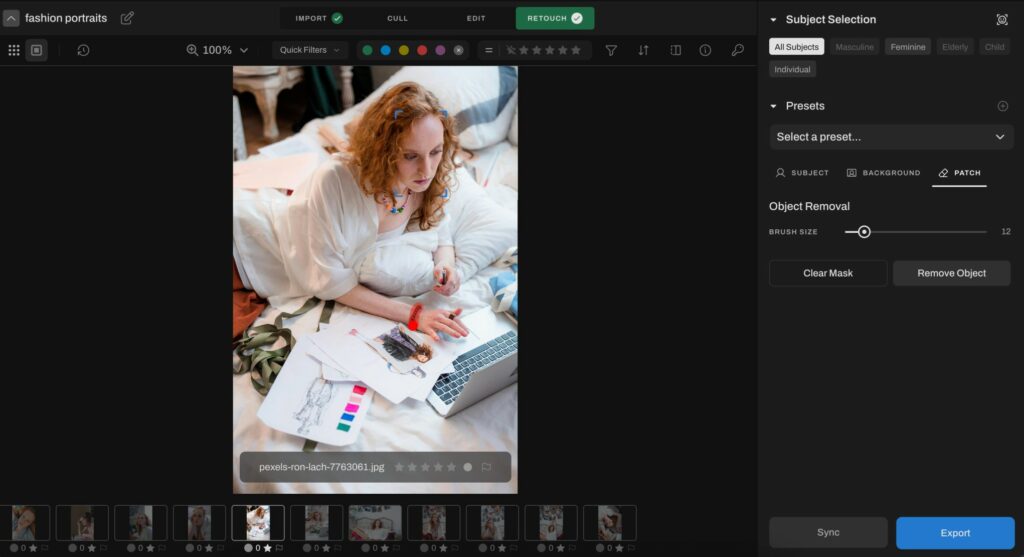
Step 4: Protect makeup, jewelry and tattoos
Open Advanced Tuning next to any slider category and paint over areas you don’t want retouched with the Erase Mask brush, such as bold makeup, jewelry or tattoos. Then click Save Mask. This is the step that stops an AI pass from softening the makeup artist’s work.
Step 5: Remove set distractions with patch
Click Patch, then Draw Mask over tape marks, cables or people in the background, and click Remove Object.
Step 6: Sync across the look, then spot-check
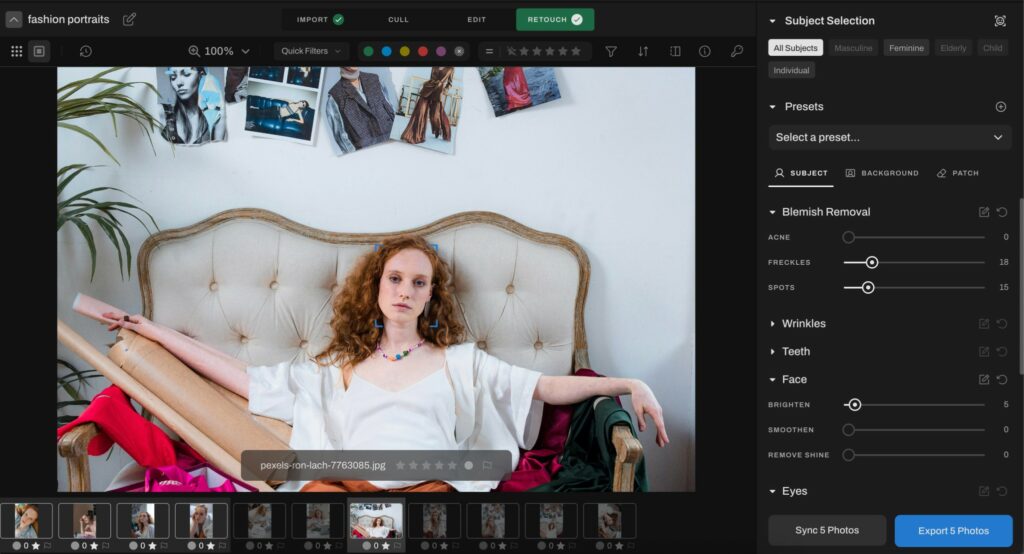
Select the rest of the look in the filmstrip and click Sync, or copy and paste settings with Cmd/Ctrl + C and V. Press \ to toggle before and after, and H to open the History panel if a slider went too far.
Export retouched files to a folder, or back to Lightroom Classic if you started there. Then take your hero frames into Photoshop for dodge and burn and any fit work.
“Gone are the days of spending hours running actions in Photoshop to clean up skin. I’m so thankful for the ability to just pull the photos I need into Aftershoot, adjust some sliders, and watch it work its magic in less time than I could even open the images in Photoshop.”
– Sarah Boles, professional photographer
If you prefer watching a video instead, here’s a quick guide on how to retouch fashion photos with Aftershoot.
Common Fashion Retouching Mistakes
| Mistake | What It Looks Like | How to Fix It |
|---|---|---|
| Over-smoothed skin | Waxy, plastic skin at 100% zoom | Lower smoothing; work color on the low-frequency layer only; keep pores |
| Skin tones drifting between looks | The model looks warm on one set and cool on the next | Use a reference frame per look; compare skin values; sync |
| Garment color drift | The dress in the photo doesn’t match the product | Shoot a grey card; compare to the sample; re-check after grading |
| Broken patterns | Stripes or checks misalign after crease removal | Clone along the repeat; check seams at 100% |
| Removing everything | Hair has no movement; faces lose character | Agree on a “keep” list with the brief |
| Visible Liquify | Bent door frames, stretched prints, warped backdrops | Freeze-mask the background; make small moves; check straight lines |
| Retouching before culling | Hours spent on frames that never get delivered | Cull first; retouch selects only |
| Checking at one zoom level | Halos and texture loss slip through | Review at fit-to-screen, at 100% and at output size |
Fashion Retouching Software Compared
Most fashion retouchers use a RAW editor for color, Photoshop for hero frames, and increasingly an AI tool for the gallery pass. Here’s a quick comparison. For a deeper look at features, pros and cons, see our guide to the best software for fashion photography retouching.
| Tool | Best For | Fashion-Relevant Strengths | Pricing |
|---|---|---|---|
| Adobe Photoshop | Hero frames, full manual control | Frequency separation, dodge and burn, Liquify, Remove tool | Photography plan (Photoshop + Lightroom) from $19.99/month, annual |
| Adobe Lightroom Classic | RAW edits, batch color | Masking, sync, AI people masks | Included in the Photography plan |
| Capture One Pro | Tethered studio shoots, color work | Color editor, tethering | About $18/month on an annual plan; perpetual license also available |
| Aftershoot AI Retouching | Gallery-wide retouching | Cloth Dewrinkle, flyaways, subject-aware sliders, masking, local processing | $20/month billed annually, unlimited images; 30-day free trial |
| Retouch4me | Photoshop users who want plugin-level texture preservation | Fabric, Heal, Dodge & Burn, Clean Backdrop plugins | Plugins from $124 one-time; cloud plans from $20/month for 200 retouches |
| Evoto | High-volume studios wanting granular face and body sliders | Face and body sliders, backdrop cleanup | Credit-based: editing is free, each export uses a credit |
| Luminar Neo | Photographers who prefer a one-time license | Face AI, Skin AI, Body AI | Perpetual licenses; price varies with promotions, so check Skylum’s site |
*Prices last checked September 2026.
DIY vs AI vs Outsourced Retouching: Cost Comparison
| Approach | Cost | Best For | Trade-off |
|---|---|---|---|
| DIY manual (Photoshop) | Software from ~$19.99/month plus your time | Hero frames, full creative control | Slowest; high-end frames can take hours each |
| AI-assisted | Flat subscription (e.g. Aftershoot, $20/month billed annually, unlimited) or per-image credits (e.g. Evoto, Retouch4me cloud) | Lookbooks, galleries, high volume | Hero frames still need manual finishing |
| Outsourced, basic | ~$0.50–$3 per image | High-volume cleanup | Less control; time spent briefing |
| Outsourced, high-end | ~$15–$50+ per image; $100+ for beauty and advertising | Covers, campaigns | Cost and revision rounds |
Most working fashion photographers end up with a hybrid: AI for the gallery pass, their own hands (or a specialist retoucher) for the frames that carry the campaign.
In a Nutshell….
Good fashion retouching is invisible. The garment looks the way it did on the rail, the model looks like themselves on a good day, and nothing in the frame pulls the eye away from the look.
Get the color right in the RAW file, clean up before you sculpt, protect texture and patterns, and save your manual hours for the frames that carry the campaign. If the gallery pass is where your week disappears, you can try Aftershoot free for 30 days, no credit card required.
FAQs for Fashion Photography Retouching
Q1. How much does fashion photo retouching cost?
Outsourced basic cleanup usually costs about $0.50–$3 per image. High-end fashion retouching runs roughly $15–$50 or more, and beauty or advertising work can pass $100 per image. AI retouching tools cost either a flat monthly fee or a few cents per image in credits.
Q2. How long does it take to retouch a fashion photo?
A cleanup pass on a gallery image can take a few minutes, or seconds per image when synced with an AI tool. An editorial or beauty image with frequency separation, dodge and burn and garment work can take one to several hours, depending on output size and how much the brief asks for.
Q3. What’s the difference between fashion retouching and beauty retouching?
Beauty retouching focuses almost entirely on the face and skin, often at pore level for cosmetics campaigns. Fashion retouching balances the model with the garment: fabric creases, fit, pattern alignment and accurate garment color matter as much as skin.
Q4. What software do professional fashion retouchers use?
Photoshop is still the standard for manual work like frequency separation, dodge and burn and Liquify. Capture One is popular in tethered studio shoots, and Lightroom Classic handles RAW edits and batch color for many photographers. AI tools such as Aftershoot, Retouch4me and Evoto are increasingly used for the repetitive first pass.
Q5. Can AI replace a fashion retoucher?
Not for hero frames. AI handles repetitive fixes like blemishes, flyaways, shine and soft creases well across large sets. Judgment calls still need a person: what to keep, how to sculpt light, how to fix a patterned garment, and how far to take a creative grade.
Q6. Do retouched fashion images need to be labeled?
In some countries, yes. France requires commercial images in which a model’s body shape has been altered to carry a “photographie retouchée” notice. Norway requires advertisers and paid influencers to label ads where body shape, size or skin has been retouched. Check the rules where your images will run, and get client sign-off before any body reshaping.