

TL;DR
- What it is: AI scores, flags and groups your photos. You still choose every keeper.
- How it differs from automated culling: In automated culling, the AI proposes the final set of picks and you review them. Assisted culling gives you more control, while automated culling is faster on high-volume shoots.
- Lightroom Assisted Culling: Generally available since June 2026 in Lightroom and Lightroom Classic, at no extra cost. It checks subject focus, eye focus, eyes open, exposure and misfires, and adds Face View and stacking.
- Where it works best: Portraits, weddings, family and newborn sessions. It’s weaker on crowded event frames, sports and non-people subjects.
- Dedicated tools go further: Aftershoot offers both AI-Assisted and AI-Automated modes, with duplicate grouping, key-face detection and local processing, from $10/month billed annually.
- Best practice: Set thresholds per shoot type, flag instead of deleting, and keep a manual pass for the moments that matter most.
Assisted culling is a photo selection workflow in which AI does the first technical pass, checking focus, eyes, exposure and near-duplicates, while the photographer makes every final keep-or-reject decision. The software scores and groups your frames. You decide which ones the client sees.
The term went mainstream in 2026, when Adobe made Assisted Culling generally available in Lightroom and Lightroom Classic. The idea itself is older. Dedicated tools like Aftershoot, Narrative and FilterPixel have offered some form of AI-assisted review for years, and they differ a lot in what they check, how they group similar frames and how much control they hand back to you.
This guide explains how assisted culling works, how it differs from automated and manual culling, how to use Lightroom’s version, where assisted culling struggles, and what to look for in a tool.
Short answer: Assisted culling is a photo culling method where AI checks every frame for soft focus, closed eyes, bad exposure and duplicates, then scores and groups the images for review. The photographer makes every final keep-or-reject decision. Lightroom, Aftershoot, Narrative and FilterPixel all offer a version of it.
What Is Assisted Culling?
Assisted culling is AI-supported photo culling where the software analyzes every frame for technical problems and visual similarity, then gives you scores, flags and groups to review. Nothing is kept or rejected until you confirm it.
That’s the design principle behind Adobe’s version too. Lightroom’s Assisted Culling is built around sliders, thresholds and filters instead of automatic decisions, so the photographer stays in control of the final selection.
Most assisted culling tools work in four stages:
- Analyze: The software reads every image and detects the main subject, faces and eyes.
- Score: Each frame gets scores for things like subject sharpness, eye sharpness and whether eyes are open.
- Group: Bursts and near-identical frames are stacked so you compare them side by side instead of scrolling past them one at a time.
- Flag for review: Frames below your thresholds are marked as likely rejects and the rest as likely keepers. You make the final call on both piles.
Take a ten-frame burst of a couple walking toward the camera. Assisted culling will typically stack all ten, flag the two where the groom blinked, mark one as soft because autofocus grabbed the background, and leave seven technically sound frames. Picking between those seven is still your job: which stride, glance or expression tells the story. Assisted culling is designed to leave that part to you.
What Assisted Culling Checks For
| Signal | What the AI flags | Where it can get it wrong |
|---|---|---|
| Subject focus | Soft or missed focus on the main subject | Intentional shallow focus or creative motion blur |
| Eye focus | Whether the eyes, not the ears or eyelashes, are sharp | Profiles, sunglasses, faces turned away |
| Eyes open | Blinks and half-closed eyes | Laughing, looking down, deliberately closed eyes |
| Exposure | Frames that are far too dark or blown out | Silhouettes, low-key and high-key work |
| Misfires | Accidental frames such as the floor, a lens cap or a pocket shot | Rarely wrong, but worth a quick glance |
| Duplicates and similar frames | Bursts and near-identical shots, grouped together | Sequences where a tiny change in expression matters |
| Key faces and expressions | The strongest expression in a series (tool-dependent) | Subjective calls your client might see differently |
Not every tool checks every signal. Lightroom’s Assisted Culling, for example, focuses on subject focus, eye focus, eyes open, exposure issues and misfires, while dedicated culling apps add deeper duplicate grouping and expression analysis.
Assisted Culling vs Automated vs Manual Culling
The three approaches differ in one thing: who makes the first selection.
| Manual culling | Assisted culling | Automated culling | |
|---|---|---|---|
| Who makes the picks | You, frame by frame | You, using AI scores, flags and groups | The AI proposes a set of picks. You review and adjust |
| What the AI does | Nothing | Scores frames, flags technical issues, groups similar shots | Scores, groups and selects keepers based on your settings and past culls |
| Speed on large shoots | Slowest | Faster first pass, but every pick is still yours | Fastest, since you review the AI’s picks and edge cases |
| Creative control | Full | Full | High, as long as you review the results |
| Best suited to | Small shoots, fine-art and editorial work | Portraits, artistic work, low-to-mid volume shoots | Weddings, events, schools and other high-volume work |
| Usual method | Cull in or cull out | Cull out: remove what fails, keep the rest | Cull in: start from the AI’s picks |
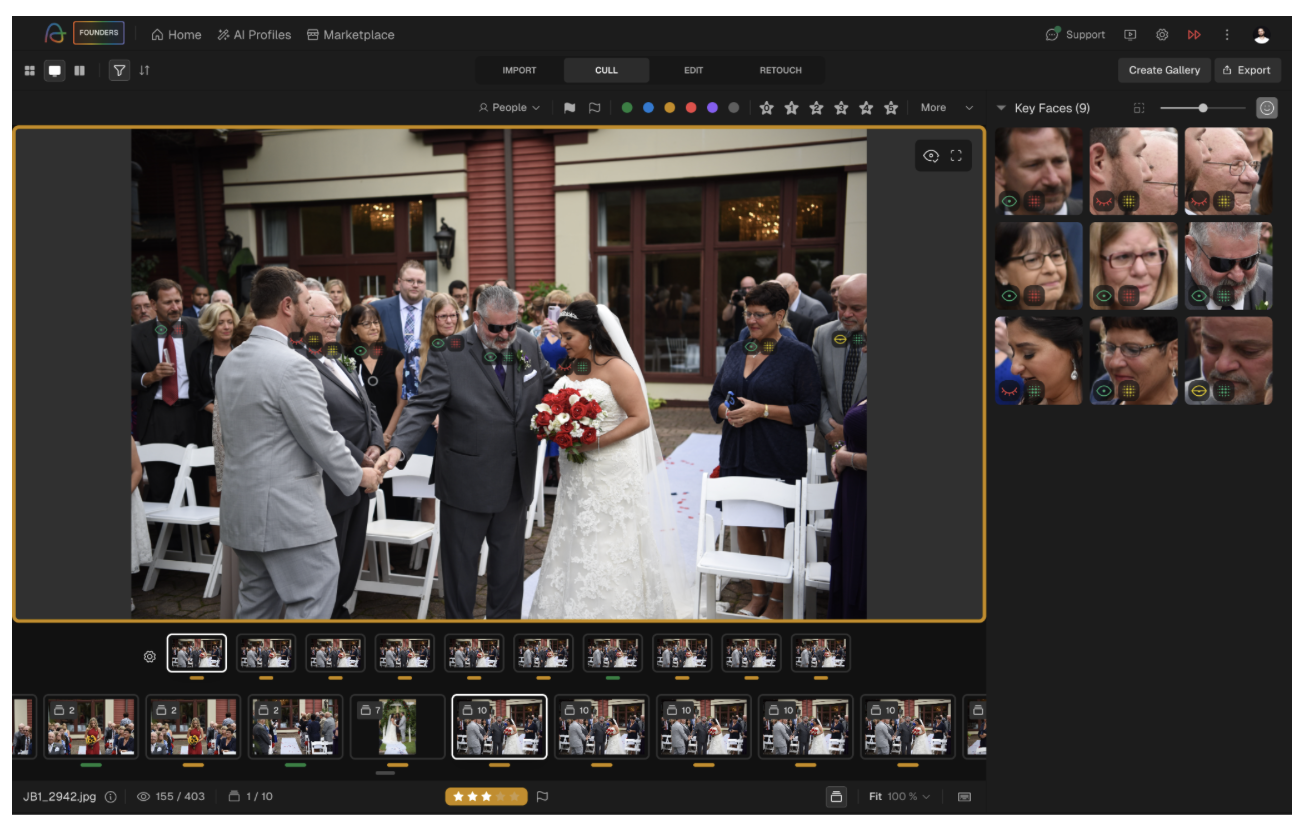
Aftershoot offers both AI modes. In AI-Assisted culling, it groups duplicates, scores every image and highlights key faces, but you make every selection. In AI-Automated culling, it selects keepers using your preferences, the shoot’s genre and your previous culls, then you review the result. Many photographers use automated culling for high-volume events and assisted culling for portrait sessions or editorial work, where intent matters more than speed.
Why Photographers Use Assisted Culling
- It removes the slowest part of a first pass. Zooming in to check eyes and focus on every frame is what makes manual culling drag. AI analysis is fast: during early access, Adobe’s Lightroom team reported an average of about 0.18 seconds per photo on modern hardware, or roughly 2,000 photos in eight minutes. Your review time then goes to judgment calls instead of technical checks.
- It protects decision quality late in a cull. After a few thousand frames, fatigue sets in. That’s when selects get bloated, strong frames get skipped and soft images slip into the client gallery. Clearing the obvious rejects first means you’re comparing fewer, better frames when your attention is lowest.
- It makes your standards consistent. The same thresholds apply to frame 50 and frame 2,500, and to this Saturday’s wedding and next month’s. Manual culling rarely holds that line.
- It keeps catalogs leaner. Some tools, including Lightroom Classic, can run checks at import, so misfires and badly exposed frames never take up space in your catalog.
Lightroom Assisted Culling: How It Works
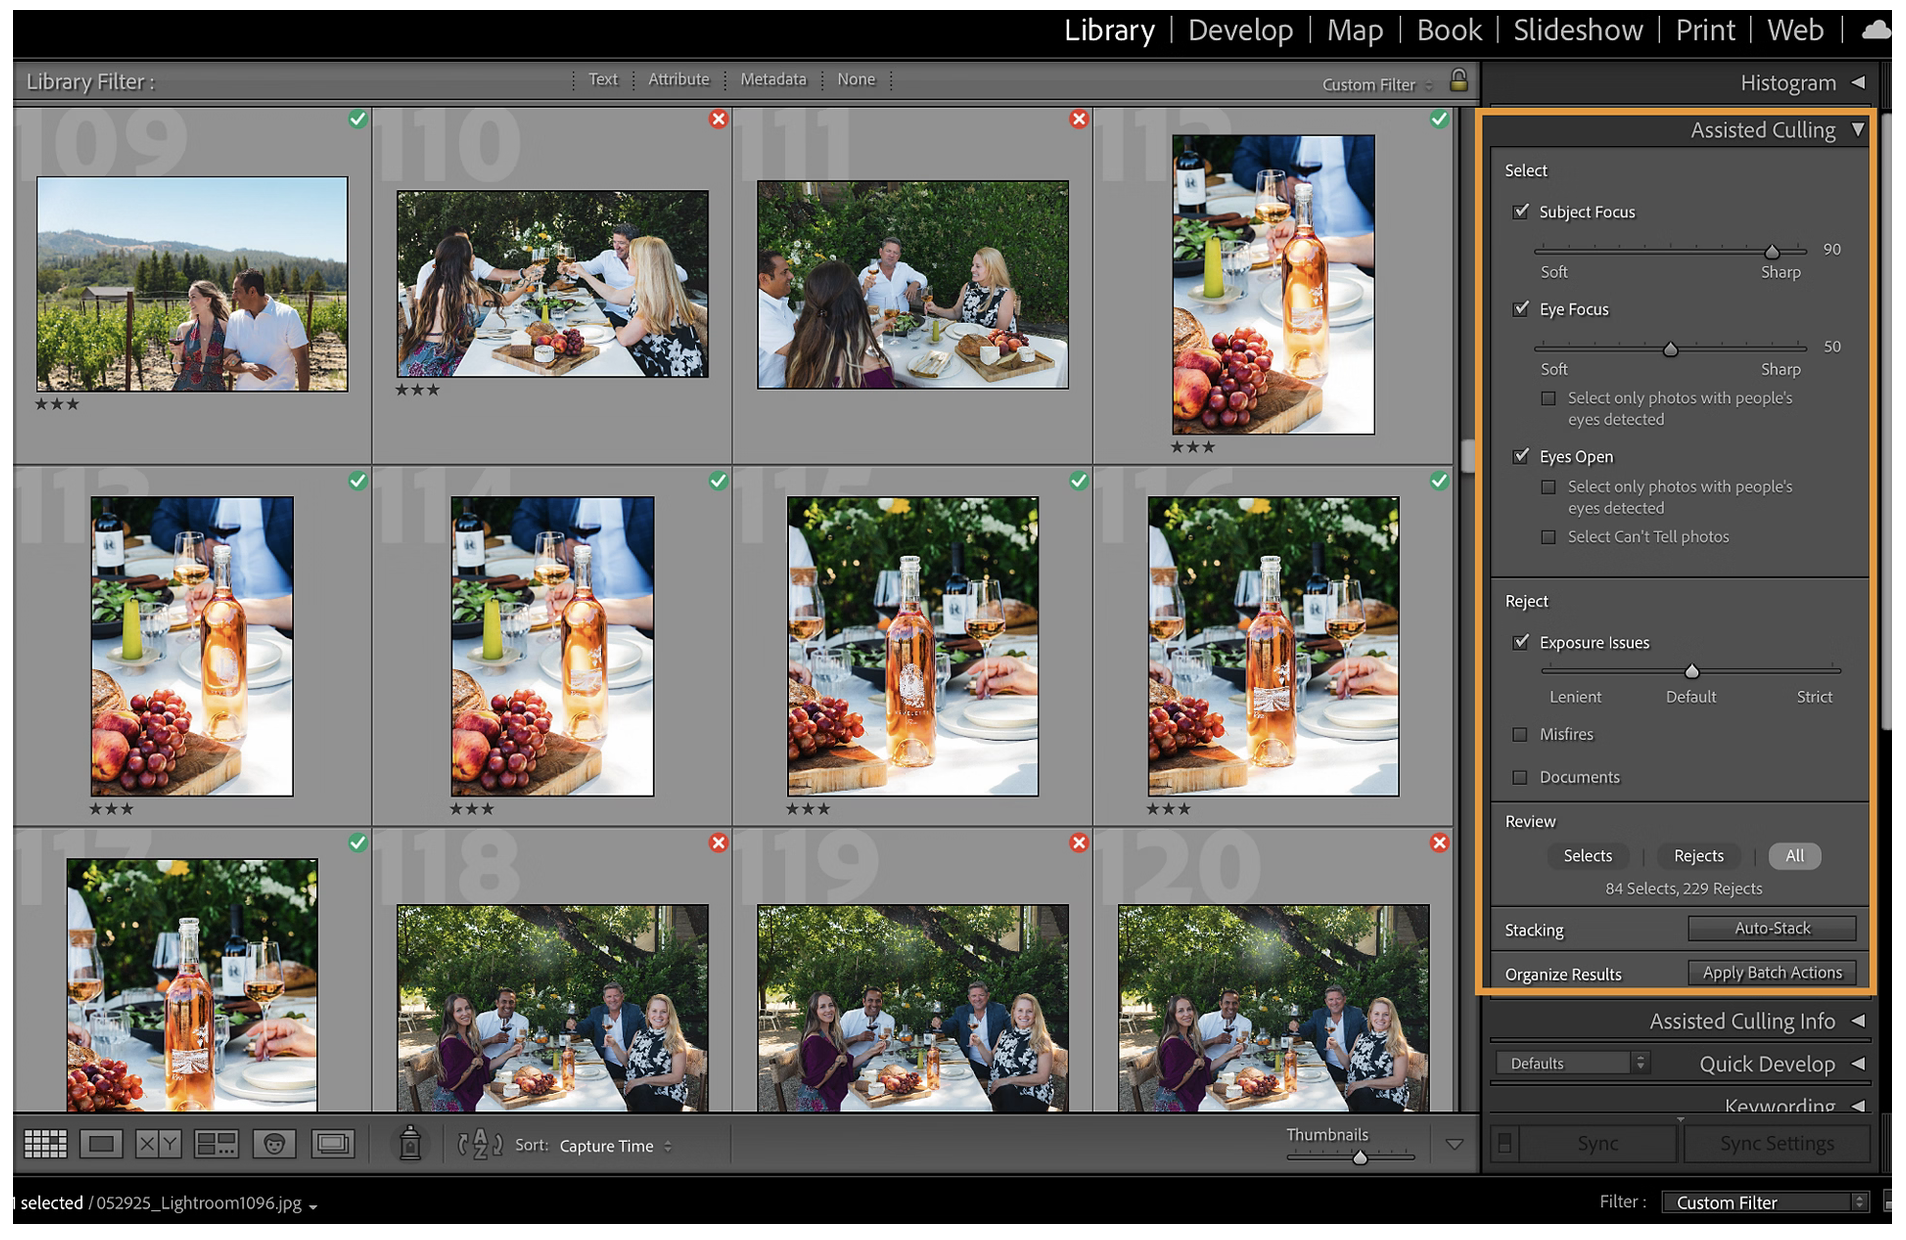
Adobe introduced Assisted Culling as an early-access feature in Lightroom Classic 15.0 and Lightroom desktop at Adobe MAX in October 2025, then made it generally available in June 2026. It’s included in existing Lightroom subscriptions at no extra cost and works in both Lightroom and Lightroom Classic.
What Lightroom’s Assisted Culling Checks
- Select criteria: Subject Focus, Eye Focus and Eyes Open. Each is scored from 0 to 100, with a slider that sets how strict the check is. The default threshold is 50.
- Reject criteria: Misfires, Exposure Issues, and Documents and Receipts.
- Face View: Isolates each person in a photo and checks whether their eyes are open and sharp, which helps with couples and group shots.
- Stacking: Groups similar images by capture time (useful for brackets) or visual similarity (useful for bursts) and recommends the strongest frame in each stack.
- Overrides: Hover over a Select or Reject badge to see the scores behind it, and change any decision manually.
Analysis runs on your computer within the current folder or collection, so you don’t wait for uploads.
How to Use Assisted Culling in Lightroom Classic
- Optional: cull at import. In the Import window, open the Assisted Culling panel and choose your criteria. Lightroom flags frames before you bring them into the catalog, so you can leave obvious rejects behind.
- Open the panel in the Library module. Press G for Grid view, then open Assisted Culling in the right-hand panel.
- Choose your Select criteria. Turn on Subject Focus, Eye Focus or Eyes Open, alone or combined, and adjust each slider for how strict the shoot needs to be.
- Turn on Reject criteria. Enable Misfires and Exposure Issues to catch accidental and unusable frames.
- Review both piles. Check the Selects and the Rejects. Hover over badges to see scores and override anything the AI got wrong.
- Stack similar frames. Use stacking to collapse bursts and pick the hero frame in each group.
- Flag in bulk, then finish by eye. Convert the results to flags, filter to your picks, and make the final creative selection yourself.
In Lightroom desktop, open an album and choose Assisted Culling > Cull to start. For a complete manual-plus-AI workflow, see our guide on how to cull photos in Lightroom.
Where Lightroom’s Assisted Culling Falls Short
- It was built around people. Adobe launched it optimized for portraits and headshots. It judges technical criteria, not composition, moment or expression.
- Busy frames are harder. Photographers in Adobe’s own feedback threads report inconsistent subject detection on events and crowded group photos.
- Near-duplicates still take work. Stacking groups similar frames, but some users say it doesn’t separate near-identical shots as cleanly as dedicated culling apps.
- Creative choices can fail the checks. Deliberate motion blur, soft focus or closed eyes can be flagged as rejects.
- Non-people genres get little help. Wildlife, landscape and product photographers have asked Adobe for broader subject support.
- It only lives inside Lightroom. That’s convenient if you already edit there, but Capture One users need a different tool.
For a head-to-head test on real shoots, see our Aftershoot vs Lightroom AI culling comparison.
Watch: Lightroom Assisted Culling vs Aftershoot
Photographer Esteban Gil tested Lightroom’s Assisted Culling against Aftershoot on a 1,356-image fashion campaign, comparing genre support, culling speed, duplicate review and the controls available after analysis. It’s a useful watch if you want to see the difference between a culling feature inside an editor and a dedicated culling workflow.
Assisted Culling Tools Compared
Lightroom made assisted culling widely available, but it isn’t the only option. Here’s how the main tools approach it.
| Tool | Approach | Key assisted features | Where it runs | Culling price |
|---|---|---|---|---|
| Adobe Lightroom and Lightroom Classic | Assisted: scores and thresholds, you decide | Subject focus, eye focus, eyes open, Face View, stacking, misfire and exposure rejects | On your computer, inside Lightroom | Included with Lightroom subscriptions |
| Aftershoot | AI-Assisted and AI-Automated modes | Duplicate grouping, key face detection, image scores based on 30+ factors, Survey Mode, Cull to Target, adjustable strictness | Local desktop app that sends results to Lightroom Classic, Capture One, Photo Mechanic and Bridge | Select plan from $10/month billed annually ($15 month to month) |
| Narrative | AI-assisted | Eye and focus assessments, Close-ups panel, Scenes with image ranking | Desktop app that ships to Lightroom, Photoshop and Capture One | Lite from $10/month billed yearly. Full eye and focus assessments start on Standard, from $20/month billed yearly |
| FilterPixel | Basic AI cull plus genre-based DeepCull | Genre modes for weddings, sports, concerts and conferences, with a score and reason for each photo | Desktop app with Lightroom Classic support | Standard from $14.99/month billed annually |
| Imagen | Automated culling with review, linked to Imagen’s editing | Culling profiles by strictness, duplicate grouping, focus and eye checks | Cloud-based | Culling from $12/month billed annually ($18 month to month). Included in the Limitless plan |
Prices are in USD as listed on each company’s pricing page in November 2026, and may vary by region.
Aftershoot is the main dedicated tool here that treats assisted culling as one mode among two. In AI-Assisted mode you get grouped duplicates, image scores and key-face highlights. You can compare up to 16 similar frames side by side in Survey Mode, set a target number of keepers, and send star ratings, color labels and flags to Lightroom Classic or Capture One. Because Aftershoot’s AI culling runs locally, nothing is uploaded and you can cull offline.
For a full ranked breakdown, including manual tools like Photo Mechanic and FastRawViewer, see our guide to the best culling software.
When Assisted Culling Works Best
Assisted culling is strongest when the subject is a person, the signals are technical, and the volume is high enough that checking every frame by hand is painful.
| Genre | How well assisted culling fits | Why |
|---|---|---|
| Portraits and headshots | Strong | Single faces give clear focus and eye signals |
| Weddings | Strong, especially with grouping | Huge volumes and lots of bursts. Expressions still need your eye |
| Events and conferences | Good for a first pass | Crowded frames and groups can confuse subject detection |
| Family and newborn | Good | Blinks and soft frames are common, but quiet in-between moments need judgment |
| Sports | Mixed | Motion and partial faces trip up general tools. Genre-specific modes do better |
| Wildlife, landscape and product | Limited | Most assisted culling is trained around people and faces |
For weddings in particular, grouping matters more than any single check. Our guide on how to cull wedding photos walks through a full wedding cull from import to final selects.
How to Get Better Results From Assisted Culling
- Set thresholds per shoot type. A corporate headshot session can take strict focus and eye settings. A documentary-style wedding needs looser ones, or you’ll reject frames full of real moments.
- Flag, don’t delete. Treat the reject pile as “probably not” rather than “gone”. Scan it once before deleting anything, especially frames with intentional blur or closed eyes.
- Group first, then judge. Clear each stack of similar frames before you assess single images. Most of the time saving comes from bursts.
- Decide cull in or cull out before you start. Cull out by removing what fails if you want full control. Cull in by starting from the AI’s picks if volume matters more.
- Write results to metadata. Make sure ratings, labels and flags are saved to XMP or your catalog so they survive the move into your editor.
- Keep a manual pass for the frames that matter most. First kiss, family formals, the client’s favorite people. Those deserve your full attention, whatever the scores say.
If you’re building this into a repeatable process, our AI culling workflow guide covers how to structure culling from card to client delivery.
What to Look for in Assisted Culling Software
| Question to ask | Why it matters |
|---|---|
| Does it handle your typical gallery size without slowing down? | A tool that’s fine on 300 headshots can stall on a 4,000-frame wedding |
| How well does it group duplicates and similar frames? | Grouping is where most of the time saving comes from on burst-heavy shoots |
| Can you compare frames side by side and inspect faces quickly? | The final call depends on expression, and that needs a fast close-up view |
| Can you override any AI decision easily? | Assisted culling only works if correcting the AI is quicker than ignoring it |
| Does it support your genre? | Most tools are tuned for people. Sports, events and non-people subjects vary widely |
| Does it keep your stars, color labels and flags? | Results should land in your editor exactly as you set them |
| Does it work with Lightroom Classic or Capture One? | Re-importing or re-rating in a second app cancels out the time saved |
| Does it run locally or in the cloud? | Local processing avoids upload time and keeps files on your machine |
| Is pricing flat or per photo? | Per-photo pricing adds up quickly in peak season |
| Can culled images move straight into editing? | Culling is only the first step of post-production, and a clean handoff saves the next one |
The real test is simple: after a full shoot, does the workflow feel faster, clearer and easier to trust than doing it yourself?
In a Nutshell…
Assisted culling has become a standard part of post-production because checking focus and eyes frame by frame was never a good use of a photographer’s attention. Whichever tool you use, judge it on how quickly it gets you to a confident final selection, not on how many frames it flags.
Good assisted culling clears the noise. The photographer still makes the call.
FAQs for Assisted Culling
What Is Assisted Culling in Photography?
Assisted culling is a way of selecting photos where AI checks every frame for issues like soft focus, closed eyes, poor exposure and duplicates, then scores and groups the images for you to review. The photographer makes every final keep-or-reject decision.
Is Lightroom’s Assisted Culling Free?
Assisted Culling doesn’t cost extra. It’s included in Lightroom and Lightroom Classic subscriptions, so you need an active Adobe plan that includes Lightroom. It isn’t available as a free standalone tool.
Does Assisted Culling Work in Lightroom Classic?
Yes. In Lightroom Classic, you’ll find Assisted Culling in the right-hand panel of the Library module and in the Import window, so you can flag frames before they reach your catalog. It’s also available in Lightroom desktop.
What Is the Difference Between AI-Assisted and AI-Automated Culling?
In AI-assisted culling, the AI scores, flags and groups images, but you choose every keeper. In AI-automated culling, the AI proposes a full set of keepers based on your settings and past culls, and you review and adjust its picks. Assisted culling gives you more control. Automated culling is faster on high-volume shoots.
Is Assisted Culling Good for Wedding Photography?
Yes, especially for the first pass. Weddings produce thousands of frames and lots of bursts, so grouping similar shots and flagging blinks saves real time. Expressions, candid moments and family formals still need your judgment, so plan a careful manual review of the key parts of the day.
Can Assisted Culling Replace Manual Culling?
No, and it isn’t meant to. Assisted culling removes technical checking, but it can’t judge composition, timing or emotion. It changes your starting point, so you make creative decisions on a cleaner, smaller set instead of reviewing every frame from scratch.