TL;DR
- Retouch temporary things, leave permanent features. Blemishes, flyaways, glasses glare and lint go; freckles, birthmarks, scars and braces stay unless a parent asks.
- Fix light and color before skin. Retouching sits on top of a consistent edit; do it last.
- Batch by setup, not by grade. Group frames that share a backdrop and light, set one hero image, sync, then review.
- Keep a spot-edit pass. Glare, braces, logos and backdrop seams are where batch settings miss.
- Pick tools by pricing model. Per-image pricing punishes volume; flat-fee tools get cheaper per portrait the more you shoot.
Retouching school and sports photography comes down to two things: consistency and restraint. Every portrait in a gallery should look like it came from the same session, and every child should still look like themselves. The fastest way to get there at volume is to batch the repeatable fixes, then spend your own time on the handful of frames that need it.
FIVE-HUNDRED kids. One day. A gym that smells like sneakers and floor polish. You nail the lighting, wrangle the basketball team into standing still, and then sit down on Sunday night to 1,200 faces that need to be print-ready before the order window opens.
This guide covers what to retouch (and what to leave alone), a batch workflow that works for picture day and game day, sport-specific fixes, and how the main tools compare on price in 2026.
What Does Retouching School and Sports Photography Involve?
Retouching school and sports photography means the light, consistent clean-up applied to high-volume portraits, individual student and athlete headshots, class photos and team photos, before they go to print, yearbook or an online gallery. It typically covers blemishes, stray hairs, glasses glare, shine, teeth and background distractions, applied in batches so hundreds of images match.
It is lighter than beauty or headshot retouching. Parents are buying a record of what their child looked like that year, not a glamour portrait, so the standard is “a good day”, not “a different face”.
What to Retouch (and What to Leave Alone)
The simplest rule most school photographers use: remove what will be gone in two weeks, keep what will still be there next year. When in doubt, leave it and let the parent opt in.
| Retouch by default | Leave alone unless asked | Always ask first |
|---|---|---|
| Active breakouts and small blemishes | Freckles and moles | Scars |
| Flyaways and stray hairs | Birthmarks | Braces removal |
| Glasses glare and reflections | Natural skin texture and pores | Missing or chipped teeth |
| Forehead and nose shine | Face and body shape | Cuts, bruises or swelling from an injury |
| Lint, crumbs, dust on clothing | Skin tone (beyond white balance) | Anything that changes expression |
| Backdrop seams, cones, bottles, clutter | Gaps between teeth | Heavy teeth whitening |
Two reasons this matters beyond taste. First, over-retouched school photos have a history of going viral for the wrong reasons, parents have publicly called out studios for erasing freckles and scars. Second, if retouching is a paid add-on, the untouched version has to be good enough on its own, or parents feel pushed into buying it.
Basic vs Premium Retouching: What Parents Are Paying For
Most school photography companies sell retouching as a per-image add-on in two or three tiers. As a real-world example, one US studio currently lists:
| Tier | Typical inclusions | Example price per image |
|---|---|---|
| Basic | Minor blemish removal, softening flyaway hairs | $11 |
| Premium | Basic, plus skin softening and redness reduction | $18 |
| Braces removal | Digital removal of braces | $25 |
Example pricing from Bill Smith Photography’s published school retouching options; prices vary widely by studio and region.
If you batch retouch every image anyway, this is worth thinking through: you can either include a light “basic” pass in every package and sell premium as the add-on, or keep all retouching opt-in. Either way, make sure the ordering page says clearly what each tier does.
Why Volume Retouching Is Harder Than It Looks
| Challenge | Why it eats time | What fixes it |
|---|---|---|
| Tight turnaround | Schools and leagues expect proofs within days, and yearbook deadlines don’t move | Batch the repeatable fixes; reserve manual time for outliers |
| Consistency across hundreds of faces | Parents compare siblings’ and friends’ photos side by side | One base setting per lighting setup, synced across the group |
| Shifting light and backdrops | Kids move, stations change between teams, gym light mixes with flash | Correct color and exposure first, then retouch |
| Group and team photos | 15–30 faces per frame, each needing different treatment | Subject-aware retouching instead of one global setting |
| Natural vs polished | Too much smoothing looks fake; too little costs reorders | Low default strength, adjusted per subject |
| Volume fatigue | At 3 minutes an image, 500 portraits is 25 hours of work | Sync + review instead of editing one by one |
How to Batch Retouch School and Sports Photography
The order matters more than the tool. Retouching sits on top of a consistent edit, so if color and exposure drift, your retouching settings will too.
Step 1: Cull and Color-Correct Before You Retouch
Cut blinks, soft frames and duplicates first, there’s no point retouching a frame nobody will buy. Then lock white balance and exposure per lighting setup. If you use AI culling, it can flag closed eyes and missed focus across a full picture day; if you edit in Lightroom Classic, sync a base develop setting per station.
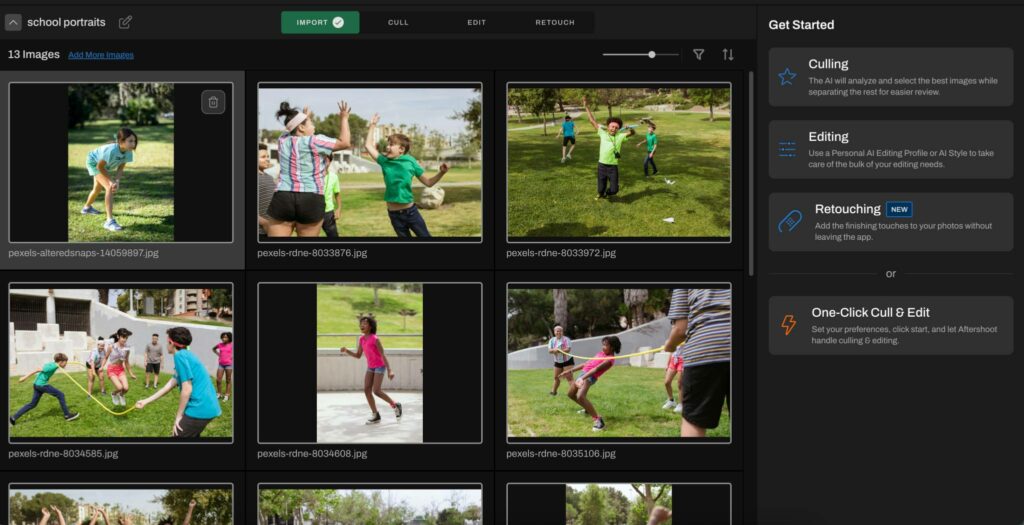
In Aftershoot, AI culling, editing and retouching run in the same app, so you can move straight from selects to retouching without exporting and re-importing. It works with RAW, JPEG and TIFF files.
Step 2: Group Images by Setup
Batch by backdrop and light, not by grade or roster order. A typical split:
- Individual portraits, station A (e.g. blue backdrop)
- Individual portraits, station B
- Class or team group photos
- Outdoor or action frames (sports)
Each group gets its own base retouch. One setting across all of them is the most common reason batch retouching looks uneven.
Step 3: Set a Base Retouch on One Hero Image
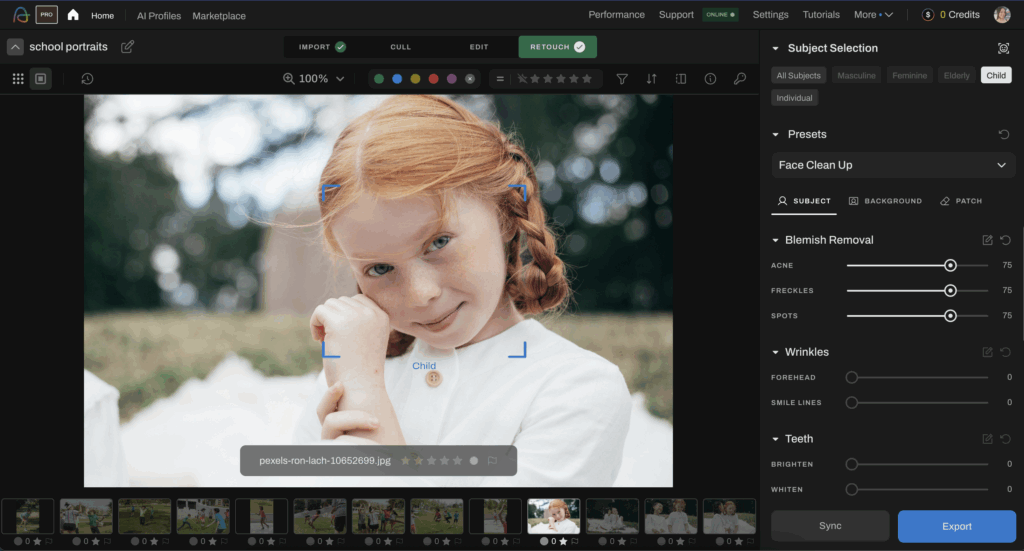
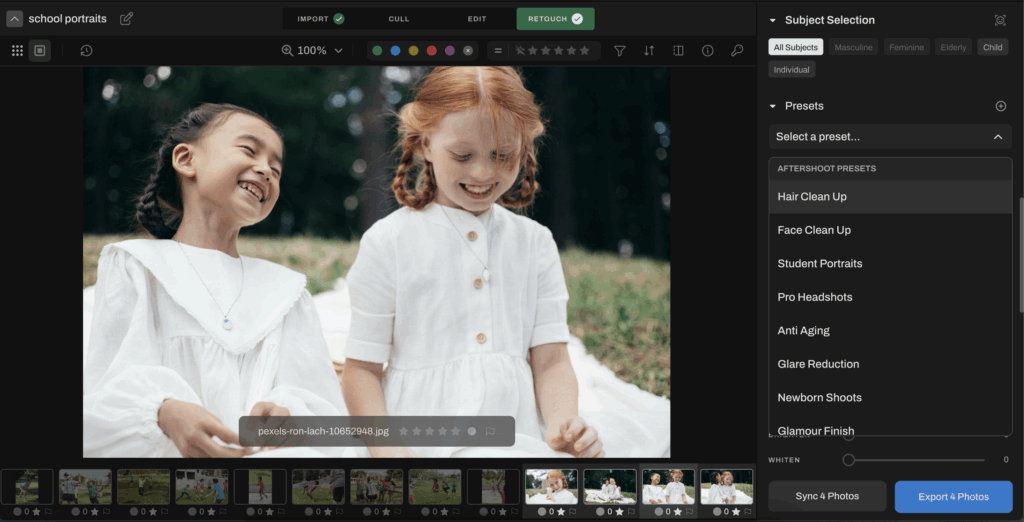
Pick a representative frame from the group and dial in a light base: blemishes, shine, flyaways, glasses glare, a touch of eye brightening. Start from a preset rather than a blank panel, and keep strengths low, you can always add, but over-smoothed skin across 500 images is expensive to undo.
For group and team photos, use subject-aware settings so a row of teenagers and a coach don’t get the same treatment. In Aftershoot’s AI retouching for school and sports portraits, you can target retouching by subject (all subjects, masculine, feminine, or by age) and start from built-in student portrait presets, then save your own.
Step 4: Sync Across the Group
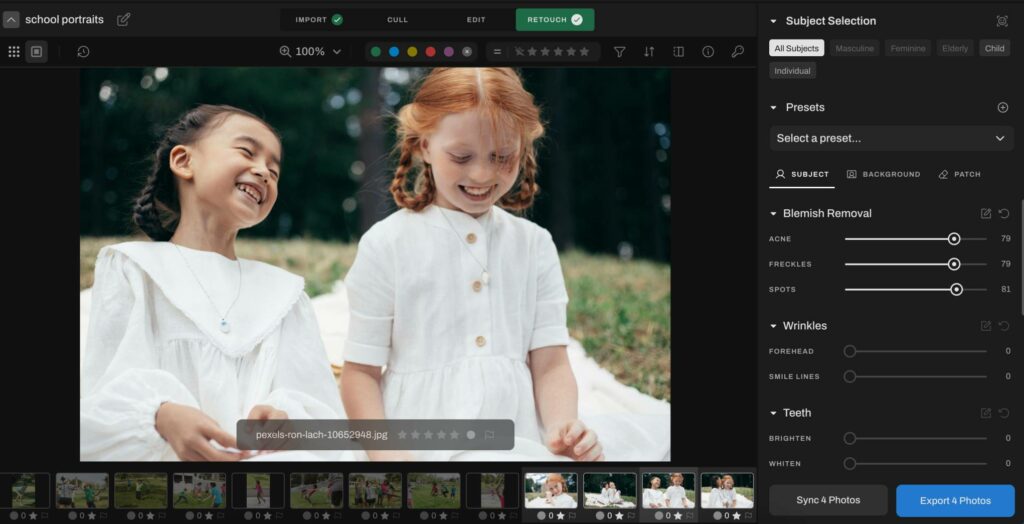
Apply the hero settings to every image in the group. Then flip through at fit-to-screen size looking for outliers rather than re-checking every frame at 100%.
Step 5: Clean Up Backgrounds, Clothing and Distractions
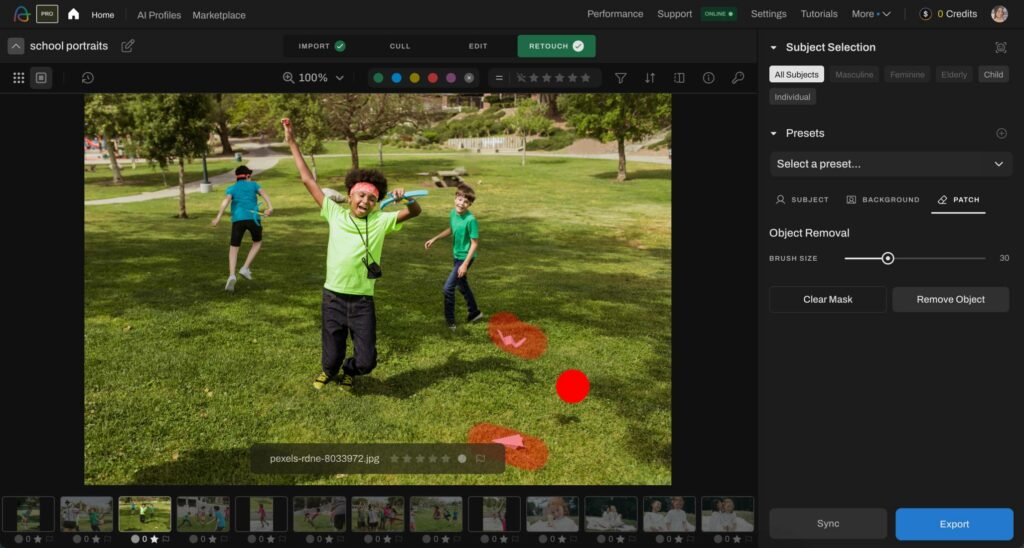
This is where volume photographers used to lose hours in Photoshop:
- Distractions: water bottles, cones, exit signs, a parent in the doorway. Use object or people removal rather than cloning.
- Backdrop seams and wrinkles: patch obvious lines; for yearbook sets, some photographers replace the backdrop entirely for a uniform look.
- Clothing: wrinkled shirts and jerseys. Dewrinkle tools keep the fabric texture instead of smearing it.
Aftershoot handles these with Object Removal, People Remover, Background Replacement (with added shadows so subjects don’t look cut out) and Cloth Dewrinkle, all inside the same retouching panel.
Step 6: Review, Export to Spec and Deliver
Toggle before/after on a sample from each group to check nothing is overcooked. Then export to your lab’s and the yearbook’s crop ratios and file specs, crop consistency matters as much as retouching for yearbook pages. For parent delivery, a gallery with face search saves you from sorting 500 kids into folders by hand; Aftershoot Galleries includes face detection and proofing.
Want to see the full cull → edit → retouch → deliver flow before trying it on your own files? Take the five-minute product tour.
Spot-Edit Checklist for the Outliers
Batch settings get most frames right. These are the ones to check by hand:
| Problem | What to do |
|---|---|
| Heavy glasses glare | Run glare removal, then patch any leftover reflection on priority frames. If the eye is fully hidden, flag it for a retake. |
| Braces | Leave them. Reduce cool casts on metal rather than brightening teeth hard. |
| Acne and shine | Moderate cleanup that keeps pore texture; small highlight reduction on hot spots. |
| Mixed gym lighting | Re-group by court side or backdrop panel and re-sync white balance per subgroup. |
| Uneven skin tones across a team | Nudge tint on outliers only; don’t push everyone to one tone. |
| Flyaways on banner or featured images | Stray hair cleanup on the set, then manual patching on anything printed large. |
| Backdrop wrinkles or seams | Patch obvious lines; add a light edge burn in your finishing editor. |
| Jersey logos and moiré | Lower sharpening on fabric; apply moiré reduction on problem patterns. |
| Eyes and catchlights | Gentle clarity and brightening; one clean catchlight per eye reads best in print. |
| Crops | Confirm every crop matches the lab or yearbook ratio before export. |
Also Read: how to remove glare from glasses in photos
Retouching Sports Photos: Team, Individual and Action Shots
Sports jobs usually mix three kinds of images, and each needs a different amount of retouching.
| Image type | Retouch level | Focus on |
|---|---|---|
| Individual athlete portraits (media day, banners) | Same as school portraits | Blemishes, sweat and shine, flyaways, jersey wrinkles, glare from eye black or visors |
| Team photos | Light, subject-aware | Consistent tone across 15–30 faces, stray objects on the floor or field, uniform creases |
| Action and game shots | Minimal | Color and exposure consistency; skip skin retouching except on hero images for social or print |
A few sport-specific habits help:
- Keep the effort visible. Sweat, flushed cheeks and grass stains on game shots are part of the story. Reduce shine on posed portraits, not action frames.
- Watch team colors. Aggressive skin-tone or saturation fixes can shift jersey colors. Check the team’s primary color after syncing.
- Banners get extra time. Anything printed at banner size shows every stray hair and seam; give those frames a manual pass.
Also read: sports photo editing tips
Manual vs AI vs Outsourced Retouching
| Approach | Best for | Typical time per portrait | Cost model | Trade-off |
|---|---|---|---|---|
| Manual (Photoshop / Lightroom) | Small jobs, hero images, complex fixes | Roughly 2–5 minutes | Adobe subscription | Full control, doesn’t scale past a few hundred images |
| AI batch retouching | Picture days, leagues, yearbooks | Seconds to apply, plus review time | Flat monthly fee or per-image credits | Needs a review pass for outliers |
| Outsourced retouching service | Studios short on staff in peak season | 24–48 hour turnaround per batch | Per image (e.g. from $0.15 at one service) | Less control, and student images leave your hands: check data-handling terms |
Most volume photographers end up combining the first two: AI for the batch, manual for the 5–10% of frames that need it.
If you’re manually retouching in Photoshop, work on a separate layer with the spot healing brush for blemishes and the clone stamp for backdrop cleanup, so every fix can be masked back.
Best Retouching Software for School and Sports Photography in 2026
For volume work, the pricing model matters as much as the features. Per-image pricing is predictable for small jobs but climbs fast across a school season; flat-fee plans get cheaper per portrait the more you shoot.
| Tool | Best for | Pricing (as of Sept 2026) | Pricing model | Runs |
|---|---|---|---|---|
| Aftershoot | Culling, editing and retouching in one app | Retouch from $20/month billed annually ($25 monthly); Cull + Edit + Retouch from $45/month billed annually | Flat fee, unlimited images | Locally on Mac/Windows |
| Imagen | Style-matched editing with per-photo AI tools | Pay-as-you-go with a $7 monthly minimum, AI tools like Smooth Skin charged per photo; Limitless $179/month billed annually | Per photo or flat fee | Cloud processing |
| Evoto | Dedicated portrait retouching, background and batch crop | Credits from 1 per photo: pay-as-you-go packs from $49 for 200 credits; annual plans from $89 for 800 credits | Per-image credits | Desktop, mobile, web |
| Retouch4me | Photoshop/Lightroom plugins for specific retouch tasks | Plugins from $124 each (one-time); cloud plans from $20/month for 200 retouches | One-time per plugin or per-retouch | Plugin / standalone |
| Adobe Lightroom + Photoshop | Catalog, color, and manual retouching | Photography plan $19.99/month (annual, billed monthly) | Subscription | Locally + cloud |
| Outsourced service (e.g. ColorClipping) | Handing off peak-season overflow | From $0.15 per image | Per image | Service |
Prices change often; check each vendor’s pricing page before you commit.
How to choose:
- Your bottleneck is retouching only and you like your current editor: a dedicated retoucher (Aftershoot Retouch, Evoto, Retouch4me) alongside Lightroom.
- You want one app from selects to delivery: Aftershoot or Imagen. The main differences are pricing model (flat vs per photo) and where processing happens (local vs cloud), relevant if a school contract restricts where student images are stored.
- You shoot a few schools a year: per-image credits can work out cheaper.
- You shoot a full season of schools and leagues: do the math, at a few thousand images a month, flat-fee pricing usually wins.
How Much Time Does Batch Retouching Actually Save?
Here’s an illustrative calculation for a 500-portrait picture day. Your numbers will depend on how heavy your retouch is and how many outliers you get.
| Parameter | Manual retouching | Batch retouching + review |
|---|---|---|
| Time per portrait | ~3 minutes | ~20 seconds (sync + review) |
| 500 portraits | ~25 hours | ~3 hours |
| Time saved | – | ~22 hours |
Those 22 hours are the difference between delivering proofs mid-week and delivering them the following Monday; and in peak season, between taking the next school contract or turning it down. Faster, more consistent delivery is also what schools remember when they decide whether to rebook you.
Your Next Picture Day, Done Faster
Retouching school and sports photography works when you keep it light, keep it consistent, and keep your own time for the frames that need it. Volume retouching works when you keep it light, keep it consistent, and keep your own time for the frames that need it. Batch the repeatable fixes, respect the features that make each kid who they are, and review before anything goes to print.
If you want to test this on your own files, Aftershoot’s retouching comes with a 30-day free trial and no credit card.

FAQs for School and Sports Photography Retouching
Q1. Should you retouch children’s school photos?
Light retouching of temporary things such as blemishes, flyaways, glare, lint, is standard and widely expected. Permanent features like freckles, birthmarks and scars should be left alone unless a parent specifically asks. Offering retouching as an opt-in, with clear descriptions of each tier, avoids most complaints.
Q2. What does basic vs premium retouching include on school photos?
Basic retouching usually covers minor blemish removal and softening stray hairs. Premium typically adds skin softening, redness reduction and sometimes teeth whitening. Braces removal is often a separate, higher-priced option. Inclusions and prices vary by studio.
Q3. How long does it take to retouch school portraits?
Manually, expect around 2–5 minutes per portrait depending on the retouch. With batch retouching, the setting is applied in seconds and most of your time goes into reviewing outliers, roughly 3 hours for 500 portraits instead of about 25.
Q4. Can AI retouch group and team photos?
Yes. Subject-aware tools detect each face in a group shot and apply retouching per person, so a coach and a row of 10-year-olds aren’t treated the same. Check large group shots at 100% before export, since small faces are where AI misses show up.
Q5. How do you remove glasses glare from school photos in bulk?
Use a retouching tool with glare removal and sync the setting across the batch, then manually patch any frames where glare covers most of the eye. Where the eye is completely hidden, a retake is usually faster than a reconstruction.