Is starting a photography business a good idea?
Could I make money doing this?
Is the photography business market too saturated?
Every photographer whose work is now sprinkled through your social feeds once asked these same questions.
Ditching the 9-5, becoming your own boss, and regularly exercising your creative muscles are enticing, so it’s not surprising that the thought of starting a photography business is appealing.
The opportunities in the photography industry are endless. There will always be a market for beautiful images. Before going all-in, it can be smart to explore photography job opportunities on platforms like Jooble to see what skills clients are hiring for and how the market is evolving.
However, in a world where just about anyone can use a camera and the industry is growing by the day, it’s increasingly important to build solid business practices from the start to ensure your photography business is a long-term success.
While most photographers launch their business by starting an Instagram account and getting to work, neither will ensure you are running a sustainable business legally or profitably.
TL;DR: 30‑Day Starter Checklist
Start by getting the foundations live, not perfect. In week one, choose your niche, publish three small sample galleries that match it, add a clear price anchor (“Collections from $…”) and a Check availability button. Handle the basics that keep you legal and bankable: pick a business structure, get your free EIN at IRS.gov (or your government’s portal), open a business checking account, register with your state, and apply for any local licenses you need. Then move.
In week two, protect your bookings and your time. Load your contract, invoice, and e‑signature templates; switch on online payments; price from a simple floor you can defend (see Pricing below); and buy insurance that fits your shoots (liability + gear at minimum).
Weeks three and four are about being findable and bookable. Ship a clean four‑page site (Home, Services, Portfolio, Contact) with your city in the headings. Claim your Google Business Profile, add services and a plain‑English description, and post fresh photos.
Publish one location/venue guide on your blog and ask five recent clients for honest Google reviews. When you feel the calendar tighten, offload culling, editing, and retouching to Aftershoot so you can keep 24–48‑hour sneak peeks and 1–2‑week galleries without working nights. The flat‑rate, unlimited model removes the “I’ll save it for later” trap.
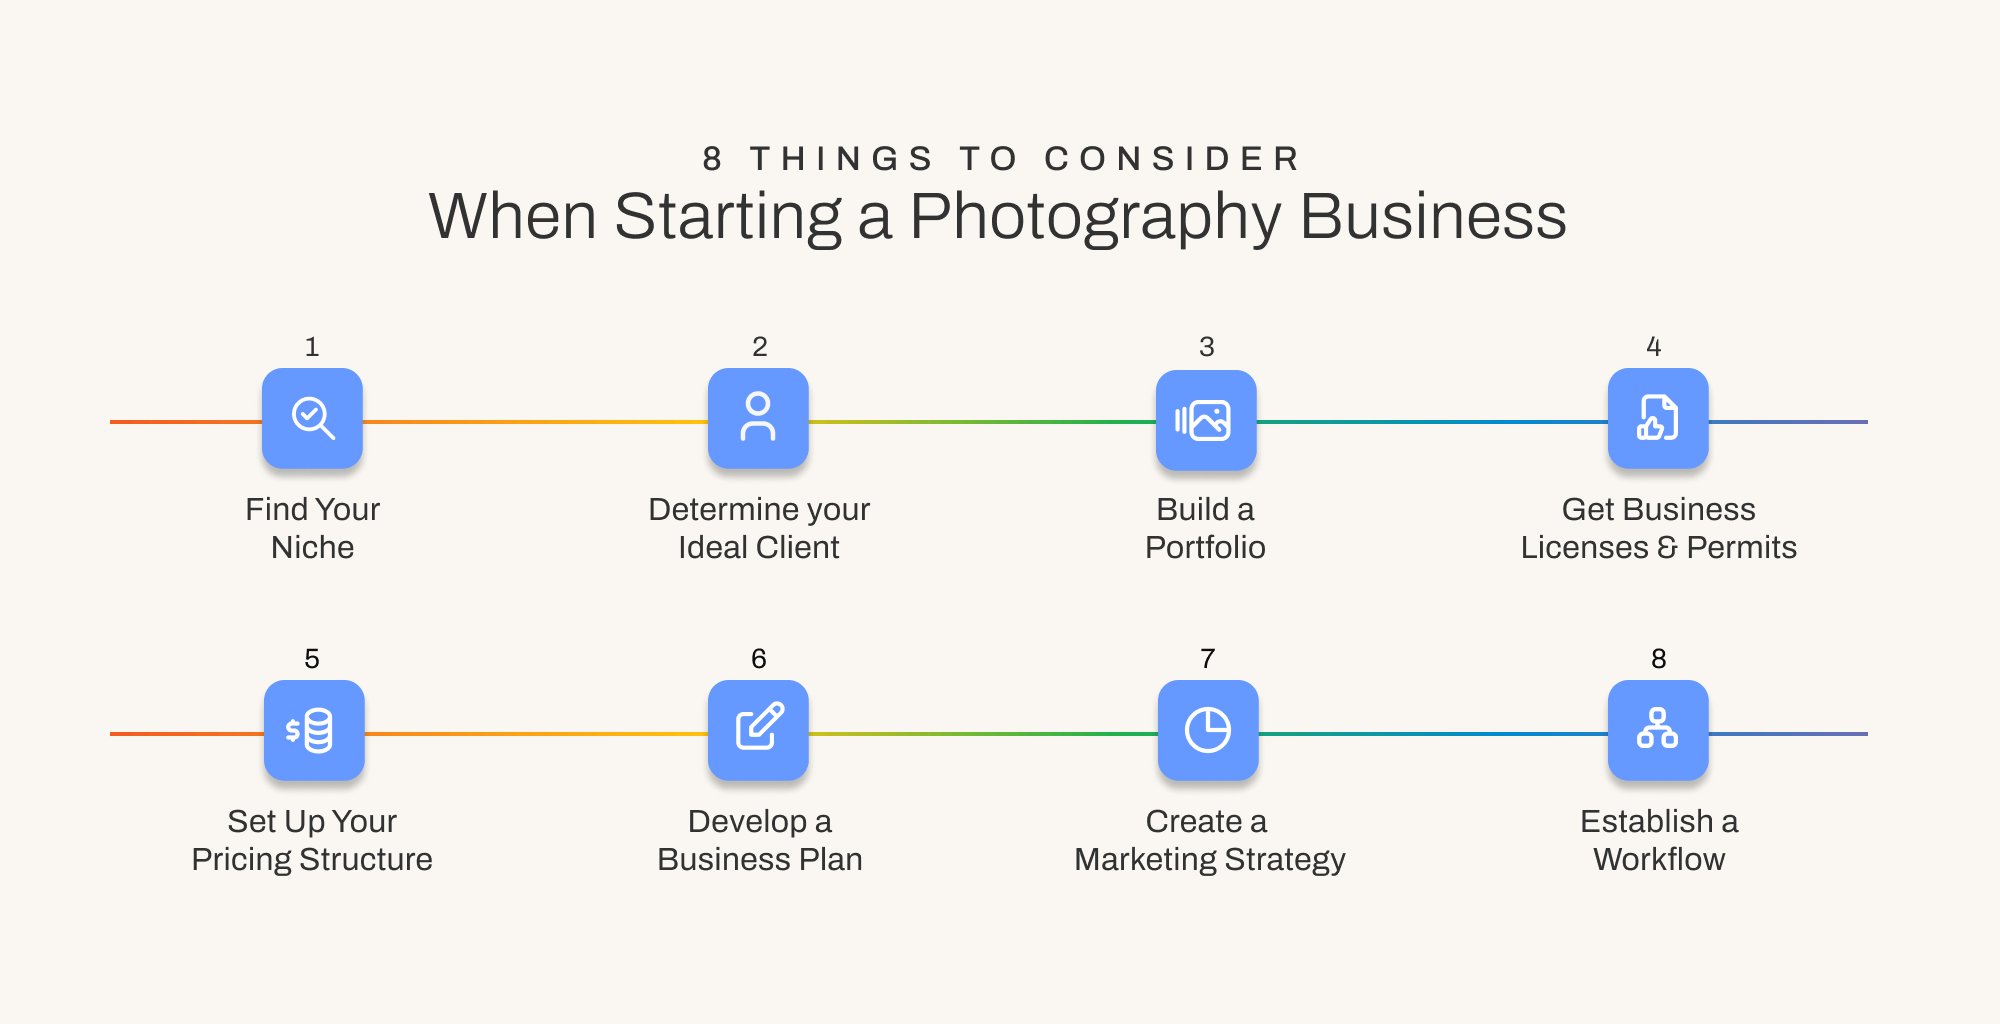
In this article, we will talk about eight things to consider when starting a photography business.
1. Find your niche for your photography business

It can be tempting to dabble in different types of photography at the start. Instead of offering a range of services, hone in on one and master it.
Finding your niche might be as simple as focusing on family photography or weddings.
It could also involve narrowing what you offer even further.
- Elopements instead of big weddings
- Documentary-style newborn sessions instead of a more editorial approach
- Studio space instead of the great outdoors
As you gain more experience, you can better determine your philosophy, style, and in which direction you want to move.
Does that mean you can’t try other types?
No, but when you’re starting, having a niche to build from will set you up for success.
2. Determine your ideal client
Similar to knowing your niche, it is important to know your ideal photography client, AKA your target market.
Determining your ideal client is pivotal for creating a marketing strategy, a portfolio, and a website that attracts those dream clients that you want to work with.
Some questions you might want to ask yourself:
- Male or female?
- Age?
- Children?
- Do they live in a booming city or small town?
- What style/vibe do they possess?
- What do they do for work? What does a typical day look like?
- What hobbies do they have?
- Where do they hang out online?
- Do they drink cosmopolitans in their free time or kombucha?
- What businesses do they engage with?
- Where do they shop?
- What blogs do they follow? What podcasts do they tune into?
- What do they love? What things are they drawn to?
- What inspires them?
- What are their biggest dreams?
- What motivates them? Fears? Frustrations? Biggest pain point?
- What keeps them up at night?
- What do they really want? What do they need?
Knowing all these details will help you craft a business that speaks directly to your ideal client.
They will feel connected to you because you are creating a business with them in mind every step of the way.
3. Build a portfolio
The next step is to build a portfolio that reflects your niche.
Here’s a list of the 11 best online proofing galleries currently on the market.
If you have decided to focus on family photography, it’s important to showcase family photos.
If you want to build a wedding photography career, having examples of work from weddings is crucial.
In order to attract your ideal clients in the niche you want to focus on, it is imperative to show that type of work.
There is an age-old question to consider: How can I build a portfolio and show it to potential clients if I don’t have any clients yet?
- Offer free sessions in the beginning to build your portfolio.
- Offer to second shoot, assist, or shadow other photographers.
- Plan a styled shoot that reflects the type of work you want to book.
4. Get business licenses & permits

After finding your niche and building a portfolio, you may acquire some paying clients.
Now is the time to develop legal processes, starting with contract and invoice templates.
Additionally, you will want to open a business bank account, register your business, acquire a business license for the location (or locations) where you are providing your services, and get a general idea of tax laws that might apply to you.
It sounds like a lot, and it is.
These legalities seem like a headache when all you want to do is get out and create.
But having these things in place will protect your right to getting paid, ensure that you can provide your services, and prevent you from getting a surprise tax bill.
Register the business, then separate the money. Choose a structure (many start as sole prop or LLC), get your EIN free at IRS.gov (avoid third‑party “EIN services”), and open a business checking account so bookkeeping takes minutes, not hours.
Add any required city/county business licenses and a sales‑tax permit if your state taxes photography services or digital files.
Keep a simple binder of signed contracts, usage/licenses, reschedule/cancellation terms, and delivery timelines. Buy liability and gear coverage; add studio, auto, or workers’ comp if they apply to your shoots.
If you plan to photograph on public land, check the specific park or city page for permit rules before you promise a date.
Track your expenses
It is never too early to start tracking your expenses!
- Keep all of your receipts (both physical and digital)
- Track your mileage
- Calculate your work-from-home space
Keep the books simple and current
Create a small chart of accounts (income, COGS/prints, software, insurance, gear, travel/mileage, education, taxes). Once a month, reconcile your bank, tag transactions, export a one‑page P&L, and move your quarterly tax set‑aside. Use a dedicated card for business purchases so this takes ten minutes, not two hours. You’ll thank yourself at tax time and when you raise prices with confidence.
Do this so that when it comes time to pay your taxes, you can get as many breaks as possible.
5. Set up your pricing structure

First and foremost, you need to determine your cost of doing business.
Your “cost of doing business” refers to the expenses incurred by your business. It includes all the costs associated with running the business on a day-to-day basis.
Some examples of business expenses might include:
- Website hosting
- Gallery hosting
- CRM such as Dubsado
- Studio fees
- Business insurance
- Photo editing software
By accurately tracking these costs, you can determine the minimum amount you need to charge to cover your expenses and ensure profitability.
Next, you should establish your desired personal yearly salary. Consider factors such as your experience, expertise, and the lifestyle you wish to maintain.
Research the tax obligations specific to your location and consult with a tax professional if needed. Plan to set aside a portion of your earnings to meet your tax obligations.
Once you clearly understand your cost of doing business, desired salary, and tax obligations, you can calculate how much revenue you need to generate.
However, pricing yourself as a photographer goes beyond simply covering your expenses.
Consider market rates, the perceived value of your work, and your ideal client’s willingness to pay.
Price from a floor you can defend, then sell from the middle
Set your annual target first: your take‑home goal + estimated taxes + overhead (software, gear, insurance, rent, web, education) + a 10–20% profit buffer. Divide that by the real number of sessions you can deliver well. That gives you a floor price per session. Example: $80,000 take‑home + $20,000 taxes + $18,000 overhead + $12,000 buffer = $130,000. If you can handle 100 sessions, your floor is $1,300 before products/COGS.
Package around that floor. A “from $…” base that meets the floor, a middle package that’s the obvious choice, and a top package that sets the anchor. Add a Saturday or rush‑turnaround fee instead of quiet discounts, and review your close rate quarterly. When edits threaten your schedule, let Aftershoot carry the first pass so your “what you get” always includes fast, reliable delivery.
Divide your total expenses by the number of billable hours or sessions you anticipate in a year to determine the minimum amount you need to charge per project or hour to cover your costs.
It’s also important to know that despite what David Rose from Schitt’s Creek says, business expenses aren’t free money back.

We reviewed Studio Ninja’s photography business management app. It’s definitely worth checking out to keep track of your finances effortlessly.
You can also get a 30% discount on any 12-month Studio Ninja subscription! Simply enter the code AFTERSHOOT30 at checkout.
6. Develop a photography business plan

Developing a business plan for your photography business is a critical step when launching a photography business.
It serves as a roadmap that guides your decisions, helps you stay organized, and increases your chances of success.
A business plan provides a framework for making key decisions, such as choosing your target market, determining pricing strategies, and setting marketing priorities. Using an AI business plan generator can help simplify this process by providing a clear structure for your ideas and goals.
With a plan in place, you can refer back to it when faced with choices or challenges, ensuring your decisions align with your overall business goals.
During the business planning process, you should conduct a self-assessment and analyze the strengths and weaknesses of your photography business.
This introspection allows you to identify what makes you unique as a photographer and how you stand out from your competitors.
On the flip side, it will enable you to determine the areas in your business that you can focus on improving.
Your one‑page plan you’ll actually use
Write what you shoot and where, the three packages with a clear “from $…”, how many sessions per month keep the lights on, and which channels you’ll show up on weekly (website/GBP, one primary social, email list, vendor partners).
Promise specific delivery windows (sneak peeks in 24–48 hours; full gallery in 1–2 weeks), note the risks you will cover (backups, insurance, a second shooter), and set two numbers you’ll check monthly: P&L and referral rate. Keep it on one page so you’ll read it.
7. Create a marketing strategy

Once you’ve established your ideal client, you can start to work on a marketing strategy that not only attracts those clients but keeps your calendar full.
The first thing is to develop your brand:
Establish a strong and cohesive brand identity that reflects your style, values, and your ideal clients.
This includes designing a logo, choosing a color scheme, and creating a consistent visual voice across your website, social media profiles, and marketing materials.
Build an online presence:
Create a professional website that showcases your portfolio, services, and contact information.
Do the work that brings inquiries this month
- Complete your Google Business Profile and post weekly. On the site, put your city in the H1/H2, show a starting price, and make “Check availability” the button people can’t miss.
- Publish one location or venue guide per week and link it to your Services and Contact pages.
- Email ten venues or vendors with a vendor‑friendly album link and a clear credit line they can copy.
The mix is simple: be discoverable, be useful, and make it easy to book you. When post‑processing gets in the way of publishing, let Aftershoot handle the cull→edit→retouch loop so marketing never stalls.
Additionally, utilize social media platforms that align with your ideal clients, such as Instagram, Facebook, or Pinterest, to share your work, engage with your audience, and build a following. Build an effective social media marketing strategy that will help you grow your business
8. Establish a workflow

Even if you don’t have the budget to subscribe to project management software right away, having a workflow that applies to every client is crucial for time management, efficiency, customer experience, and staying on track.
As your career progresses, you may find that there are more steps to incorporate. It can be as simple as building a spreadsheet with the following steps.
Steps in a Photography Workflow
- Receive inquiry (if using a PM platform, enter client information in the database)
- Respond to inquiry
- Create contract
- Client signs contract
- Co-sign contract
- Invoice for deposit
- Deposit received
- Date scheduled
- Location confirmed
- Location scouted (if necessary)
- Session complete
- Images backed up
- Images culled with Aftershoot
- First pass of edits (if using Aftershoot EDITS, run the images through once)
- Second pass (if using Aftershoot, make final tweaks)
- Final tweaks
- Export images
- Backup edits
- Upload to gallery
- Deliver to client
- Invoice for final payment
- Receive payment
A delivery‑first workflow clients remember
Send an instant inquiry reply with a calendar link and three short FAQs. Book with contract + retainer in one move. Back up cards before bed. The next morning, cull in minutes and apply your editing style so you can share sneak peeks within 24–48 hours and deliver the full gallery in 1–2 weeks.
Close strong: deliver, collect the balance, ask for a Google review (no incentives), then invite referrals with a small add‑on for booked friends.
Do a short monthly admin pass: reconcile the books, refresh your GBP post, publish one blog, and update your portfolio.
If any step keeps slipping, move culling, batch edits, and natural retouching into Aftershoot. That’s how you protect your time, your margins, and your reputation for speed.
Having a photo editing workflow can be particularly helpful for seeing the scope of upcoming work at a glance and is a beneficial process to establish at the start of your business.
Building a Successful Photography Business
You can do many additional things to level up your business, but starting your photography business with these eight essential steps gives you a foundation for success.
Finding a niche, establishing your target market, and building a portfolio can improve your craft and start carving out your place in the industry.
Covering all the legal bases will prevent surprise tax bills and fines and set you up for success when you make more money.
When you begin booking clients, charging enough is crucial to cover your costs and make a profit.
Ensuring you have a business and marketing plan will provide a road map for long-term sustainability.
Establishing a workflow creates consistent experiences for your clients and allows you to see your scope of work at a glance.
If you want to get an extra step ahead in quality and efficiency, use Aftershoot to speed up your post-shoot workflow.
Do I need an LLC to start?
Not on day one. Many begin as sole proprietors, keep a separate bank account, use a real contract, and carry liability + gear insurance. When volume grows, talk to a local CPA/attorney about switching structures.
Do I need a business license?
Usually, yes—city and county rules vary. Check your local site for business licenses and whether your state taxes photography services or digital goods. Keep proof handy so event venues don’t hold up your date.
Is an EIN required if I’m solo?
Not always, but it’s free at IRS.gov and useful for banking, 1099s, and keeping your SSN off paperwork. Use the .gov site—don’t pay third‑party “EIN” sites.
What insurance do photographers actually carry?
Start with general liability and equipment/inland‑marine. Add studio, commercial auto, or workers’ comp if they fit your shoots. The right policy saves you from one bad day.
How do I keep delivery fast when I’m busy?
Standardize your flow and offload the time sinks. Cull, batch edit, and light retouch with Aftershoot so you protect 24–48‑hour sneak peeks and 1–2‑week galleries. Speed plus consistency drives referrals.