Different Culling workflows with AfterShoot
While Using AfterShoot is a simple process, the way the app is used might differ depending on what your workflow looks like.
Usually, there are 2 different workflows involving culling and editing the images, namely:
- Culling the images and then Importing them into Lightroom or Capture One Pro for editing
- Importing the images into Lightroom/Capture One Pro and then Culling them from there.
In this blog post, we will outline how you can use Aftershoot with each of the above-mentioned workflows, as they differ slightly so in the approach.
Using AfterShoot before importing your images (recommended)
If you plan on culling your images before importing them into Lightroom or Capture One, things are pretty straightforward.
To get started, you open AfterShoot and create a new Album. After that, drop your folder into AfterShoot, select your thresholds and start the cull.
Once the culling is completed, you can import the images into Lightroom or Capture One with a single Click and proceed with your editing.
More information on Doing this can be found in our Earlier Blog here:
https://aftershoot.com/tutorials/how-to-cull-photos-quickly-with-aftershoot/
This is the recommended workflow as you only import what images you want into Lightroom/Capture One Pro.
This is not only faster but also saves a lot of time that you otherwise would have to spend waiting for the Smart Previews to be generated!
Using AfterShoot after importing your images
Often, your workflow might require you to import all the images directly into Lightroom or Capture One before you start the cull.
This might be done for various reasons, some of which might be: to automatically back them up, do a bulk rename, automatically apply presets, etc.
To use AfterShoot in this case, there are certain things you need to do to ensure that everything works as expected!
Workflow for Lightroom Classic
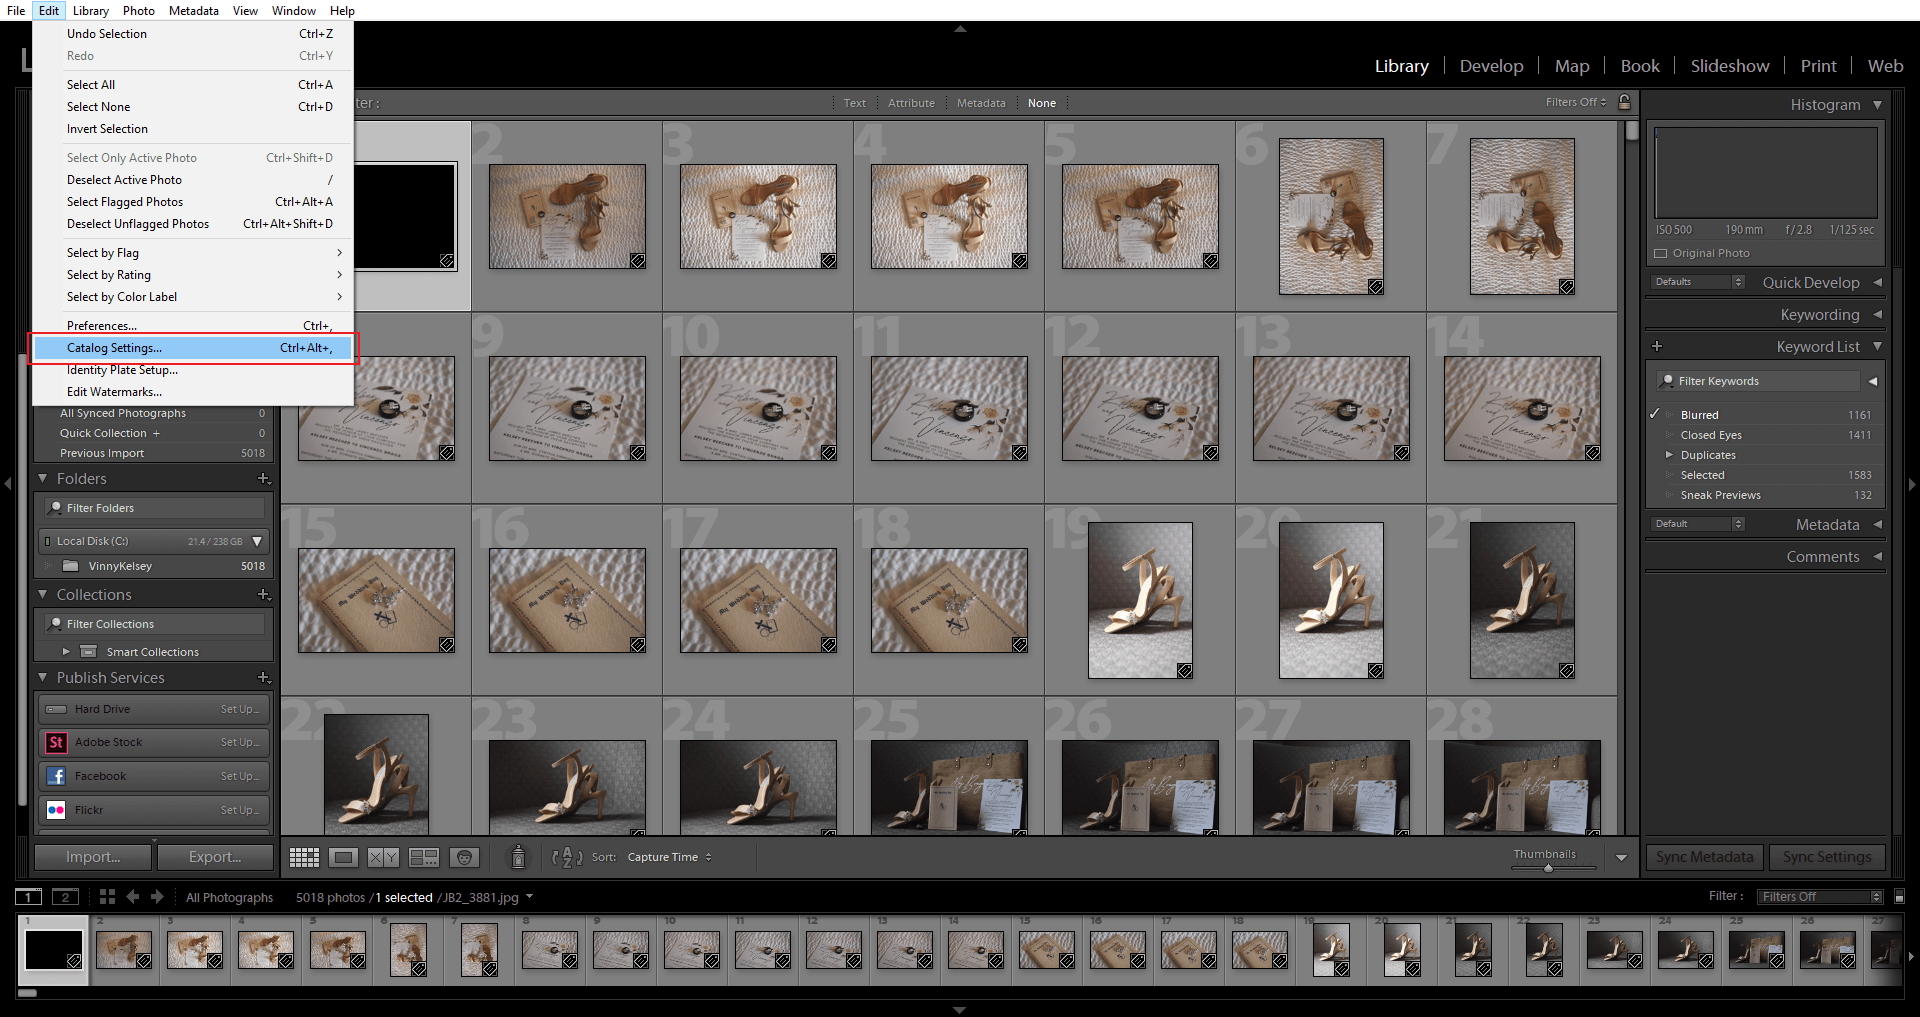
Step 1: Make sure that you write the changes to XMP files in your catalog
If you have any edits made to your images in Lightroom, this step is important as it ensures that none of those changes are lost when AfterShoot adds its stars and colors to them.
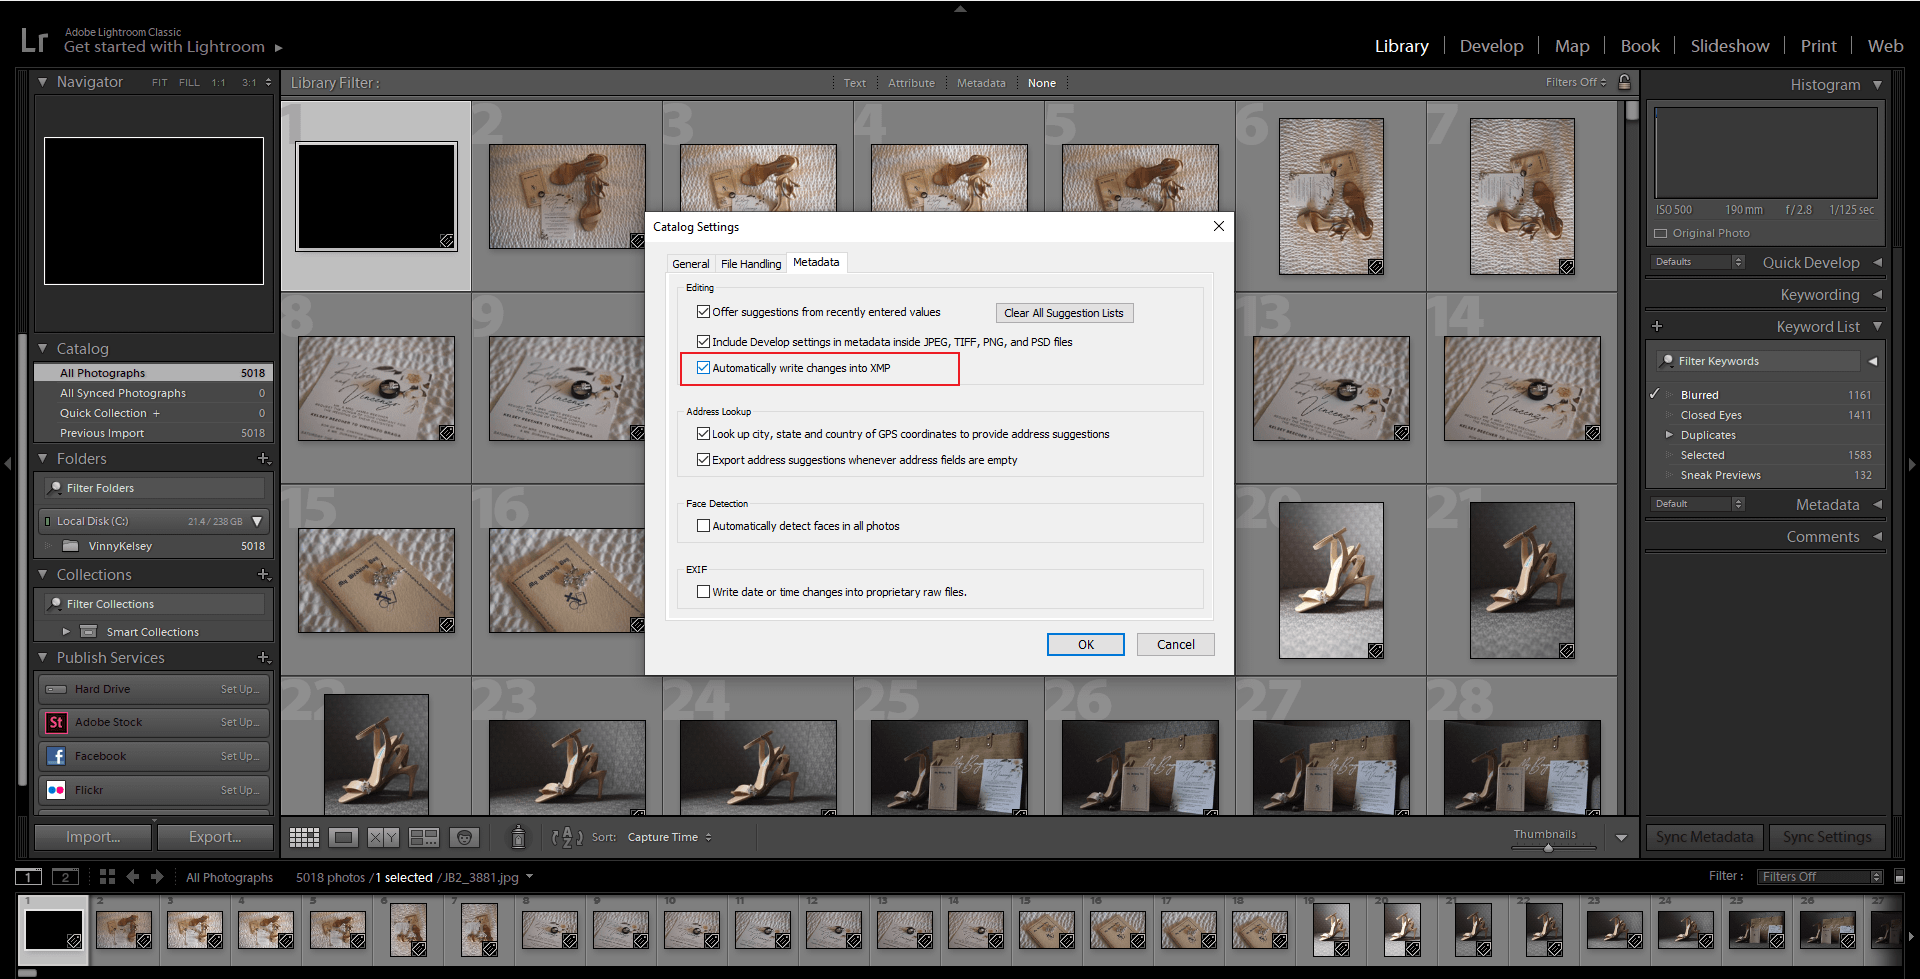
To do so, head over to your Lightroom’s Catalog preferences (File -> Catalog Settings) / (Lightroom Classic -> Catalog Settings) and make sure that the option called “Automatically write changes into XMP” is enabled.
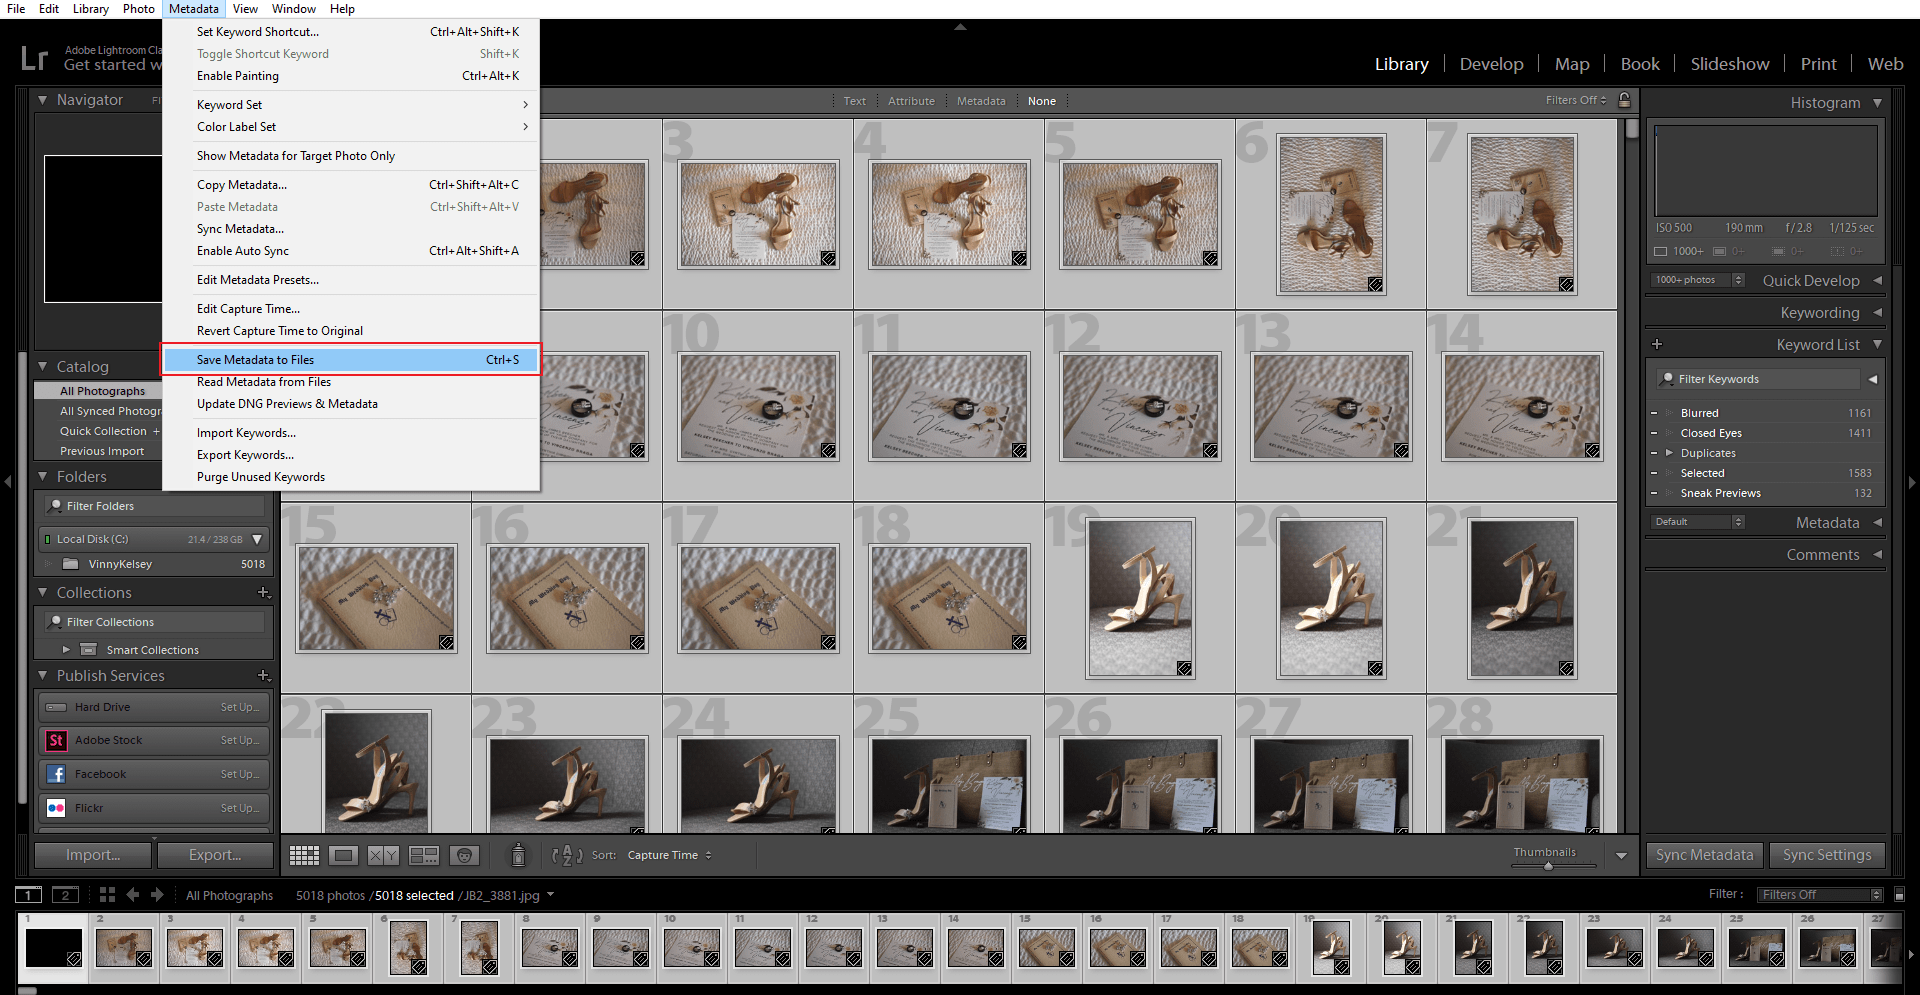
Step 2: Ensure that all your presets/edits are saved to the XMP files
Once the Catalog settings are updated, the next step is to ensure that all of the changes made to the currently imported images are saved to their respective XMP files.
To do so, first Select All Images by pressing Ctrl + A / Cmd + A and then press Ctrl + S / Cmd + S to save the changes to XMP files.
Step 3: Use AfterShoot as you normally would
If you haven’t culled your images in AfterShoot yet, add them to AfterShoot and go back to using it as you normally would and proceed to Step 4.
Here’s a primer guide on using AfterShoot.
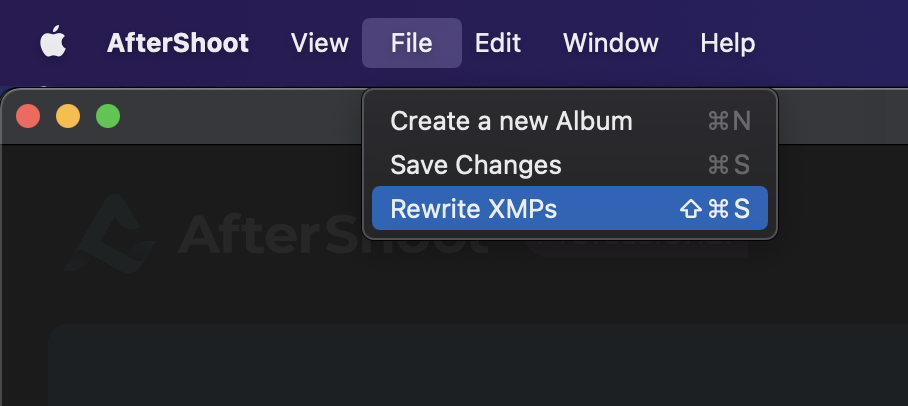
However, If you have already culled your photos in AfterShoot, open the culled album and choose File -> Rewrite XMPs in AfterShoot and let it update your xmp files.
Step 4: Bring in the changes into Lightroom
After AfterShoot is done culling your images, the final step is having the selections made by AfterShoot reflected back into Lightroom.
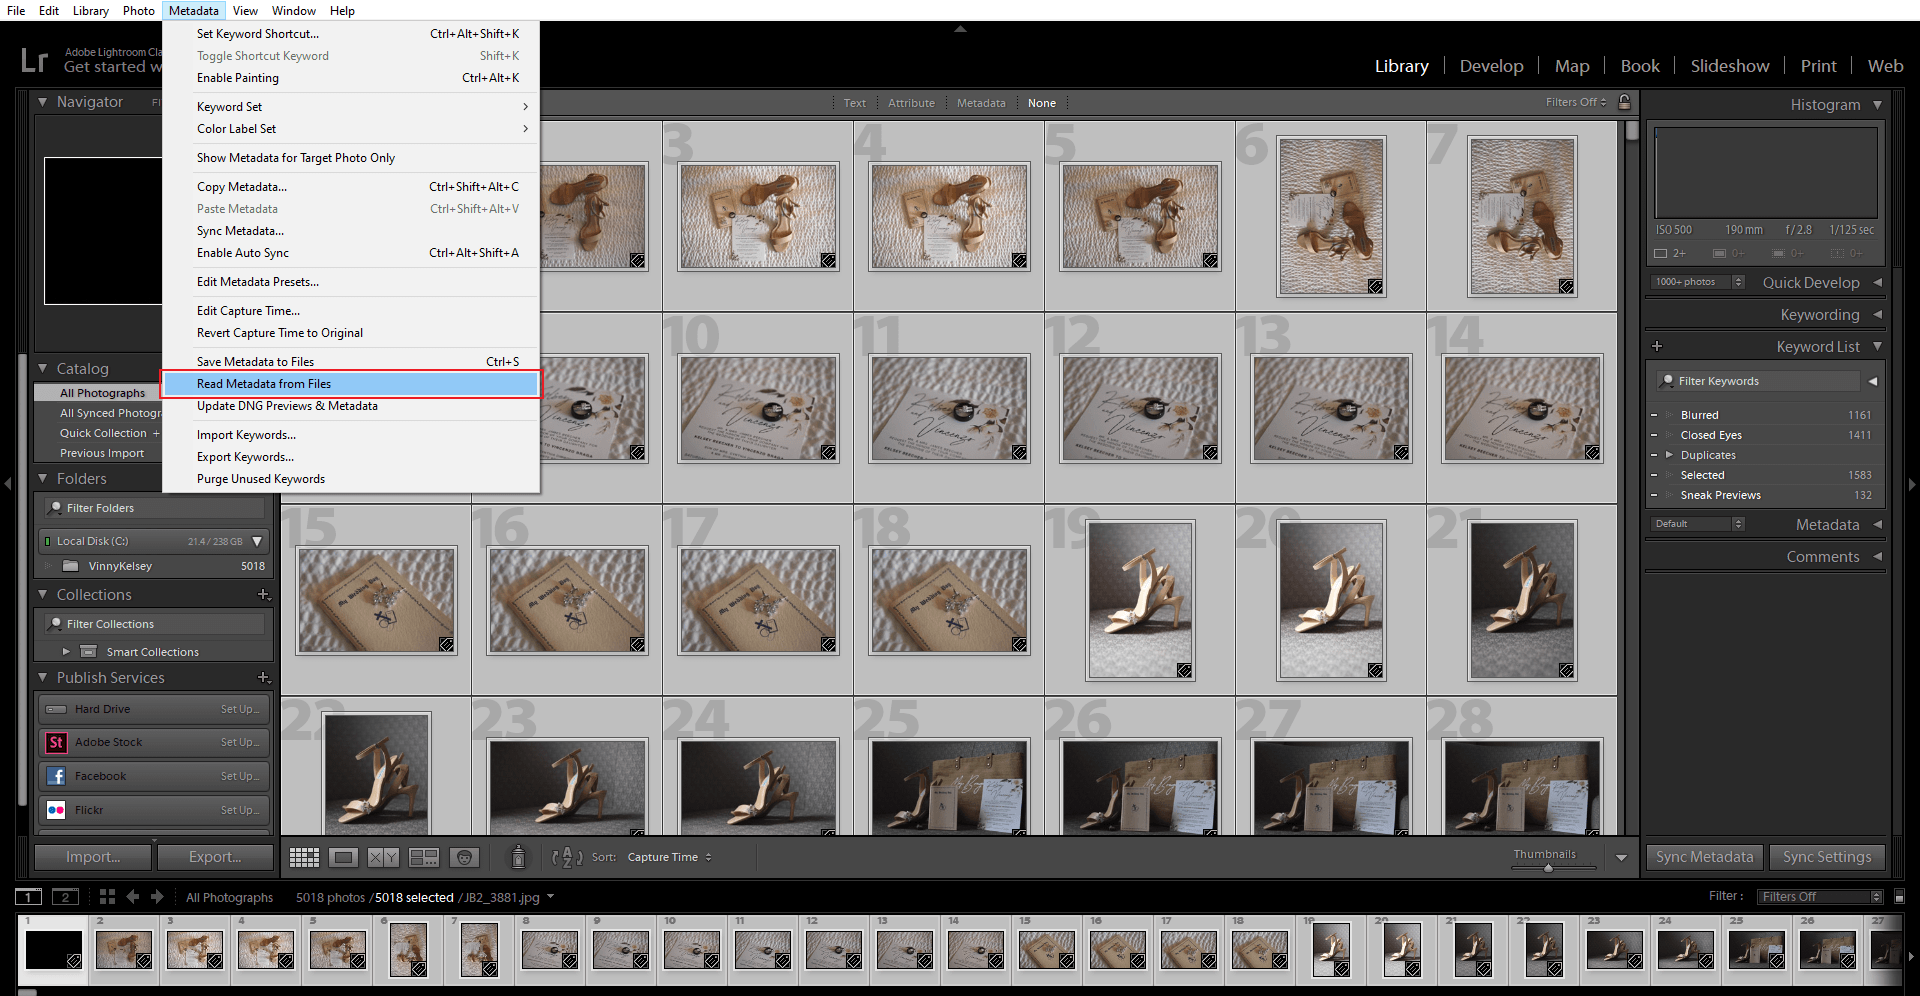
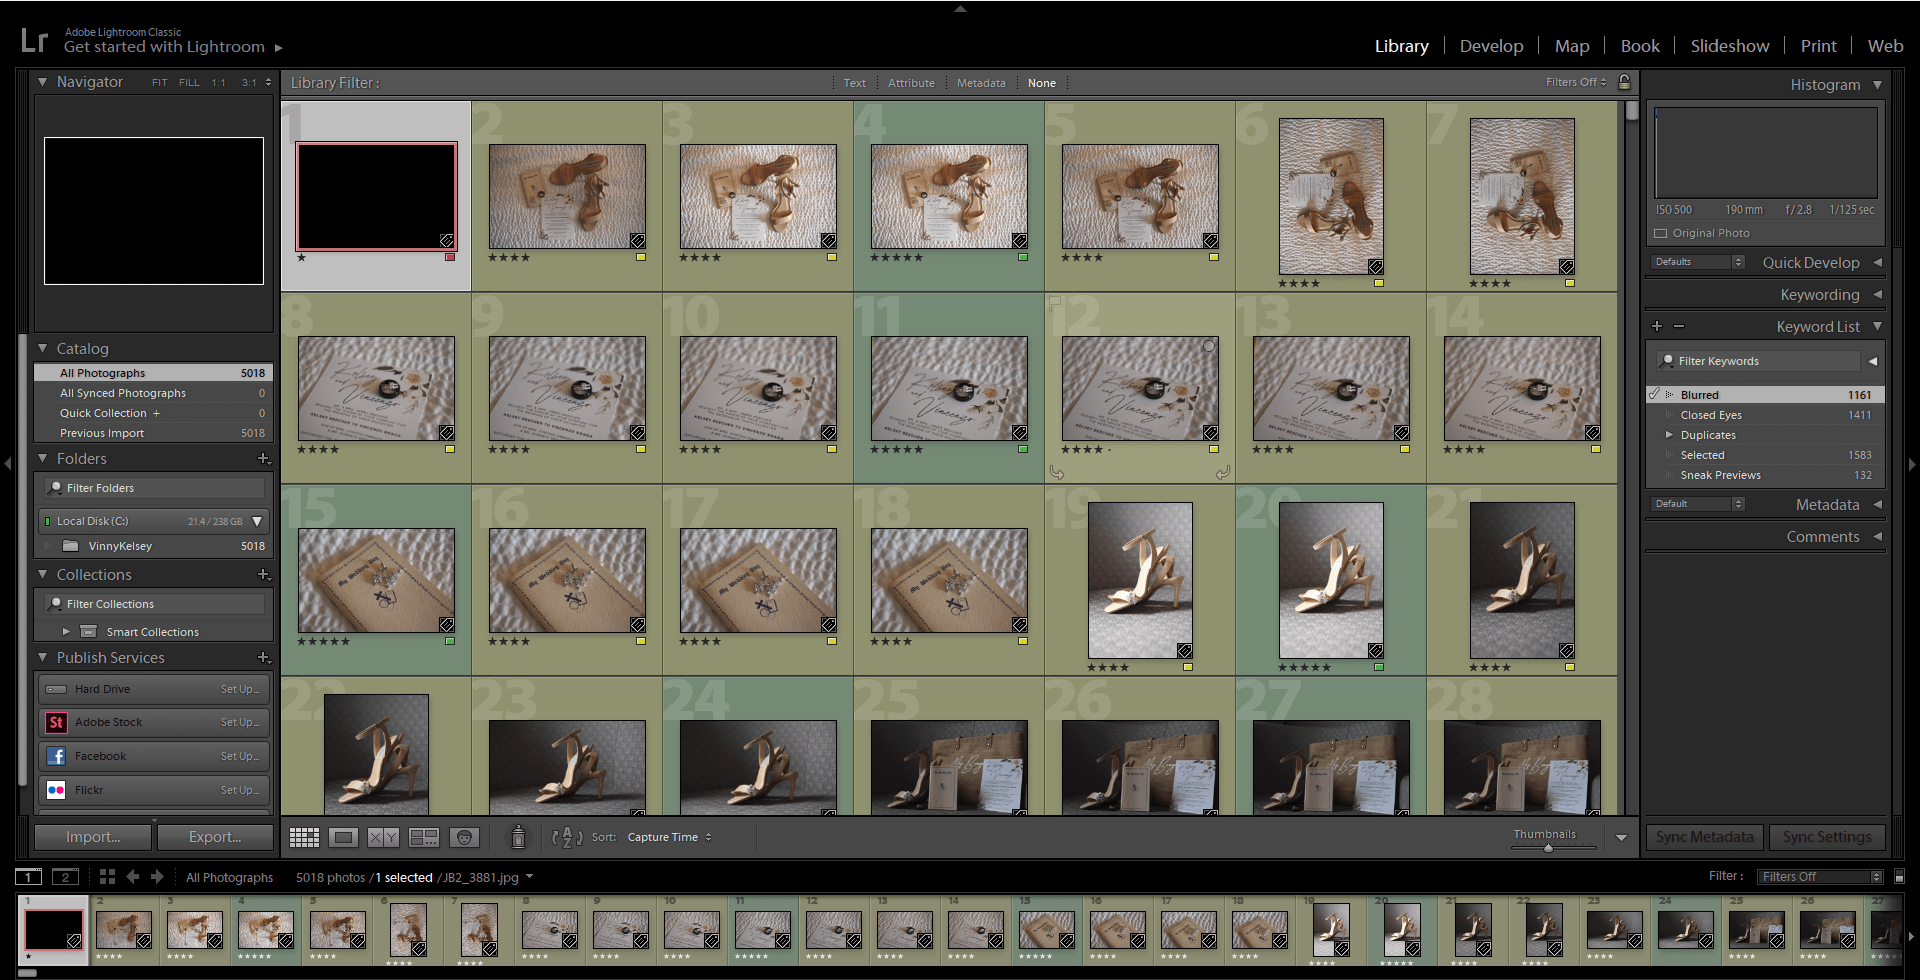
To do this, head back into Lightroom and select all your images by pressing Ctrl + A / Cmd + A
Once selected, go to “Metadata” from the file menu and select the option “Read Metadata from File“. Doing this will force Lightroom to fetch the star and color ratings from the XMP files and you should see all your imported images getting color-coded and star rated automatically!
Workflow for Capture One
Step 1: Use AfterShoot as you normally would
After importing your images into Capture One and applying the required presets/edits, import your images into AfterShoot and use it as you normally would.
Here’s a primer guide on using AfterShoot.
Step 2: Bring changes into Capture One
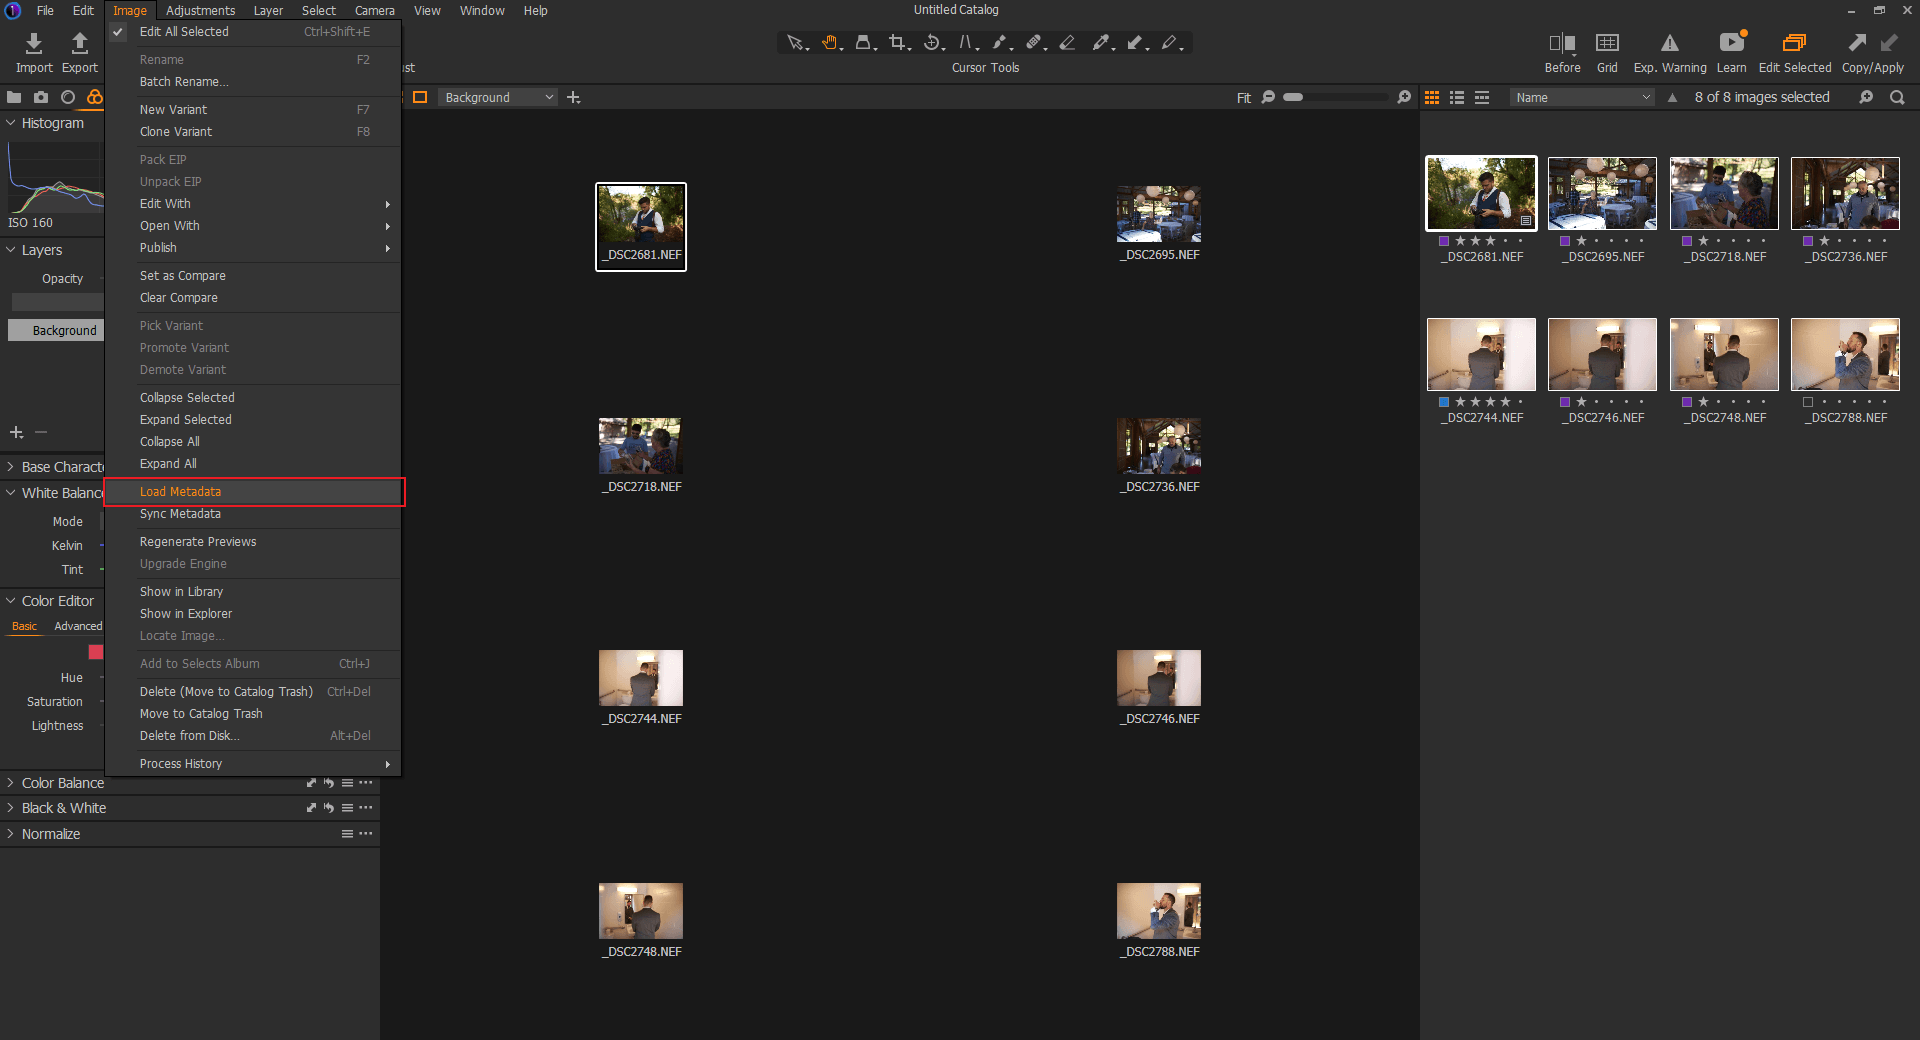
Once AfterShoot is done culling your images, Open Capture one and select all your images by pressing Ctrl + A / Cmd + A.
(We’ve created a plethora of Keyboard Shortcuts that you can use within AfterShoot to help you speed up your culling workflow even more!)
Next, go to the “Image” file menu and select the option that says “Load Metadata“. Doing this will force Capture One to read the stars and colors applied to the images from AfterShoot.
Step 3: Resolve conflicts
If you have already assigned Stars or Colors to some of your images you might get the following dialog during the above step:
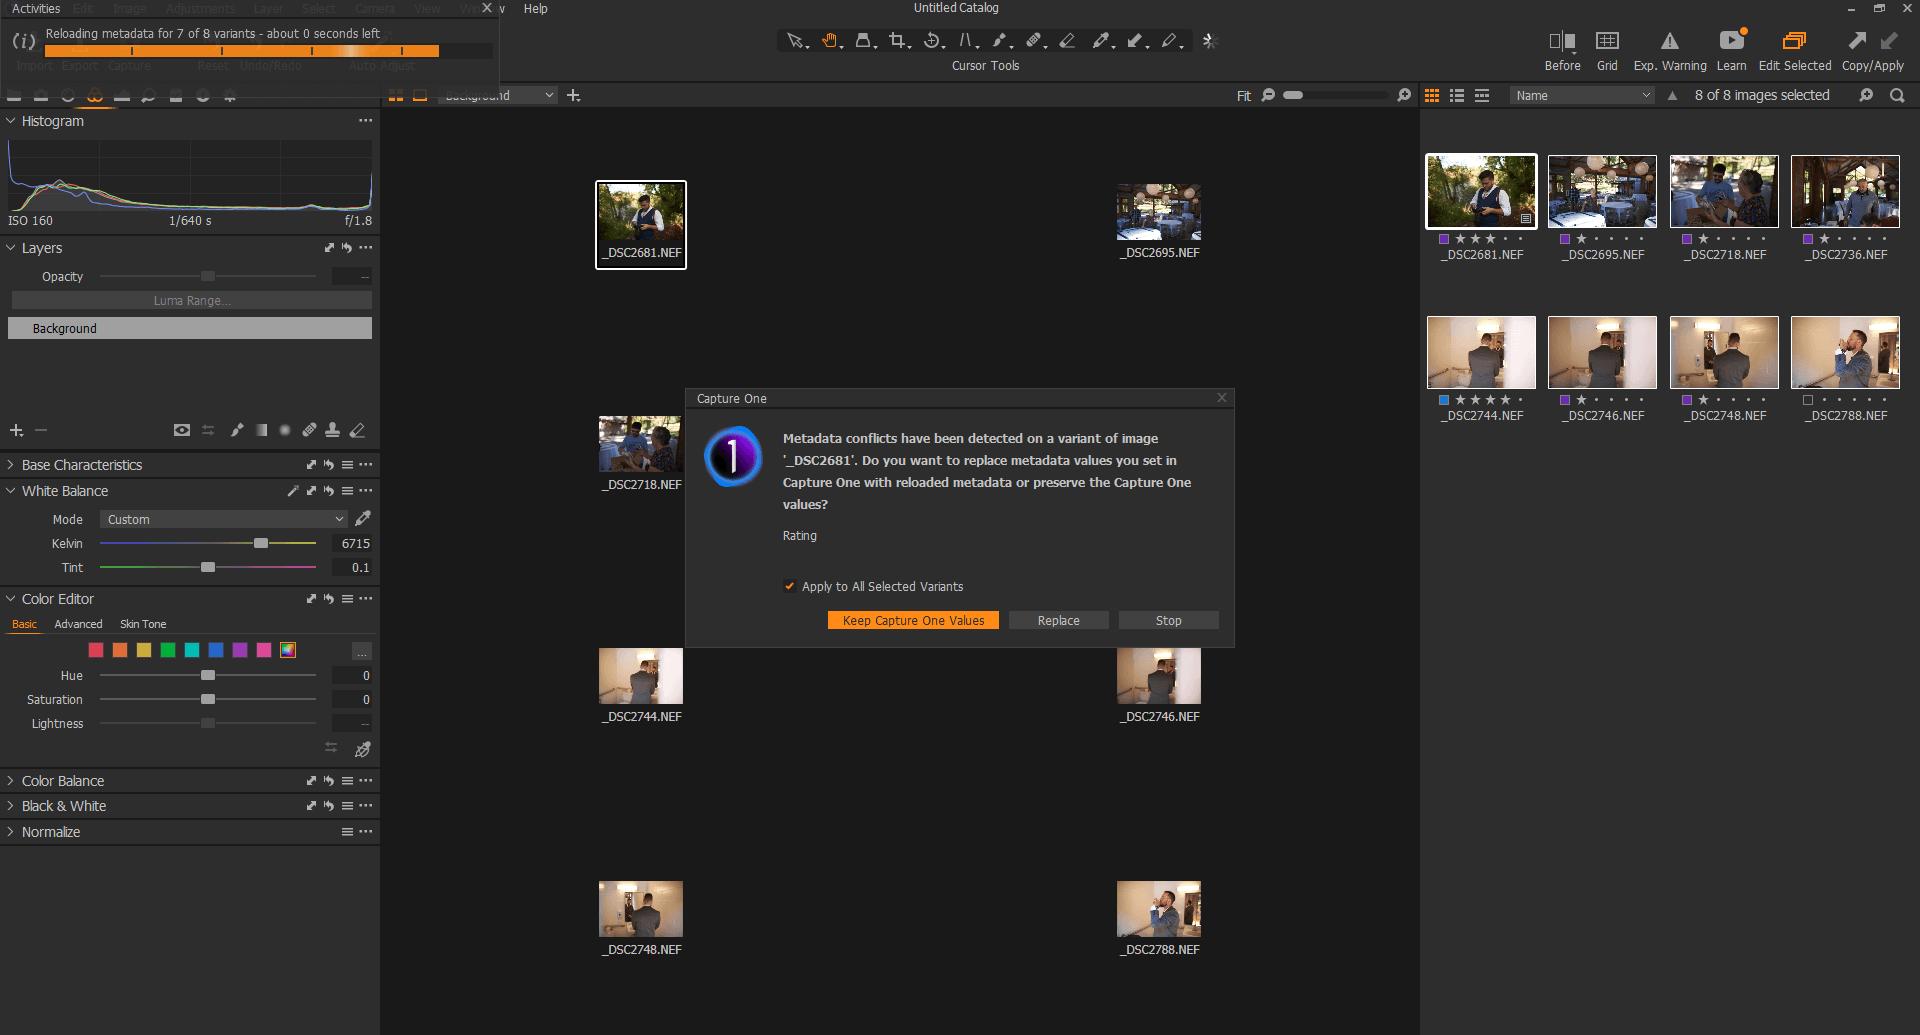
To keep your changes, select the first option that says “Keep Capture One Values” and to overwrite the changes with values assigned by AfterShoot, select “Replace“.
You can either do this image by image basis or select the option “Apply to All Selected Variants” to make these changes in a single go!
Conclusion
And that’s it. AfterShoot is tailored to have minimal to no impact on your workflow thereby ensuring that you continue working the way you used to!
If you have any questions specific to your workflow that aren’t answered in this blog; please feel free to get in touch with us or post a message in our Facebook Community.
We’ll try our best to help you out!